Selenium Python SDK
The Evinced Selenium Python SDK integrates with new or existing Selenium WebDriver tests to automatically detect accessibility issues. By adding a few lines of code to your Selenium WebDriver project, you can begin analyzing all the web pages and DOM changes to provide a dynamic view of how your site can become more accessible. As a result of the test, a rich and comprehensive report is generated to easily track issues to resolution.
Interested in seeing this in action? Contact us to get started!
Prerequisites
- Python 3.10 or higher (tested on 3.10, 3.11, and 3.12) - check with
python3 --versionon macOS / Linux orpy --versionon Windows - Selenium 4.46 or higher
- pytest 8 or higher for the examples in this guide (optional - the SDK works with any test runner)
- A Chrome, Edge, or Firefox browser and matching WebDriver (Selenium Manager resolves drivers automatically)
- Evinced credentials (service account ID and either a JWT or a secret)
Get started
Installation
To install Selenium Python SDK you will need either a file provided by Evinced Support or access to a remote repository that provides it. If you have neither, contact us to get started.
Adding Evinced to an existing Python project
evinced-selenium-sdk is a standard Python package with ordinary
dependencies, so it does not impose any project
layout or tooling. Install it into your existing setup exactly the way you
install any other dependency.
Starting a Python project from scratch
The standard way to work on a Python project is one virtual environment (venv) per project: a private Python environment inside the project folder that keeps its packages separate from other projects and from the system-wide Python. Create it once, then activate it in every new terminal you open for this project.
On macOS / Linux:
1mkdir my-a11y-tests2cd my-a11y-tests3python3 -m venv .venv4source .venv/bin/activate
On Windows:
1mkdir my-a11y-tests2cd my-a11y-tests3py -m venv .venv4.venv\Scripts\activate
While the environment is active, your prompt is prefixed with (.venv) and the
plain python command refers to the project's own interpreter - from this
point on, the commands in this documentation are identical on every operating
system.
Running pip from your project folder does not install into that folder.
Without an activated virtual environment, the package goes into your global
Python installation. Activate your project's environment first (.venv in
this guide), then check where pip will install to:
1python -m pip -V
The printed path should point inside your project's environment.
This documentation uses python -m pip rather than the bare pip command. On
Windows in particular, pip may be missing from PATH or bound to a different
Python installation than the one you intend to use - python -m pip always
runs pip for exactly the interpreter you invoke it with, on every operating
system. The python command itself is guaranteed inside an activated virtual
environment; outside one, substitute python3 -m pip on macOS / Linux or
py -m pip on Windows.
A typical pytest project for accessibility testing looks like this:
1my-a11y-tests/2├── .venv/ # virtual environment - never commit; add to .gitignore3├── requirements.txt # the project's dependencies4├── conftest.py # shared pytest fixtures: credentials and driver setup5└── tests/6 └── test_home_page.py
Declare your dependencies in requirements.txt so teammates and CI can
recreate the same environment:
1selenium>=4.462pytest>=8.0
and install them all at once with:
1python -m pip install -r requirements.txt
How the Evinced SDK itself is added depends on which installation method below
applies to you: with remote repository access, add
evinced-selenium-sdk==<version> to requirements.txt together with the
--extra-index-url line shown in that section; with a locally provided
file, either reference the wheel by path
(./evinced_selenium_sdk-<version>-py3-none-any.whl on its own line) or
install it as a separate step on each machine.
Installation with a locally provided file
Selenium Python SDK is distributed as a pre-built wheel - the accessibility engine and report generators are vendored inside it, so no Node.js is required. This is the supported way to install the SDK today.
Obtain the distribution file (a .whl wheel or a .tar.gz source archive)
from Evinced Support and place it in your project folder. Then install it -
if your project uses a virtual environment, activate it first.
On macOS / Linux / Windows:
1python -m pip install evinced_selenium_sdk-<version>-py3-none-any.whl
Verify the installation:
1python -m pip show evinced-selenium-sdk
Installation from a remote repository
Evinced Customers have the option of accessing Selenium Python SDK from a remote repository - the Evinced JFrog Artifactory - to keep their SDK version up-to-date and to share the SDK internally at their organization.
When access is enabled, Selenium Python SDK is published to the Evinced JFrog Artifactory. The repository requires authentication - Evinced provides a JFrog username and access token, which you embed in the index URL. Activate your project's virtual environment if you use one, then install by pointing pip at the Evinced index:
1python -m pip install evinced-selenium-sdk --extra-index-url "https://<JFROG_USER>:<JFROG_TOKEN>@evinced.jfrog.io/artifactory/api/pypi/restricted-python/simple"
If your JFrog username is an email address, URL-encode the @ as %40
(for example jane.doe%40example.com).
Verify the installation:
1python -m pip show evinced-selenium-sdk
AI Skills
The evinced-selenium-sdk package ships built-in AI agent skills that guide your AI assistant through using the Evinced Selenium Python SDK - from initial setup and test writing to configuration, reporting, and CI integration. They work with any AI assistant that reads project context files (Claude Code, Cursor, Copilot, Windsurf, Gemini, and others).
Installing the skills
After installing the SDK, run the bundled installer from your project root:
1evinced-ai install
The command detects your assistant and writes the skills pointer into the matching context file - .cursor/rules/evinced-ai.mdc for Cursor, CLAUDE.md for Claude Code, or AGENTS.md otherwise. The pointer locates the skills inside the installed package rather than at a machine-specific path, so it is safe to commit and keeps working for every team member, on any operating system, after a plain package install.
Manual installation
To add the pointer yourself, copy the following block into your project's AGENTS.md or CLAUDE.md (for Cursor, put it in .cursor/rules/evinced-ai.mdc). Running evinced-ai snippet prints the same block:
1<!-- evinced-ai:begin (managed by `evinced-ai install`) -->23## Evinced accessibility SDK — AI skills45This project uses the Evinced Selenium Python SDK (`evinced-selenium-sdk`), which ships AI skills for setting up and using accessibility testing. Before working on any web accessibility task:671. **Make sure the SDK is installed** in this project's Python environment:89 ```bash10 python -c "import evinced_selenium_sdk"11 ```1213 If that fails, install `evinced-selenium-sdk` **the way this project manages dependencies**, and add it as a project dependency — match the existing setup, don't switch package managers:14 - **pip / venv** (`requirements.txt` or a `.venv/`): activate the venv, then `pip install evinced-selenium-sdk`, and add it to `requirements.txt`.15 - **Poetry** (`pyproject.toml` with `[tool.poetry]`): `poetry add evinced-selenium-sdk`.16 - **uv** (`uv.lock` / `[tool.uv]`): `uv add evinced-selenium-sdk`.17 - **Pipenv** (`Pipfile`): `pipenv install evinced-selenium-sdk`.18 - **conda**: `pip install evinced-selenium-sdk` inside the active conda env.19202. **Find the skills entry point** (run in the same environment):2122 ```bash23 python -c "import evinced_selenium_sdk, pathlib; print(pathlib.Path(evinced_selenium_sdk.__file__).parent / 'evinced_ai' / 'entry.mdc')"24 ```25263. **Read the file it prints, then follow it.** It routes you to the right skill (setup, writing tests, reporting, configuration) and to the SDK integration rule.2728The skills only add to the project and never overwrite existing code.2930<!-- evinced-ai:end -->
What the skills do
The entry point routes the assistant by intent:
- "install" - installs the SDK and creates a standalone demo test (one-shot and continuous) that showcases it, without touching your existing tests.
- "integrate" - a guided wizard that wires the SDK into your existing suite: it asks whether you authenticate online or offline, places the credential call and driver fixture in
conftest.py, keeps yourtest_*.pyfiles clean, and finishes with the exact credential steps and a copy-paste verification command.
The skills can also:
- Write accessibility tests using
ev_analyze,ev_start, andev_stop - Configure accessibility rules, skip validations, and scope analysis to a DOM subtree
- Generate HTML, JSON, SARIF, or CSV reports
- Configure the SDK through
EvincedConfig- screenshots, iframes, and network-idle waiting - Enable and tune SDK logging and log levels
- Control SDK toggles and the kill switch
- Integrate accessibility checks into CI/CD pipelines
Credentials and driver setup always go in conftest.py (pytest's fixture and configuration file), so your test files contain only tests.
Note. The skills entry point resolves the SDK in the active Python environment. If your assistant cannot find it, activate the project's virtual environment (or select the correct interpreter) and try again.
Example prompts:
- "Install Evinced and show me a demo test"
- "Integrate Evinced into my existing Selenium WebDriver tests"
- "Fail my tests when critical accessibility issues are found"
Authentication
To launch Selenium Python SDK, you need to have a Service ID and an API Key.
Where to find your Evinced SDK credentials
These credentials are available via the Evinced Product Hub in the “Automation for Web” or “Automation for Mobile” product areas. Click the “Get SDK” button to see the Service Account ID and API Key at the bottom of the page.
Authenticate for Offline Testing
There are two methods to provide the token: online mode and offline mode. Online mode contacts the Evinced Licensing Server. Offline mode assumes that an Evinced employee has supplied a JSON Web Token (JWT). If an offline token is required, please reach out to your account team or support@evinced.com.
Please set credentials in environment variables and reference the environment variables in code.
On macOS / Linux:
1# Online mode2export AUTH_SERVICE_ID=YOUR_SERVICE_ID3export AUTH_SECRET=YOUR_API_SECRET45# Offline mode - when a JWT has been provided by Evinced6export AUTH_SERVICE_ID=YOUR_SERVICE_ID7export AUTH_TOKEN=YOUR_JWT
On Windows:
1# Online mode2$env:AUTH_SERVICE_ID = "YOUR_SERVICE_ID"3$env:AUTH_SECRET = "YOUR_API_SECRET"45# Offline mode - when a JWT has been provided by Evinced6$env:AUTH_SERVICE_ID = "YOUR_SERVICE_ID"7$env:AUTH_TOKEN = "YOUR_JWT"
Both forms last only for the current terminal session. To persist them, add the
export lines to your shell profile (~/.zshrc or ~/.bashrc) on macOS /
Linux, or the $env: lines to your PowerShell profile (open it with
notepad $PROFILE) on Windows.
Setting credentials, an example:
1# conftest.py - project root2import os34import pytest56from evinced_selenium_sdk import set_credentials789@pytest.fixture(scope="session", autouse=True)10def evinced_credentials():11 # Online mode - exchange a service-account secret for a JWT12 set_credentials(13 service_id=os.environ["AUTH_SERVICE_ID"],14 secret=os.environ["AUTH_SECRET"],15 )
If Evinced has supplied you with a signed JWT (offline mode), use the same
fixture with set_offline_credentials instead:
1# conftest.py - project root2import os34import pytest56from evinced_selenium_sdk import set_offline_credentials789@pytest.fixture(scope="session", autouse=True)10def evinced_credentials():11 # Offline mode - you already hold a signed JWT from Evinced12 set_offline_credentials(13 service_id=os.environ["AUTH_SERVICE_ID"],14 token=os.environ["AUTH_TOKEN"],15 )
Your First Test
SDK Initialization
To use Selenium Python SDK, you first need to authenticate. Please refer to Authentication for details.
The examples in this guide use pytest, but nothing in the SDK requires it -
EvincedWebDriver wraps a plain Selenium WebDriver, so unittest, Robot
Framework, Behave, or a bare script all work the same. Framework-neutral, the
contract is: call set_credentials (or set_offline_credentials) once per
process before creating the first EvincedWebDriver, and save any reports you
need before calling quit().
Everything else is regular Selenium.
Using the SDK without pytest
1import os23from selenium import webdriver45from evinced_selenium_sdk import EvincedWebDriver, SaveFileFormat, set_credentials67set_credentials(8 service_id=os.environ["AUTH_SERVICE_ID"],9 secret=os.environ["AUTH_SECRET"],10)1112driver = EvincedWebDriver(webdriver.Chrome())13try:14 driver.get("https://demo.evinced.com")15 report = driver.ev_analyze()16 driver.ev_save_file(report, "report.html", SaveFileFormat.HTML)17finally:18 driver.quit()
Add the import at the top of your test module:
1from evinced_selenium_sdk import EvincedWebDriver2from selenium import webdriver
The Evinced SDK wraps your Selenium driver and intercepts navigation and interactions for continuous analysis. Initialize it with a Chrome (or other) WebDriver instance:
1raw = webdriver.Chrome()2driver = EvincedWebDriver(raw)
Chrome, Edge, and Firefox are all supported - pass webdriver.Edge() or webdriver.Firefox() the same way. Chromium-only capabilities are called out where they apply (for example ScreenshotMode.SDK).
Using Evinced with RemoteWebDriver or Selenium Grid
Use the same EvincedWebDriver constructor with any Selenium WebDriver, including webdriver.Remote (Selenium Grid, BrowserStack, Sauce Labs, and other remote endpoints). There is no separate remote wrapper class:
1from selenium import webdriver2from evinced_selenium_sdk import EvincedWebDriver34remote = webdriver.Remote(command_executor="http://localhost:4444", options=webdriver.ChromeOptions())5driver = EvincedWebDriver(remote)
Add Evinced Accessibility Checks (Single Run Mode)
This is a simple pytest example of a single-page Evinced accessibility scan.
1# tests/test_home_page.py2from selenium import webdriver34from evinced_selenium_sdk import EvincedWebDriver567def test_home_page_accessibility():8 driver = EvincedWebDriver(webdriver.Chrome())9 try:10 driver.get("https://demo.evinced.com")11 report = driver.ev_analyze()12 # demo.evinced.com intentionally contains issues, so this assertion13 # fails there - point the test at your own application14 assert len(report.get_failed_validations()) == 015 finally:16 driver.quit()
Add Evinced Accessibility Checks (Continuous Mode)
This is a simple pytest example of continuous accessibility scanning. Using ev_start() and ev_stop(), the Evinced engine scans in the background as your test runs, capturing DOM changes and navigations.
1# tests/test_continuous_scan.py2import pytest3from selenium import webdriver4from selenium.webdriver.common.by import By56from evinced_selenium_sdk import EvincedWebDriver, SaveFileFormat789@pytest.fixture10def driver():11 d = EvincedWebDriver(webdriver.Chrome())12 yield d13 d.quit()141516def test_trip_planner_accessibility(driver):17 driver.get("https://demo.evinced.com")18 driver.ev_start()1920 # Interact with the page - each step below reveals new UI21 # (dropdown options, calendar) that is scanned in the background22 driver.find_element(By.CSS_SELECTOR, "div.filter-container > div:nth-child(1) > div > div.dropdown.line").click()23 driver.find_element(By.CSS_SELECTOR, "div.filter-container > div:nth-child(2) > div > div.dropdown.line").click()24 driver.find_element(By.CSS_SELECTOR, ".react-date-picker").click()2526 report = driver.ev_stop()2728 driver.ev_save_file(report, "test-results.html", SaveFileFormat.HTML)29 driver.ev_save_file(report, "test-results.json", SaveFileFormat.JSON)30 # the TRVL demo site intentionally contains issues, so this assertion31 # fails there - point the test at your own application32 assert len(report.get_failed_validations()) == 0
Using Evinced with Selenium BiDi
You can configure the Evinced SDK to use Selenium BiDi (Bidirectional Protocol). BiDi reduces communication overhead between the test runner and the browser, which can speed up continuous accessibility scanning.
By default, continuous mode uses interaction-based transport (clicks and navigation hooks). BiDi is opt-in: set continuous_transport="bidi" on a driver that advertises the webSocketUrl capability.
1from selenium import webdriver2from selenium.webdriver.chrome.options import Options3from evinced_selenium_sdk import EvincedConfig, EvincedWebDriver45options = Options()6options.set_capability("webSocketUrl", True)7raw = webdriver.Chrome(options=options)8config = EvincedConfig(continuous_transport="bidi")9driver = EvincedWebDriver(raw, config)10driver.ev_start()
API
EvincedWebDriver(driver, config)
Prepares the Evinced object for use in the project.
1from evinced_selenium_sdk import EvincedConfig, EvincedWebDriver2from selenium import webdriver34config = EvincedConfig(root_selector="#main", include_iframes=True)5driver = EvincedWebDriver(webdriver.Chrome(), config)
Refer to Configuration to see examples of initializing with options.
ev_analyze(config, upload_to_platform=None)
Scans the current page and returns a Report with the accessibility issues found.
This is the recommended method for static page analysis.
Note: This method is not supported if ev_start() is already running.
1from evinced_selenium_sdk import EvincedConfig, Report23# Basic usage - uses the driver-level EvincedConfig (if any)4report: Report = driver.ev_analyze()5failed = report.get_failed_validations()67# Optional per-call config override8report = driver.ev_analyze(EvincedConfig(root_selector="#main"))
Both parameters are optional. The optional upload_to_platform parameter overrides platform upload for this call - see Uploading Reports to Evinced Platform.
Calling ev_analyze() during an active ev_start session raises SessionError (importable with from evinced_selenium_sdk import SessionError). Call ev_stop() first.
Returns Report.
The returned report object contains a list of accessibility issues.
For more information regarding reports as well as the report object itself, please refer to our detailed Web Reports page.
ev_start(config)
Continually watches for DOM mutations and page navigation, recording accessibility issues
until the ev_stop() method is called. This method is recommended for dynamic page flows.
1# Uses the EvincedConfig passed to EvincedWebDriver(driver, config), if any2driver.ev_start()34# Optional per-call override for this session only5driver.ev_start(EvincedConfig(include_iframes=False))
The optional config parameter accepts an EvincedConfig instance or a plain dict. It overrides the driver-level settings for this continuous session only.
Returns None.
ev_stop(upload_to_platform=None)
Stops the issue-gathering process started by ev_start().
1from evinced_selenium_sdk import Report23driver.ev_start()4report: Report = driver.ev_stop()5failed = report.get_failed_validations()
The optional upload_to_platform parameter overrides platform upload for this call - see Uploading Reports to Evinced Platform.
When include_passed_validations=True was enabled for the session, report.get_passed_validations() is also populated.
Returns Report.
The returned report object includes all accessibility issues detected between
the ev_start() and ev_stop() method calls.
For more information regarding reports as well as the report object itself, please refer to our detailed Web Reports page.
ev_save_file(report, destination, file_format)
Saves issues in a file with the specified format and location.
Supported formats are json, html, sarif, and csv.
Find detailed information in the Web Reports page.
ev_save_file has two forms - the first argument decides which one you get:
| Goal | Call |
|---|---|
| Save one specific report | ev_save_file(report, path, format) |
Save the aggregated run (every ev_analyze + ev_stop on this driver) | ev_save_file(path, format) |
Save a single report
Pass the Report from ev_analyze or ev_stop:
1from evinced_selenium_sdk import Report, SaveFileFormat23report: Report = driver.ev_stop()4# or: report = driver.ev_analyze()56driver.ev_save_file(report, "jsonReport.json", SaveFileFormat.JSON)7driver.ev_save_file(report, "htmlReport.html", SaveFileFormat.HTML)8driver.ev_save_file(report, "sarifReport.sarif.json", SaveFileFormat.SARIF)9driver.ev_save_file(report, "csvReport.csv", SaveFileFormat.CSV)
String format names ("json", "html", "sarif", "csv") are also accepted. A plain list[dict] of failed issues is still accepted for backward compatibility.
Pass a scale keyword argument (float) to adjust HTML report scaling.
When include_passed_validations=True, pass the full Report to include passed validations in JSON output.
Save an aggregated run report
After multiple ev_analyze and ev_stop calls on the same driver, save one combined deduplicated report without passing a Report object:
1driver.ev_save_file("combined.html", SaveFileFormat.HTML)2driver.ev_save_file("combined.json", SaveFileFormat.JSON)
See Aggregated Report for a full example.
SaveFileFormat
Defines the report file type. Options are JSON, HTML, SARIF, and CSV (via the SaveFileFormat enum or equivalent strings).
Returns None.
Aggregated Report
The aggregated report feature allows you to have a general aggregated report for
the whole run (not only for one test or suite). This report will contain all the
issues found by the tests where ev_start() and
ev_stop() commands were called. It is still possible to use the
ev_save_file() command in any place of your code along with this
Aggregated Report feature.
Each EvincedWebDriver keeps its own aggregation store. Every ev_analyze and ev_stop call on that driver contributes deduplicated issues you can save as one combined report.
1from evinced_selenium_sdk import SaveFileFormat23driver.get("https://demo.evinced.com/page1")4driver.ev_analyze()56driver.get("https://demo.evinced.com/page2")7driver.ev_start()8driver.find_element("id", "next").click()9driver.ev_stop()1011driver.ev_save_file("evinced-combined.html", SaveFileFormat.HTML)12driver.ev_save_file("evinced-combined.json", SaveFileFormat.JSON)
Save the aggregated report before calling quit() or close() - quitting the driver clears the aggregation store, and issues collected during the run are lost.
To save a single analyze/stop result instead, pass the Report as the first argument:
1report = driver.ev_analyze()2driver.ev_save_file(report, "page-only.json", SaveFileFormat.JSON)
Merge arbitrary issue lists (for example from separate drivers) with ev_merge_issues:
1merged = driver.ev_merge_issues(report_page1, report_page2)2driver.ev_save_file(merged, "merged.json", SaveFileFormat.JSON)
Configuration
The same configuration options can be used when initializing the Evinced object
using EvincedConfig() and when calling the ev_start()
and ev_analyze() methods but with a bit different consequences.
Providing options when initializing defines a global configuration for all calls
of ev_analyze() and ev_start(), while providing options to
either of those methods affect only the test in which they are called. Some SDKs
also let you define configuration outside your code, in a config file that is
picked up automatically at startup.
Options provided in either ev_analyze() or ev_start() override
those set in Evinced engine initialization.
Engines Configuration
Evinced uses two separate engines when scanning for accessibility issues: the Axe (axe-core) engine and the proprietary Evinced engine. By default, Evinced disables Axe Needs Review and Best Practices rules because they are mostly false positives. Keep this in mind when comparing issue counts with other tools. See Toggles to enable them.
Configuration Object
Evinced configuration is passed as an EvincedConfig dataclass (or a plain dict with the same keys). You can set it in two places:
- Per driver - pass config when constructing
EvincedWebDriver. These values apply to everyev_analyzeandev_starton that driver unless overridden. - Per call - pass config to a single
ev_analyze(config)orev_start(config)to override the driver-level settings for that command only. Precedence: SDK defaults → per-driver config → per-call config.
Both snake_case (include_iframes) and camelCase (includeIframes) keys are accepted in dicts. When both forms of the same option are set, camelCase wins. Note that keys inside nested options (for example skip_validations entries such as urlRegex and validationTypes) are passed to the engine as-is and are always camelCase, as are the keyword arguments of set_upload_to_platform_config.
Per-driver configuration
1from evinced_selenium_sdk import EvincedConfig, EvincedWebDriver2from selenium import webdriver34config = EvincedConfig(5 include_iframes=False,6 root_selector="#app",7 screenshot_mode="sdk",8)9driver = EvincedWebDriver(webdriver.Chrome(), config)
Per-call override
1from evinced_selenium_sdk import EvincedConfig23# Include passed validations for one analyze call4report = driver.ev_analyze(EvincedConfig(include_passed_validations=True))56# Override root selector for one continuous session7driver.ev_start(EvincedConfig(root_selector="#content"))
The sections below cover each option in detail.
Root Selector
Sets a CSS selector to limit the Evinced Engine to scan only the selected element and its children. Must be a valid CSS selector. If not set, the Evinced Engine will scan the entire document.
Default: no value
1from evinced_selenium_sdk import EvincedConfig, EvincedWebDriver2from selenium import webdriver34config = EvincedConfig(root_selector=".some-selector")5driver = EvincedWebDriver(webdriver.Chrome(), config)
Axe Configuration
Configures Axe open-source accessibility toolkit, which the Evinced engine includes with its own, more extensive accessibility detection. For full Axe config options, see Axe Core API.
1from evinced_selenium_sdk import EvincedConfig, EvincedWebDriver2from selenium import webdriver34config = EvincedConfig(5 axe_config={"rules": {"html-has-lang": {"enabled": False}}},6)7driver = EvincedWebDriver(webdriver.Chrome(), config)
Engine Logging
Set level of messages the Evinced engine will print to the console.
Valid levels are "debug", "info", "warn" and "error".
Default: "error"
1from evinced_selenium_sdk import EvincedConfig, EvincedWebDriver2from selenium import webdriver34config = EvincedConfig(logging={"loggingLevel": "debug"})5driver = EvincedWebDriver(webdriver.Chrome(), config)
Reports Screenshots
When true, the Evinced SDK will include screenshots in its reports that
highlight elements with accessibility issues.
Default: false.
Note: Enabling screenshots may affect test run performance.
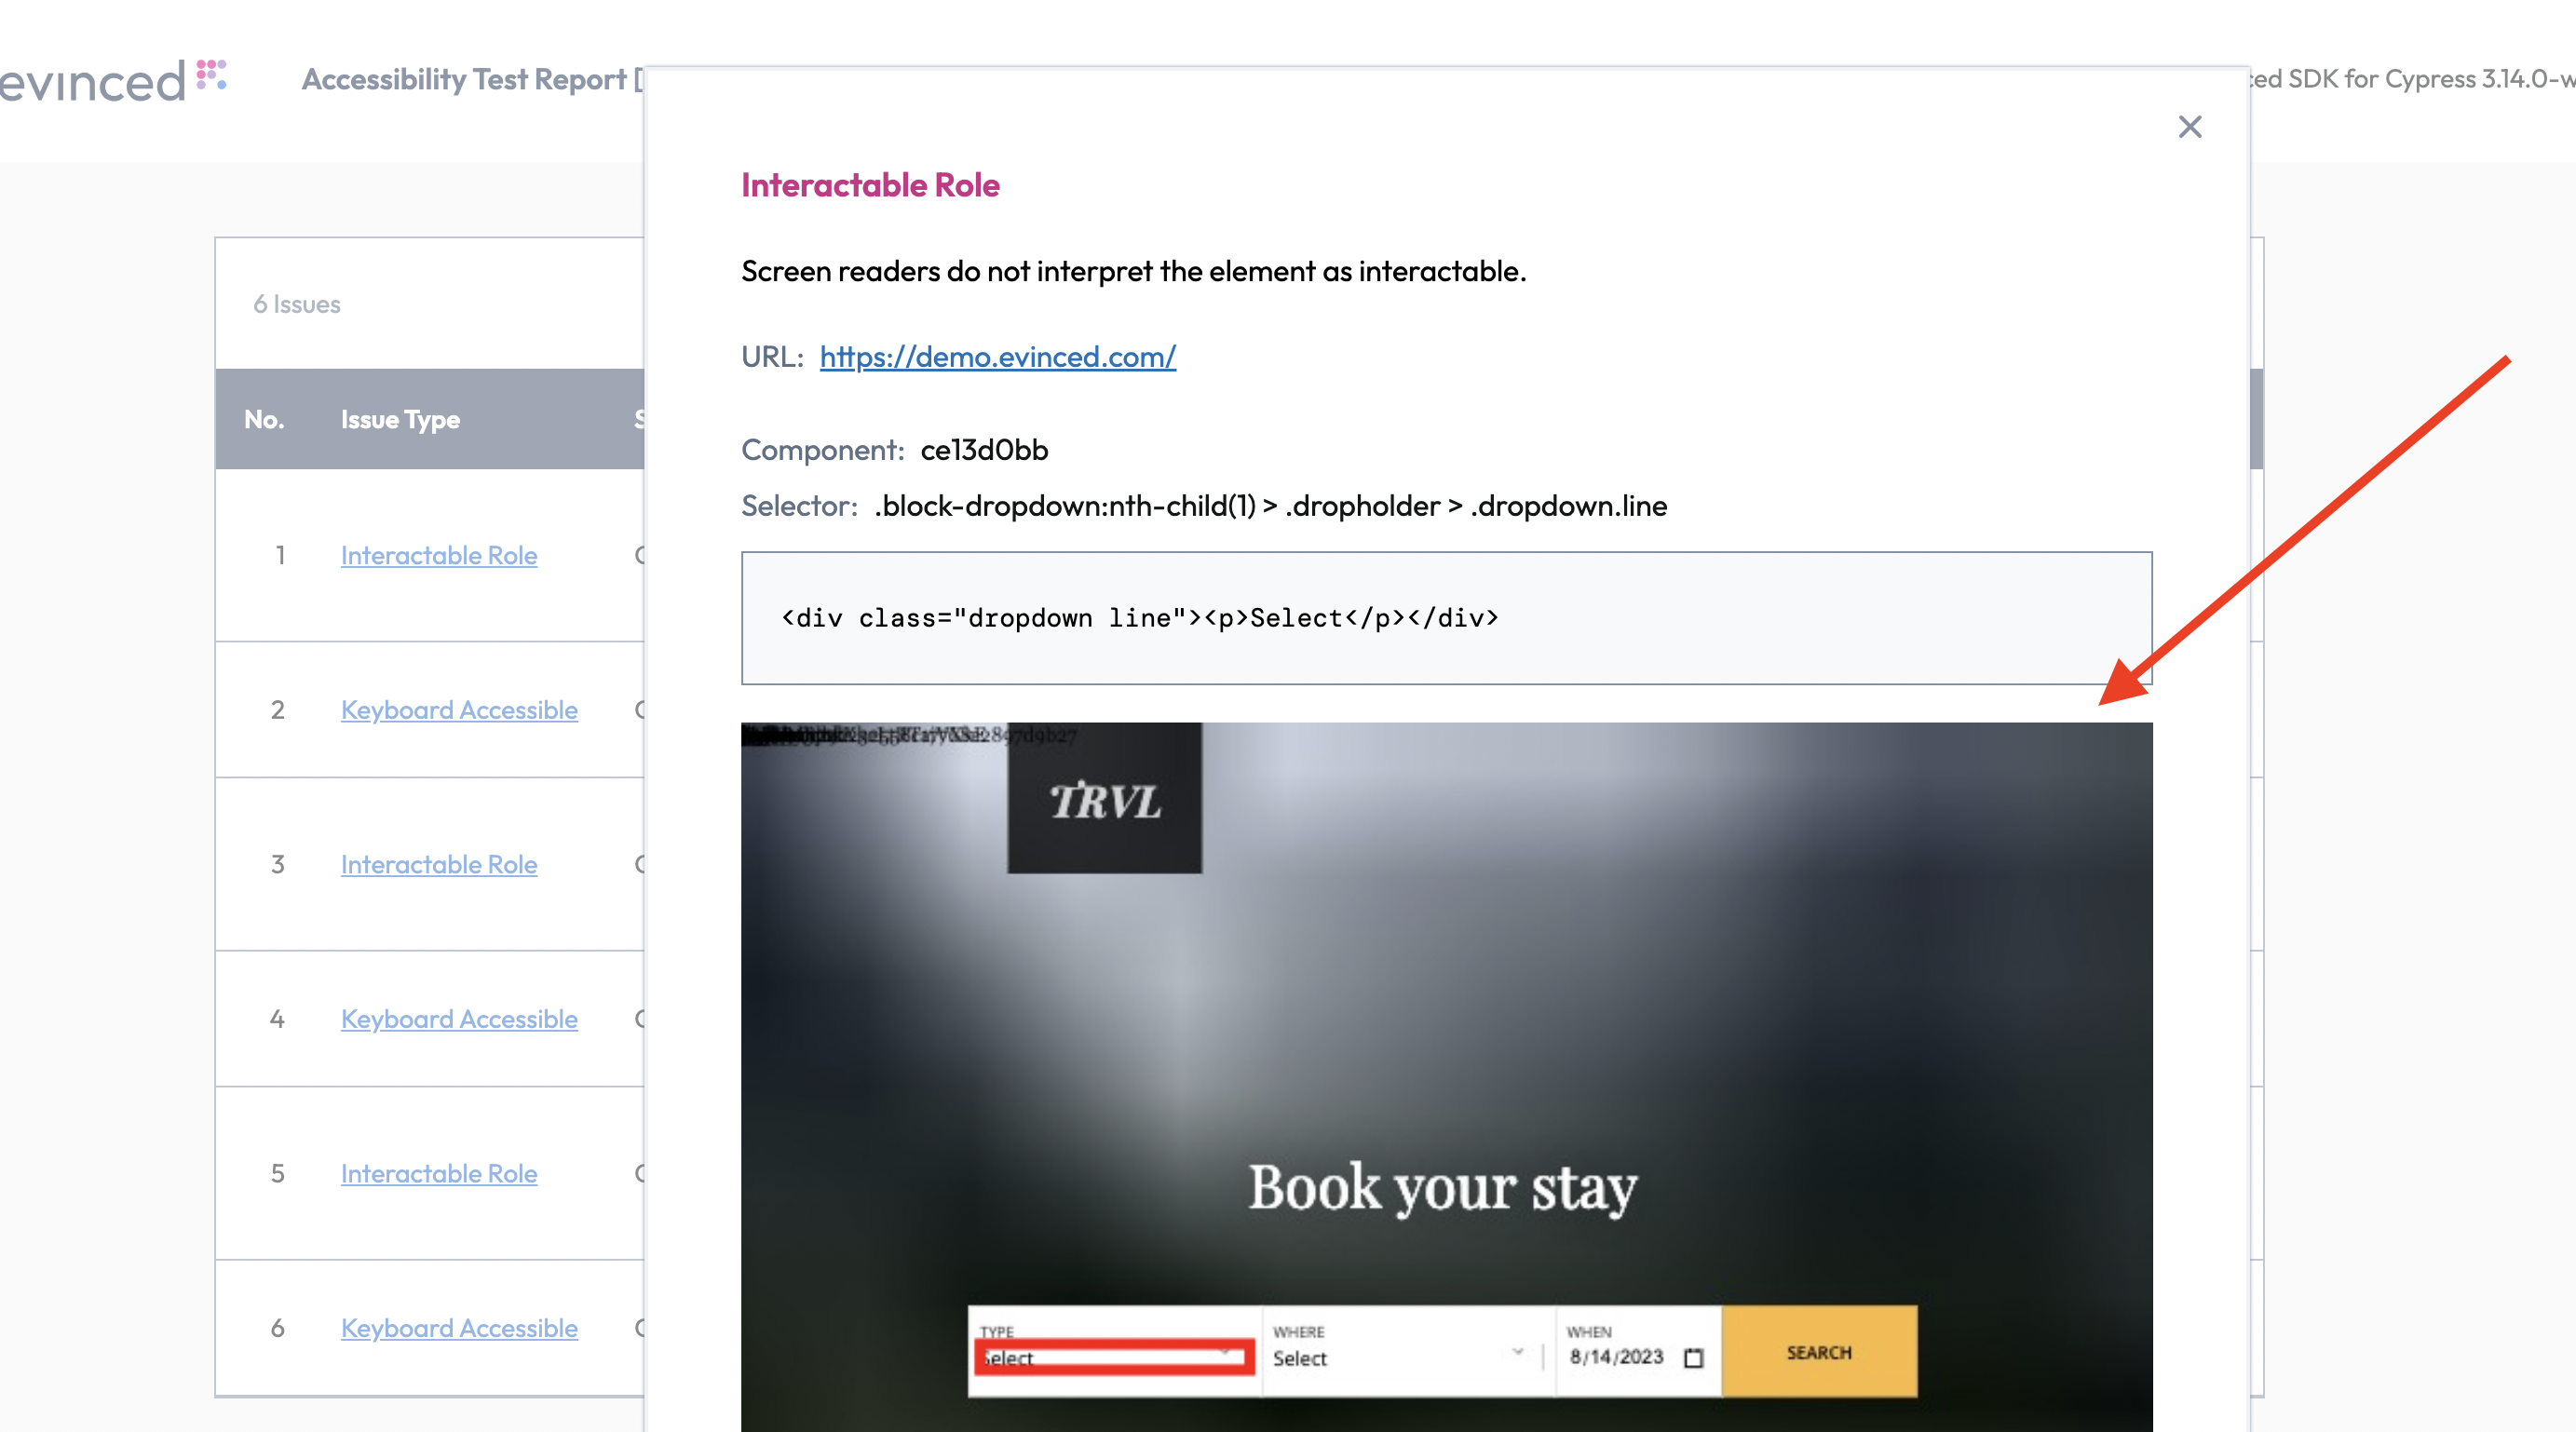
Screenshots are disabled by default because capturing and embedding element images increases test runtime and report size. Enable them when visual context in HTML or SARIF reports is worth the overhead - for example when triaging issues offline or sharing reports with designers.
The SDK supports three screenshot modes via the screenshot_mode option (the ScreenshotMode enum, or the equivalent string):
| Mode | Description |
|---|---|
ScreenshotMode.PAGE | In-page capture via html2canvas (default when screenshots are enabled) |
ScreenshotMode.SDK | Driver-side capture via Chrome DevTools (Page.captureScreenshot) - pixel-true, Chromium-only |
ScreenshotMode.DISABLED | Screenshots off (default) |
ScreenshotMode.SDK is recommended when you need pixel-accurate images: it uses the real browser compositor, avoiding the html2canvas artifacts that can appear on overlays or fixed elements. It is Chromium-only - on other browsers the SDK logs a warning and falls back to PAGE (html2canvas).
1from evinced_selenium_sdk import EvincedConfig, EvincedWebDriver, ScreenshotMode2from selenium import webdriver34# Recommended: driver-side (CDP) capture, pixel-true5config = EvincedConfig(screenshot_mode=ScreenshotMode.SDK) # or screenshot_mode="sdk"6driver = EvincedWebDriver(webdriver.Chrome(), config)78# Per-call - screenshots for one analyze only9report = driver.ev_analyze(EvincedConfig(screenshot_mode="page"))
Tune SDK-side capture with screenshot_config (all optional): quality (JPEG 1–100, default 70), timeout (per-capture bound in ms, default 5000), scale (capture scale, default 1.0).
1config = EvincedConfig(2 screenshot_mode="sdk",3 screenshot_config={"quality": 70, "timeout": 5000, "scale": 1.0},4)
Backward compatibility: the flag options still work - enable_screenshots=True is equivalent to ScreenshotMode.PAGE, and adding sdk_side_screenshots=True is equivalent to ScreenshotMode.SDK.
1# Legacy flags - still supported2EvincedConfig(enable_screenshots=True) # == ScreenshotMode.PAGE3EvincedConfig(enable_screenshots=True, sdk_side_screenshots=True) # == ScreenshotMode.SDK
Toggles
Enables experimental features. Feature names and values may vary from release to release.
Example:
1from evinced_selenium_sdk import EvincedConfig, EvincedWebDriver2from selenium import webdriver34config = EvincedConfig(5 toggles={6 "USE_AXE_NEEDS_REVIEW": True,7 "USE_AXE_BEST_PRACTICES": True,8 },9)10driver = EvincedWebDriver(webdriver.Chrome(), config)
Skip Validations
Sets validation types to be skipped for specified URL pattern and CSS selector. Issue type IDs can be found by inspecting a JSON report as described in Web Reports.
Default: no validations skipped.
1from evinced_selenium_sdk import EvincedConfig, EvincedWebDriver2from selenium import webdriver34config = EvincedConfig(5 skip_validations=[6 {7 "selector": "test.1--selector",8 "urlRegex": "http://url.to.skip/path1",9 "validationTypes": ["NO_DESCRIPTIVE_TEXT", "NOT_FOCUSABLE"],10 },11 {12 "selector": "test.2--selector",13 "urlRegex": "http://url.to.skip/path2",14 "validationTypes": ["NOT_FOCUSABLE", "ONE_MORE_TYPE_TO_EXCLUDE", "NO_DESCRIPTIVE_TEXT"],15 },16 ],17)18driver = EvincedWebDriver(webdriver.Chrome(), config)
A selector matches elements, not subtrees
Skip rules are evaluated against each reported element on its own, so a selector suppresses issues only on the elements it matches — not on anything nested inside them. To cover a container and its contents, list both the container and its descendants:
1#parent, #parent *
#parent alone suppresses only issues reported on #parent itself.
Recording Service
This setting controls how frequently event-triggered functions are executed, helping to optimize performance and responsiveness. The option does not enable or disable the event-handling service itself but determines how frequently events are processed based on the selected mode.
Available modes:
debounce- Delays execution until a set time has passed since the last event. Useful for actions triggered by continuous input, such as typing in a search box, to avoid excessive function calls.throttle- Ensures execution at fixed intervals, regardless of event frequency. Ideal for scenarios like handling window resize events or scroll tracking, where limiting execution prevents performance degradation.
Default: Functions execute as triggering events occur.
An example of how to modify settings:
The config keys map to the modes above: DELAY_MODE selects "debounce" or
"throttle", and ENABLE_DEBOUNCE_NEW_SELECTORS / DEBOUNCE_NEW_SELECTORS_MS
debounce the analysis of newly appearing elements:
1from evinced_selenium_sdk import EvincedConfig, EvincedWebDriver2from selenium import webdriver34config = EvincedConfig(5 recording_service={6 "ENABLE_DEBOUNCE_NEW_SELECTORS": True,7 "DEBOUNCE_NEW_SELECTORS_MS": 1000,8 "DELAY_MODE": "throttle",9 },10)11driver = EvincedWebDriver(webdriver.Chrome(), config)
These settings apply only during continuous mode (ev_start / ev_stop); they have no effect on ev_analyze. They tune scanning driven by the page's own DOM changes; scans triggered by your test's interactions are tuned in Settled Analysis.
Settled Analysis
Settled analysis is built into continuous mode: after each interaction (a click,
a key press), the engine waits for the page to settle and analyzes the newly
revealed content - dropdowns, modals, dynamically loaded sections. It is always
on during ev_start / ev_stop sessions and needs no configuration; rapid
interactions are coalesced automatically (at most one settled scan per 300 ms).
Two options bound how long each scan waits for the page to settle. The wait
holds the driver's command lock, so it can delay your test's next command by up
to the timeout - lower it if your app is sensitive to that (0 disables the
wait):
| Option | Type | Default | Description |
|---|---|---|---|
settle_wait_timeout_ms | int | 1500 | Maximum time to wait for the page to settle before analyzing |
settle_wait_poll_ms | int | 50 | How often the page state is re-checked while waiting |
1from evinced_selenium_sdk import EvincedConfig, EvincedWebDriver2from selenium import webdriver34config = EvincedConfig(settle_wait_timeout_ms=500)5driver = EvincedWebDriver(webdriver.Chrome(), config)
Settled analysis reacts to your test's interactions; scanning driven by the page's own DOM changes is tuned separately - see Recording Service.
Single-page applications. SPA flows are covered by the same mechanism:
route changes triggered by your test's interactions are analyzed like any other
interaction, with no extra configuration. Content that appears without any
interaction (for example a timer-driven banner) is not captured automatically -
call ev_analyze() once that state is on screen, or interact with the page to
trigger a scan.
Shadow DOM Support
Shadow DOM is now supported by default. No additional configuration is needed.
IFrames Support
When true, accessibility analysis includes iframe that exist inside the page.
Default: true.
1from evinced_selenium_sdk import EvincedConfig, EvincedWebDriver2from selenium import webdriver34config = EvincedConfig(include_iframes=False)5driver = EvincedWebDriver(webdriver.Chrome(), config)
Visible iframes are analyzed when include_iframes=True (default). Hidden iframes are skipped unless their domain is listed in include_hidden_iframe_domains - see Include Hidden IFrames Domain below.
Include Hidden IFrames Domain
Configures which hidden iframe domains are included in accessibility analysis. By default, hidden iframes are excluded for performance and security reasons.
This setting allows you to specify a list of domains to analyze even when the iframe is hidden.
1from evinced_selenium_sdk import EvincedConfig, EvincedWebDriver2from selenium import webdriver34config = EvincedConfig(5 include_iframes=True,6 include_hidden_iframe_domains=["example.com", "auth.example.com"],7)8driver = EvincedWebDriver(webdriver.Chrome(), config)
Hidden iframes (for example SSO checksession frames or zero-size tracking widgets) are skipped by default. List a domain here to include its hidden iframes in analysis.
Passed Validations
By default, the Evinced SDK only reports accessibility issues that have failed validation. However, you can also configure the SDK to include passed validations in your reports. Passed validations represent accessibility checks that were successfully completed without any issues found.
Why include passed validations?
Including passed validations in your reports provides several benefits:
- Comprehensive Coverage: Get a complete picture of all accessibility checks performed, not just the failures
- Compliance Documentation: Demonstrate which accessibility standards your application successfully meets
- Trend Analysis: Track improvements over time by monitoring both failed and passed validation counts
- Quality Assurance: Verify that accessibility checks are running as expected across your entire application
- Regulatory Reporting: Provide evidence of accessibility testing coverage for compliance audits
Report Structure
When passed validations are enabled, your reports will include both:
failedValidations: Array of accessibility issues that need to be fixedpassedValidations: Array of accessibility checks that passed successfully
Default: false (passed validations are not included)
Enable Passed Validations
To include passed validations in your reports, set include_passed_validations to True.
Note. Enabling passed validations noticeably increases analysis and reporting overhead - the report carries every check that ran, not only the failures.
Single Page Analysis with Passed Validations
1from evinced_selenium_sdk import EvincedConfig, EvincedWebDriver, Report, SaveFileFormat2from selenium import webdriver34config = EvincedConfig(include_passed_validations=True)5driver = EvincedWebDriver(webdriver.Chrome(), config)6driver.get("https://demo.evinced.com")78report: Report = driver.ev_analyze()9failed = report.get_failed_validations()10passed = report.get_passed_validations()1112driver.ev_save_file(report, "complete-report.json", SaveFileFormat.JSON)
Continuous Analysis with Passed Validations
1from evinced_selenium_sdk import EvincedConfig, EvincedWebDriver, Report2from selenium import webdriver34config = EvincedConfig(include_passed_validations=True)5driver = EvincedWebDriver(webdriver.Chrome(), config)67driver.ev_start(config)8driver.get("https://demo.evinced.com")9driver.find_element("css selector", ".dropdown").click()1011report: Report = driver.ev_stop()12failed = report.get_failed_validations()13passed = report.get_passed_validations()
The option can also be set per call, like any other configuration option:
1report = driver.ev_analyze(EvincedConfig(include_passed_validations=True))
Proxy
Configures proxy server access settings. Needed to enable outbound communication to the Evinced Platform through a proxy server.
Routing browser traffic - configure Selenium's own Proxy object. This
affects the pages the browser loads, not the SDK:
1from selenium import webdriver2from selenium.webdriver.common.proxy import Proxy3from selenium.webdriver.chrome.options import Options4from evinced_selenium_sdk import EvincedWebDriver56proxy_string = "proxy.example.com:8080"7# Or with credentials: proxy_string = "user:password@proxy.example.com:8080"89proxy = Proxy()10proxy.http_proxy = proxy_string11proxy.ssl_proxy = proxy_string1213options = Options()14options.proxy = proxy15driver = EvincedWebDriver(webdriver.Chrome(options=options))
Routing the SDK's own requests (authentication and platform upload) - a
separate mechanism: the SDK honors the standard proxy environment variables
HTTP_PROXY, HTTPS_PROXY, NO_PROXY, and optional PROXY_USERNAME /
PROXY_PASSWORD. NO_PROXY supports wildcard and suffix patterns (e.g.
*.internal, .example.com, <local>), and socks5:// / socks4:// proxy
URLs are supported.
Network Idle Detection
Network-idle gating waits for network activity to settle before analysis, so the scan runs on a stable page with dynamic content loaded. It is opt-in and requires the WebDriver BiDi transport (continuous_transport="bidi" on a driver that advertises webSocketUrl); on the interaction (click) transport it is a no-op.
Configure it with the nested network_idle option:
| Key | Type | Default | Description |
|---|---|---|---|
enabled | bool | False | Enable network-idle gating |
timeout | int (ms) | 300 | Quiet window - idle means 0 in-flight requests for this long |
maxWait | int (ms) | 7500 | Hard cap; proceed anyway after this even if the network never quiets |
1from evinced_selenium_sdk import EvincedConfig, EvincedWebDriver2from selenium import webdriver34config = EvincedConfig(5 continuous_transport="bidi",6 network_idle={"enabled": True, "timeout": 300, "maxWait": 7500},7)8driver = EvincedWebDriver(webdriver.Chrome(), config)910# Per-call override for one analysis (e.g. a slower API)11report = driver.ev_analyze(12 EvincedConfig(network_idle={"enabled": True, "maxWait": 10000})13)
The wait applies before one-shot ev_analyze and before each continuous-mode scan. A page that never quiets (persistent polling, WebSocket, SSE) proceeds after maxWait with a logged warning - it never hangs.
Global Switch
When false, disables Evinced functionality. Enabled by default, use this setting to disable
Evinced accessibility analysis when not needed during test development or when running CI jobs
where accessibility testing is not intended.
Default: true.
When switched off:
ev_start()andev_save_file()will be bypassed.ev_stop()andev_analyze()will return an empty report.
Switching Evinced Functionality Off in Configuration
Disable all Evinced analysis at runtime - useful during local development when you want to run functional tests without accessibility overhead, or in CI jobs that skip a11y checks.
1from evinced_selenium_sdk import evinced_disable, evinced_enable23evinced_disable()45# ev_start is skipped; ev_analyze returns an empty Report6report = driver.ev_analyze()7assert report.get_failed_validations() == []89# Re-enable for the next test10evinced_enable()11driver.ev_analyze() # runs normally again
If you call evinced_disable() after ev_start(), you must still call ev_stop() to finalize the session - the switch gates new work, not teardown of an active session.
Switching Evinced Functionality Off in Environment
1# Canonical cross-SDK variable2export EV_SWITCH_ON=false34# Python-only alias - takes precedence over EV_SWITCH_ON5export EVINCED_DISABLED=true
Note the opposite polarity: disabling is EV_SWITCH_ON=false but EVINCED_DISABLED=true. Setting the wrong value to the wrong variable (for example EVINCED_DISABLED=false intending to disable) silently does nothing - no error or warning is logged.
The variables are read once, the first time the SDK checks the switch, and cached for the rest of the process - set them before your first use of the SDK. Programmatic evinced_disable() / evinced_enable() calls take precedence from the moment they run, including over the environment.
Alerts
When true, Evinced expects alerts to be displayed at any time, after any action, and will wait for them to be closed.
When false, Evinced will not wait for alerts to be closed and will continue the analysis.
Default: false.
With the default alert_expected=False, the SDK's background analysis that
runs after each interaction can dismiss an alert before your test handles it -
the alert simply disappears. Set alert_expected=True when your flow triggers
alerts: the SDK then leaves them alone (analysis waits until the alert is
closed) and your test handles them as usual with driver.switch_to.alert.
1from evinced_selenium_sdk import EvincedConfig, EvincedWebDriver2from selenium import webdriver34config = EvincedConfig(alert_expected=True)5driver = EvincedWebDriver(webdriver.Chrome(), config)6driver.ev_start()
Uploading Reports to Evinced Platform
Introduction
Evinced Platform allows you to seamlessly collect, organize, visualize and monitor Evinced accessibility reports in one place. In this section, we will guide you through the key functionalities of the upload methods of the accessibility reports from the Evinced SDK to the Evinced Platform, which was introduced in version 0.1.0. This upload method is fully compatible with the previous versions of the Evinced SDK API, and is disabled by default.
Enable Upload Report to Platform
Check which SDK version you have installed with python -m pip show evinced-selenium-sdk.
Call set_upload_to_platform_config before creating your EvincedWebDriver, typically in a session-scoped pytest fixture or conftest.py:
1from evinced_selenium_sdk import set_upload_to_platform_config23set_upload_to_platform_config(enableUploadToPlatform=True)
Without this master switch, no upload happens regardless of per-call flags.
Upload is skipped when there are no failed validations, even if passed validations were collected.
Automatic Report Upload
Once the enableUploadToPlatform method is set to true and setUploadToPlatformDefault is true (which is the default),
all generated reports will be automatically uploaded to the Platform immediately upon calling the ev_stop() or ev_analyze() command.
How it works:
- When
enableUploadToPlatform: trueandsetUploadToPlatformDefault: true (default), upload happens automatically - No additional code is needed - just call
ev_analyze()orev_stop()and the report uploads - Upload occurs synchronously as part of the command execution
If you want to change this behavior and control uploads manually, set the setUploadToPlatformDefault feature flag to false.
1from evinced_selenium_sdk import set_upload_to_platform_config23set_upload_to_platform_config(setUploadToPlatformDefault=False)
If the setUploadToPlatformDefault is disabled, you can still upload
selected reports to the platform.
For that, use the following parameter in the ev_stop() command:
1driver.ev_stop(upload_to_platform=True)
Or, in the ev_analyze() command:
1driver.ev_analyze(upload_to_platform=True)
upload_to_platform has three states: None (the default) follows the global upload configuration described above, while True / False force uploading (or not uploading) that report regardless of it.
Test Names
To facilitate report management and be able to distinguish between different reports on the Platform, use the set_test_info method to inform the test name and test class.
It’s recommended to do that in a per-test pytest fixture.
1driver.set_test_info("test_method_name", "tests/test_module.py")
Labels and Custom Fields
You can attach labels and custom fields to your report to enhance readability and organization in the platform. Labels help you filter, search, and organize reports on the Evinced Platform.
There are two types of labels:
Built-in Labels: Pre-defined labels that can be set using the add_label method. Available built-in labels include:
testName- The name of the testtestFile- The file path of the testenvironment- The environment where the test runs (e.g., "Development", "Staging", "Production")flow- The test flow identifiergitBranch- The Git branch namegitUserName- The Git user namegitVersion- The Git commit version
Custom Labels: Flexible key-value pairs that can be set using the custom_label method. You can use any custom key-value pairs, including:
- Single values:
{ productVersion: '1.0.0' } - Multiple values (arrays):
{ browsers: ['Chrome', 'Firefox'] } - Special label
unitId: Use this to tag tests for relevant units within your organization
See the following code examples of how to set up labels:
1driver.test_run_info.add_label(environment="production", flow="standard")2driver.test_run_info.custom_label(3 Product_version="1.2.3",4 OS_Type="Linux",5 suite=["smoke", "regression"], # a list adds one label per value6)
To set labels once for every driver created afterwards (e.g. in a session fixture), use the process-global run info:
1from evinced_selenium_sdk import get_test_run_info23get_test_run_info().custom_label(team="a11y").add_label(environment="staging")
The built-in gitUserName / gitBranch / gitVersion labels are not collected automatically - set them explicitly when you want them, for example from CI environment variables:
1import os23driver.test_run_info.add_label(4 gitBranch=os.getenv("GIT_BRANCH", ""),5 gitVersion=os.getenv("GIT_COMMIT", ""),6)
Per-test Setup and Teardown
Run each test in its own analysis session, so every test uploads its own
report: start the session and set labels before the test, stop the session
(which uploads) after it. With pytest, that is an autouse fixture:
1@pytest.fixture(autouse=True)2def evinced_continuous(driver, request):3 driver.set_test_info(request.node.name, str(request.fspath))4 driver.ev_start()5 yield6 driver.ev_stop()
Putting All of This Together
Here is a complete code snippet of how to perform uploads to the platform on a per-test basis.
pytest conftest.py example with platform upload:
1import os2import pytest3from selenium import webdriver4from evinced_selenium_sdk import EvincedWebDriver, set_offline_credentials, set_upload_to_platform_config567@pytest.fixture(scope="session", autouse=True)8def evinced_credentials():9 set_offline_credentials(10 service_id=os.environ["AUTH_SERVICE_ID"],11 token=os.environ["AUTH_TOKEN"],12 )13 set_upload_to_platform_config(enableUploadToPlatform=True)141516@pytest.fixture(scope="module")17def driver():18 d = EvincedWebDriver(webdriver.Chrome())19 d.test_run_info.add_label(gitUserName="git", gitBranch="main")20 d.test_run_info.custom_label(Testing_purpose="Test platform uploading feature")21 yield d22 d.quit()232425@pytest.fixture(autouse=True)26def evinced_session(driver, request):27 driver.set_test_info(request.node.name, str(request.fspath))28 driver.ev_start()29 yield30 driver.ev_stop()313233def test_demo_home(driver):34 driver.get("https://demo.evinced.com")
Accessing Upload Information
After a successful upload, retrieve the test ID and platform URL from the driver's run metadata:
1test_id = driver.test_run_info.get_test_id()2platform_url = driver.test_run_info.get_upload_test_url()
Complete example:
1report = driver.ev_analyze(upload_to_platform=True)2if report.get_failed_validations():3 print(f"Upload test ID: {driver.test_run_info.get_test_id()}")4 print(f"Platform URL: {driver.test_run_info.get_upload_test_url()}")
Upload runs only when platform upload is enabled, the page is not blank, and there is at least one failed validation.
Tutorials
You can find fully functional example projects on our GitHub.
Generating a comprehensive accessibility report for your application
In this tutorial, we enhance an existing Selenium UI test with the Evinced Selenium Python SDK to check an application for accessibility issues. Prerequisites:
- All prerequisites for the Evinced Selenium Python SDK are met
evinced-selenium-sdkis installed in your project- Credentials are configured once in
conftest.py, as shown in Authentication - none of the test code below mentions them
Preface - existing UI test overview
Starting point - a functional UI test:
1from selenium import webdriver2from selenium.webdriver.common.by import By345def test_trvl_filters():6 driver = webdriver.Chrome()7 try:8 driver.get("https://demo.evinced.com/")9 driver.find_element(By.CSS_SELECTOR, "div.filter-container > div:nth-child(1) > div > div.dropdown.line").click()10 driver.find_element(By.CSS_SELECTOR, "div.filter-container > div:nth-child(2) > div > div.dropdown.line").click()11 driver.find_element(By.CSS_SELECTOR, ".react-date-picker").click()12 finally:13 driver.quit()
We use the demo travel site TRVL with known accessibility issues.
Step 1 - Initialize EvincedWebDriver
1import pytest2from selenium import webdriver3from selenium.webdriver.common.by import By4from evinced_selenium_sdk import EvincedWebDriver, SaveFileFormat567@pytest.fixture8def driver():9 d = EvincedWebDriver(webdriver.Chrome())10 yield d11 d.quit()121314def test_trvl_filters(driver):15 driver.get("https://demo.evinced.com/")16 driver.find_element(By.CSS_SELECTOR, "div.filter-container > div:nth-child(1) > div > div.dropdown.line").click()17 driver.find_element(By.CSS_SELECTOR, "div.filter-container > div:nth-child(2) > div > div.dropdown.line").click()18 driver.find_element(By.CSS_SELECTOR, ".react-date-picker").click()
Step 2 - Start the Evinced engine
1@pytest.fixture2def driver():3 d = EvincedWebDriver(webdriver.Chrome())4 d.ev_start()5 yield d6 d.quit()
Step 3 - Stop the engine and save reports
1@pytest.fixture2def driver(request):3 d = EvincedWebDriver(webdriver.Chrome())4 d.ev_start()5 yield d6 report = d.ev_stop()7 d.ev_save_file(report, f"{request.node.name}.html", SaveFileFormat.HTML)8 d.ev_save_file(report, f"{request.node.name}.json", SaveFileFormat.JSON)9 assert len(report.get_failed_validations()) == 0 # optional gating assertion10 d.quit()
Run the test with pytest. Additional configuration options are documented in the API section.
Additional Configuration Examples
Testing accessibility in a specific state of the application
Open UI state first, then analyze:
1from selenium import webdriver2from selenium.webdriver.common.by import By3from evinced_selenium_sdk import EvincedWebDriver, SaveFileFormat45driver = EvincedWebDriver(webdriver.Chrome())6driver.get("https://demo.evinced.com/")7driver.find_element(By.CSS_SELECTOR, "div.filter-container > div:nth-child(1) > div > div.dropdown.line").click()8report = driver.ev_analyze()9assert len(report.get_failed_validations()) >= 110driver.ev_save_file(report, "test-results.html", SaveFileFormat.HTML)
Running ev_analyze on multiple tabs
ev_analyze runs on the current window. Switch handles before analyzing a new tab:
1from selenium.webdriver.common.by import By23driver.get("page1.html")4report = driver.ev_analyze()5assert len(report.get_failed_validations()) >= 167driver.find_element(By.ID, "open-tab-link").click()8handles = driver.window_handles9driver.switch_to.window(handles[1])1011report = driver.ev_analyze()12assert len(report.get_failed_validations()) >= 1
Running ev_start and ev_stop on multiple tabs
In continuous mode, driver.switch_to.window(...) or driver.switch_to.new_window(...) flushes the current slice and restarts analysis on the destination window. You do not need to call ev_stop before switching - a single ev_stop() at the end can include issues from every window visited during the session:
1from selenium.webdriver.common.by import By23driver.get("page1.html")4driver.ev_start()5# interact on page1...6driver.find_element(By.ID, "open-tab-link").click()7driver.switch_to.window(driver.window_handles[1])8# interact on the popup tab...9driver.switch_to.window(driver.window_handles[0]) # optional: return to the original window10report = driver.ev_stop()
Closing a popup with driver.close() keeps the session alive; only closing the last remaining window tears it down. Issues not yet flushed on the closed window are dropped (the SDK logs a warning) - switch away from the popup or interact on it before closing if you need its final state analyzed.
Iframes and continuous mode
Enable iframe analysis with include_iframes=True (default). The engine always runs in the main frame. if your test is inside an iframe when a slice fires, the SDK restores your frame context afterward - you typically do not need to match iframe context before ev_stop:
1from evinced_selenium_sdk import EvincedConfig, EvincedWebDriver2from selenium import webdriver3from selenium.webdriver.common.by import By45config = EvincedConfig(include_iframes=True)6driver = EvincedWebDriver(webdriver.Chrome(), config)7driver.get("page1.html")8driver.switch_to.frame("iframe1")9driver.ev_start()10# interact inside iframe...11report = driver.ev_stop()
Fail the test if critical issues are found
Using ev_analyze
1report = driver.ev_analyze()2critical = [3 i for i in report.get_failed_validations()4 if (i.get("severity") or {}).get("id") == "CRITICAL"5]6assert not critical, "Critical accessibility issues found"
Using ev_start / ev_stop
1driver.ev_start()2# ... test steps ...3report = driver.ev_stop()4critical = [5 i for i in report.get_failed_validations()6 if (i.get("severity") or {}).get("id") == "CRITICAL"7]8assert not critical, "Critical accessibility issues found"
Support
Please feel free to reach out to support@evinced.com with any questions.
FAQ
- Can I configure which validations to run?
Yes, see the Configuration section for details on how to configure Axe validations to your needs.
- Can I run tests with Evinced using cloud-based services like Sauce Labs, Perfecto, or BrowserStack?
Yes, we have tested the Evinced SDK on many of these types of cloud-based services and expect no issues.