Playwright Java SDK
The Evinced Playwright Java SDK integrates with new or existing Playwright tests to automatically detect accessibility issues. By adding a few lines of code to your Playwright project, you can begin analyzing all the web pages and DOM changes to provide a dynamic view of how your site can become more accessible. As a result of the test, a rich and comprehensive report is generated to easily track issues to resolution.
Interested in seeing this in action? Contact us to get started!
Prerequisites
- Playwright version 1.29 or higher
Get started
Installation
To install Playwright Java SDK you will need either a file provided by Evinced Support or access to a remote repository that provides it. If you have neither, contact us to get started.
Installation with a locally provided file
You can install Playwright Java SDK using a standalone .jar distribution. In this case, you need to do the following:
- Download the .jar file.
- Unpack the provided java-playwright-sdk.zip to any desirable location.
- Add the following dependencies entries pointing to java-playwright-sdk-version.jar
- Gradle:1 implementation files('/Users/<path-to-your-unpacked-folder>/java-playwright-sdk-<version>.jar')
- Maven:
- First, install the “all” jar into your local Maven repository by the following command:
Example:1mvn org.apache.maven.plugins:maven-install-plugin:2.5.2:install-file \2 -Dfile=java-playwright-sdk-<version>.jar \3 -DpomFile=java-playwright-sdk-<version>.pom1mvn org.apache.maven.plugins:maven-install-plugin:2.5.2:install-file \2 -Dfile=java-playwright-sdk-1.6.1.jar \3 -DpomFile=java-playwright-sdk-1.6.1.pom - Add the corresponding dependency into your pom.xml:1 <dependency>2 <groupId>com.evinced</groupId>3 <artifactId>java-playwright-sdk</artifactId>4 <version>1.6.1</version>5 </dependency>
- First, install the “all” jar into your local Maven repository by the following command:
- Gradle:
Installation from a remote repository
Evinced Customers have the option of accessing Playwright Java SDK from a remote repository - the Evinced JFrog Artifactory - to keep their SDK version up-to-date and to share the SDK internally at their organization.
When access is enabled, Playwright Java SDK is available at
https://evinced.jfrog.io/artifactory/restricted-maven/com/evinced/java-playwright-sdk.
Authentication
To launch Playwright Java SDK, you need to have a Service ID and an API Key.
Where to find your Evinced SDK credentials
These credentials are available via the Evinced Product Hub in the “Automation for Web” or “Automation for Mobile” product areas. Click the “Get SDK” button to see the Service Account ID and API Key at the bottom of the page.
Authenticate for Offline Testing
There are two methods to provide the token: online mode and offline mode. Online mode contacts the Evinced Licensing Server. Offline mode assumes that an Evinced employee has supplied a JSON Web Token (JWT). If an offline token is required, please reach out to your account team or support@evinced.com.
Please set credentials in environment variables and reference the environment variables in code.
1# Online mode2export EVINCED_SERVICE_ID=<serviceId>3export EVINCED_API_KEY=<apiKey>45# Offline mode, when a JWT has been provided by Evinced6export EVINCED_SERVICE_ID=<serviceId>7export EVINCED_AUTH_TOKEN=<token>
Setting credentials, an example:
1using Evinced.SDK;23// Offline mode4EvincedSDK.SetOfflineCredentials(Environment.GetEnvironmentVariable("EVINCED_SERVICE_ID"), Environment.GetEnvironmentVariable("EVINCED_AUTH_TOKEN"));56// Online mode7EvincedSDK.SetCredentials(Environment.GetEnvironmentVariable("EVINCED_SERVICE_ID"), Environment.GetEnvironmentVariable("EVINCED_API_KEY"));
Your First Test
SDK Initialization
To use Playwright Java SDK, you first need to authenticate. Please refer to Authentication for details.
The only command you need to add is to wrap the existing WebDriver object.
1Playwright playwright = Playwright.create();2Browser browser = playwright.chromium().launch();3EvPage page = EvPageFactory.create(browser.newPage());
Add Evinced Accessibility Checks (Single Run Mode)
This is a simple example of how to add an Evinced accessibility scan to a test. Please note the inline comments that give detail on each test step.
1@Test2public void evAnalyzeTest() {3 Playwright playwright = Playwright.create();4 Browser browser = playwright.chromium().launch();5 EvPage page = EvPageFactory.create(browser.newPage());67 try{8 page.navigate("https://demo.evinced.com");9 Report report = page.evAnalyze();10 List<Issue> issues = report.getIssues();11 assertEquals(6, issues.size());12 } finally {13 playwright.close();14 }15}
Add Evinced Accessibility Checks (Continuous Mode)
This is an example of how to add a continuous Evinced accessibility scan to a test. Using the
evStart() and evStop() methods, the Evinced engine will continually scan in the background capturing all DOM changes and page navigation as the test is executed. This will capture all accessibility issues as clicking on drop-downs or similar interactions reveals more of the page. The advantage of continuous mode is that no interaction with the actual test code is needed.
1@Test2public void evAnalyzeTest() {3 Playwright playwright = Playwright.create();4 Browser browser = playwright.chromium().launch();5 EvPage page = EvPageFactory.create(browser.mewPage());67 try{8 page.navigate("https://demo.evinced.com");9 page.evStart();1011 // More test code to interact with the page1213 Report report = page.evStop();14 List<Issue> issues = report.getIssues();15 assertEquals(6, issues.size());16 } finally {17 playwright.close();18 }19}
API
EvPageFactory.create()
Prepares the Evinced object for use in the project.
1EvPage page = EvPageFactory.create(browser.newPage());
Refer to Configuration to see examples of initializing with options.
evAnalyze(options)
Scans the current page and returns a list of accessibility issues. This is the recommended method for static page analysis.
Note: This method is not supported if evStart() is already running.
1EvPage page = EvPageFactory.create(browser.newPage());2Report report = page.evAnalyze();
Returns Report.
The returned report object contains a list of accessibility issues.
For more information regarding reports as well as the report object itself, please refer to our detailed Web Reports page.
evStart(options)
Continually watches for DOM mutations and page navigation, recording accessibility issues
until the evStop() method is called. This method is recommended for dynamic page flows.
1EvPage page = EvPageFactory.create(browser.newPage());2page.evStart();
Returns void.
evStop(options)
Stops the issue-gathering process started by evStart().
1EvPage page = EvPageFactory.create(browser.newPage());2page.evStart();3Report report = page.evStop();
Returns Report.
The returned report object includes all accessibility issues detected between
the evStart() and evStop() method calls.
For more information regarding reports as well as the report object itself, please refer to our detailed Web Reports page.
evSaveFile(destination, issues, format)
Saves issues in a file with the specified format and location.
Supported formats are json, html, sarif, and csv.
Find detailed information in the Web Reports page.
1Report report = page.evStop();2// OR3Report report = page.evAnalyze();45// create a JSON file named jsonReport.json6EvincedSDK.evSaveFile("jsonReport", report, FileFormat.JSON);78// create an HTML file named htmlReport.html9EvincedSDK.evSaveFile("htmlReport", report, FileFormat.HTML);1011// create an SARIF file named sarifReport.html12EvincedSDK.evSaveFile("sarifReport", report, FileFormat.SARIF);1314// create an CSV file named csvReport.csv15EvincedSDK.evSaveFile("csvReport", report, FileFormat.CSV);
FileFormat
Defines the file type of the report. Options are JSON, HTML, SARIF and CSV.
Returns Path.
Aggregated Report
The aggregated report feature allows you to have a general aggregated report for
the whole run (not only for one test or suite). This report will contain all the
issues found by the tests where evStart() and
evStop() commands were called. It is still possible to use the
evSaveFile() command in any place of your code along with this
Aggregated Report feature.
1Path htmlAggregatedReport = EvincedSDK.evSaveFile("evinced-html-report", FileFormat.HTML);
Configuration
The same configuration options can be used when initializing the Evinced object
using Global.config and when calling the evStart()
and evAnalyze() methods but with a bit different consequences.
Providing options when initializing defines a global configuration for all calls
of evAnalyze() and evStart(), while providing options to
either of those methods affect only the test in which they are called. Some SDKs
also let you define configuration outside your code, in a config file that is
picked up automatically at startup.
Options provided in either evAnalyze() or evStart() override
those set in Evinced engine initialization.
Engines Configuration
Evinced uses two separate engines when scanning for accessibility issues, one is the aXe engine and the other is the Evinced engine. By default, Evinced disables the aXe Needs Review and Best Practices issues based on customer request and due to the fact they are mostly false positives. Please note this setting when comparing issue counts directly. See an example of how to enable Needs Review and Best practices issues in the Toggles section.
Configuration File
Place a configuration file at the root of your working directory to set options without touching code. The SDK looks for one of the following, in this order, and uses the first one it finds — file formats are never merged together:
evConfig.yamlevConfig.ymlevConfig.json
1scan:2 iframes: true3logging:4 enabled: true5 preset: standard6platform:7 upload:8 enabled: true
1{2 "scan": {3 "iframes": true4 },5 "logging": {6 "enabled": true,7 "preset": "standard"8 },9 "platform": {10 "upload": {11 "enabled": true12 }13 }14}
How settings are combined
Configuration can come from several places, and each one can override the ones before it:
- Built-in defaults — what the SDK ships with.
- Environment variables — a small set of process-wide switches, listed below.
- The evConfig file — settings for the whole project, discovered automatically as described above.
- Your code, when you create the SDK instance — using
EvincedOptions, or the deprecated configuration object. - Your code, on an individual call — options passed directly to a single
evStart()orevAnalyze()call, which apply only to that call.
Later steps win over earlier ones for the same setting. A setting your code never touches keeps falling through to whatever the evConfig file, an environment variable, or the built-in default provided.
Settings that are objects merge key by key rather than replacing each other wholesale. Most lists, by contrast, are replaced wholesale by whichever layer set them last — setting the same list-typed setting in the evConfig file and again in code means the code's value wins outright, not a combination of both. The list of domains allowed for hidden iframes (scan.iframeDomains) is the one named exception: it's always combined across layers instead, with duplicate entries removed, so a list in the evConfig file and one added in code both end up applied. A handful of other settings that accumulate entries one call at a time (rather than taking a whole list at once) behave the same way — check that setting's own reference entry below for its specific merge behavior.
Environment variables
A handful of environment variables participate in this same layering, primarily useful in CI environments where you don't want to check in a config file:
| Variable | Same as | Notes |
|---|---|---|
EV_SWITCH_ON | switchOn | Only the literal value true turns Evinced on; anything else is treated as off. |
EV_PLATFORM_UPLOAD | platform.upload.enabled | Set to enable to turn on report uploads to the Evinced Platform. |
EV_PLATFORM_URL | platform upload endpoint | Overrides the Evinced Platform address reports are uploaded to. |
EVINCED_DISABLE_ANALYTICS | telemetry.channels.sdk (inverted) | Set to any value to disable SDK telemetry. |
An environment variable that is left unset never overrides a lower-priority default — it only takes effect when you explicitly set it.
Configuration Object
Global configuration for Playwright Java SDK can be defined in three ways, all sharing the same nested structure: an evConfig file at the root of your project (see Configuration File), the modern EvincedOptions builder passed to EvPageFactory.create(), or the deprecated Global.config configuration object, which keeps working unchanged. Options passed directly to a single evStart() or evAnalyze() call override all three for that call only.
The full shape of the configuration, shown here as a type definition for reference:
1type EvConfig = {2 switchOn?: boolean;3 mock?: boolean;4 scan?: {5 rootSelector?: string;6 iframes?: boolean;7 iframeDomains?: string[];8 withPasses?: boolean;9 screenshots?: {10 enabled?: boolean;11 mode?: 'browser' | 'sdk';12 scale?: number;13 quality?: number;14 timeout?: number;15 };16 dedupe?: {17 local?: boolean;18 };19 settle?: {20 enabled?: boolean;21 throttle?: { enabled?: boolean; delay?: number };22 };23 };24 analysis?: {25 [key: string]: unknown;26 };27 logging?: {28 enabled?: boolean;29 preset?: 'errors' | 'standard' | 'diagnostic';30 level?: 'error' | 'warn' | 'info' | 'debug' | 'trace';31 outputDir?: string;32 maxEntryLength?: number;33 consoleLogger?: boolean;34 systemInfo?: boolean;35 configurationFile?: string;36 channels?: {37 sdk?: boolean;38 engine?: boolean;39 browserConsole?: boolean;40 httpClient?: boolean;41 performance?: boolean;42 scanInsights?: boolean;43 };44 };45 network?: {46 enabled?: boolean;47 maxRetries?: number;48 retryDelay?: number;49 idle?: { enabled?: boolean; timeout?: number; maxWait?: number };50 };51 platform?: {52 upload?: { enabled?: boolean; autoUpload?: boolean; emptyResults?: boolean };53 };54 telemetry?: {55 enabled?: boolean;56 channels?: { sdk?: boolean; engine?: boolean };57 };58};
1switchOn: true2scan:3 rootSelector: '#main'4 iframes: true5 screenshots:6 enabled: true7logging:8 enabled: true9 level: debug
1{2 "switchOn": true,3 "scan": {4 "rootSelector": "#main",5 "iframes": true,6 "screenshots": {7 "enabled": true8 }9 },10 "logging": {11 "enabled": true,12 "level": "debug"13 }14}
1EvincedOptions options = EvincedOptions.create()2 .scan(s -> s3 .rootSelector("#main")4 .iframes(true)5 .screenshots(sc -> sc.enabled(true)))6 .logging(l -> l.enabled(true).level("debug"));78EvPage evPage = EvPageFactory.create(page, options);
Per-call, EvincedOptions also works with evStart() and evAnalyze() to override the instance-level configuration for a single call:
1evPage.evAnalyze(EvincedOptions.create().scan(s -> s.rootSelector(".block-dropdown")));
Deprecated — still fully supported, but new code should prefer EvincedOptions above.
1EvConfig configuration = new EvConfig();2configuration.setRootSelector("#main");3configuration.setIFramesIncluded(true);4configuration.setEnableScreenshots(true);56EvPage evPage = EvPageFactory.create(page, configuration);
Per-call, the legacy object also works with evStart() and evAnalyze():
1EvConfig configuration = new EvConfig();2configuration.setRootSelector(".block-dropdown");3evPage.evAnalyze(configuration);
Or set it once, globally, via Global.config:
1Global.config.setRootSelector("#some-selector");
Global.config is read once per process, at the very first EvPageFactory.create() call — not live on every call. A mutation made before that first call applies; a mutation made after it is not observed by that or any later call in the same process. If you need to vary configuration across test classes or calls, use EvincedOptions per instance or per call instead.
Root Selector
Sets a CSS selector to limit the Evinced Engine to scan only the selected element and its children. Must be a valid CSS selector. If not set, the Evinced Engine will scan the entire document.
Default: no value
1scan:2 rootSelector: '.some-selector'
1{2 "scan": {3 "rootSelector": ".some-selector"4 }5}
1EvincedOptions options = EvincedOptions.create().scan(s -> s.rootSelector(".some-selector"));23EvPage evPage = EvPageFactory.create(page, options);
Deprecated — still fully supported, but new code should prefer EvincedOptions above.
1EvConfig configuration = new EvConfig();2configuration.setRootSelector(".some-selector");34EvPage evPage = EvPageFactory.create(page, configuration);
Or, set it once for every call, using Global.config:
1Global.config.setRootSelector(".some-selector");
Axe Configuration
Configures Axe open-source accessibility toolkit, which the Evinced engine includes with its own, more extensive accessibility detection. For full Axe config options, see Axe Core API.
1analysis:2 AXE_CONFIG:3 rules:4 html-has-lang:5 enabled: false
1{2 "analysis": {3 "AXE_CONFIG": {4 "rules": {5 "html-has-lang": { "enabled": false }6 }7 }8 }9}
Using the dedicated rule() method, which enables or disables one axe-core rule at a time:
1EvincedOptions options = EvincedOptions.create()2 .analysis(a -> a.rule("html-has-lang", false));34EvPage evPage = EvPageFactory.create(page, options);
Or, for options rule() doesn't cover, passing the raw axe-core rules object through raw():
1Map<String, Object> rules = new HashMap<>();2rules.put("html-has-lang", Collections.singletonMap("enabled", false));34EvincedOptions options = EvincedOptions.create()5 .analysis(a -> a.raw("AXE_CONFIG", Collections.singletonMap("rules", rules)));67EvPage evPage = EvPageFactory.create(page, options);
Deprecated — still fully supported, but new code should prefer EvincedOptions above.
1EvConfig configuration = new EvConfig();2AxeConfiguration axeConfig = new AxeConfiguration();34// Axe's own syntax to disable the html-has-lang validation5axeConfig.setRules(Collections.singletonMap("html-has-lang", new AxeRuleConfiguration(false)));6configuration.setAxeConfig(axeConfig);78EvPage evPage = EvPageFactory.create(page, configuration);
Engine Logging
Set level of messages the Evinced engine will print to the console.
Valid levels are "debug", "info", "warn" and "error".
Default: "error"
Beyond the engine's own log level, the logging.* section controls the SDK's logging as a whole: whether logging is on at all, which channels are captured (the SDK's own messages, the engine's, the browser console, the HTTP client, performance timings, and scan insights), where logs are written, and how verbose they are. A preset is a shortcut that sets several of these at once — errors, standard, or diagnostic (which additionally turns on the engine channel).
1logging:2 enabled: true3 preset: diagnostic4 level: debug5 channels:6 engine: true
1{2 "logging": {3 "enabled": true,4 "preset": "diagnostic",5 "level": "debug",6 "channels": {7 "engine": true8 }9 }10}
1EvincedOptions options = EvincedOptions.create()2 .logging(l -> l3 .enabled(true)4 .level("debug")5 .engineChannel(true));67EvPage evPage = EvPageFactory.create(page, options);
Deprecated — still fully supported, but new code should prefer EvincedOptions above.
1LoggingConfiguration loggingConfig = LoggingConfiguration.builder()2 .loggingEnabled(true)3 .loggingLevel("DEBUG")4 .engineLoggingEnabled(true)5 .build();67EvConfig configuration = new EvConfig();8configuration.setLoggingConfiguration(loggingConfig);910EvPage evPage = EvPageFactory.create(page, configuration);
Valid values for level/loggingLevel are "error", "warn", "info", "debug", and "trace" (case-insensitive).
Reports Screenshots
When true, the Evinced SDK will include screenshots in its reports that
highlight elements with accessibility issues.
Default: false.
Note: Enabling screenshots may affect test run performance.
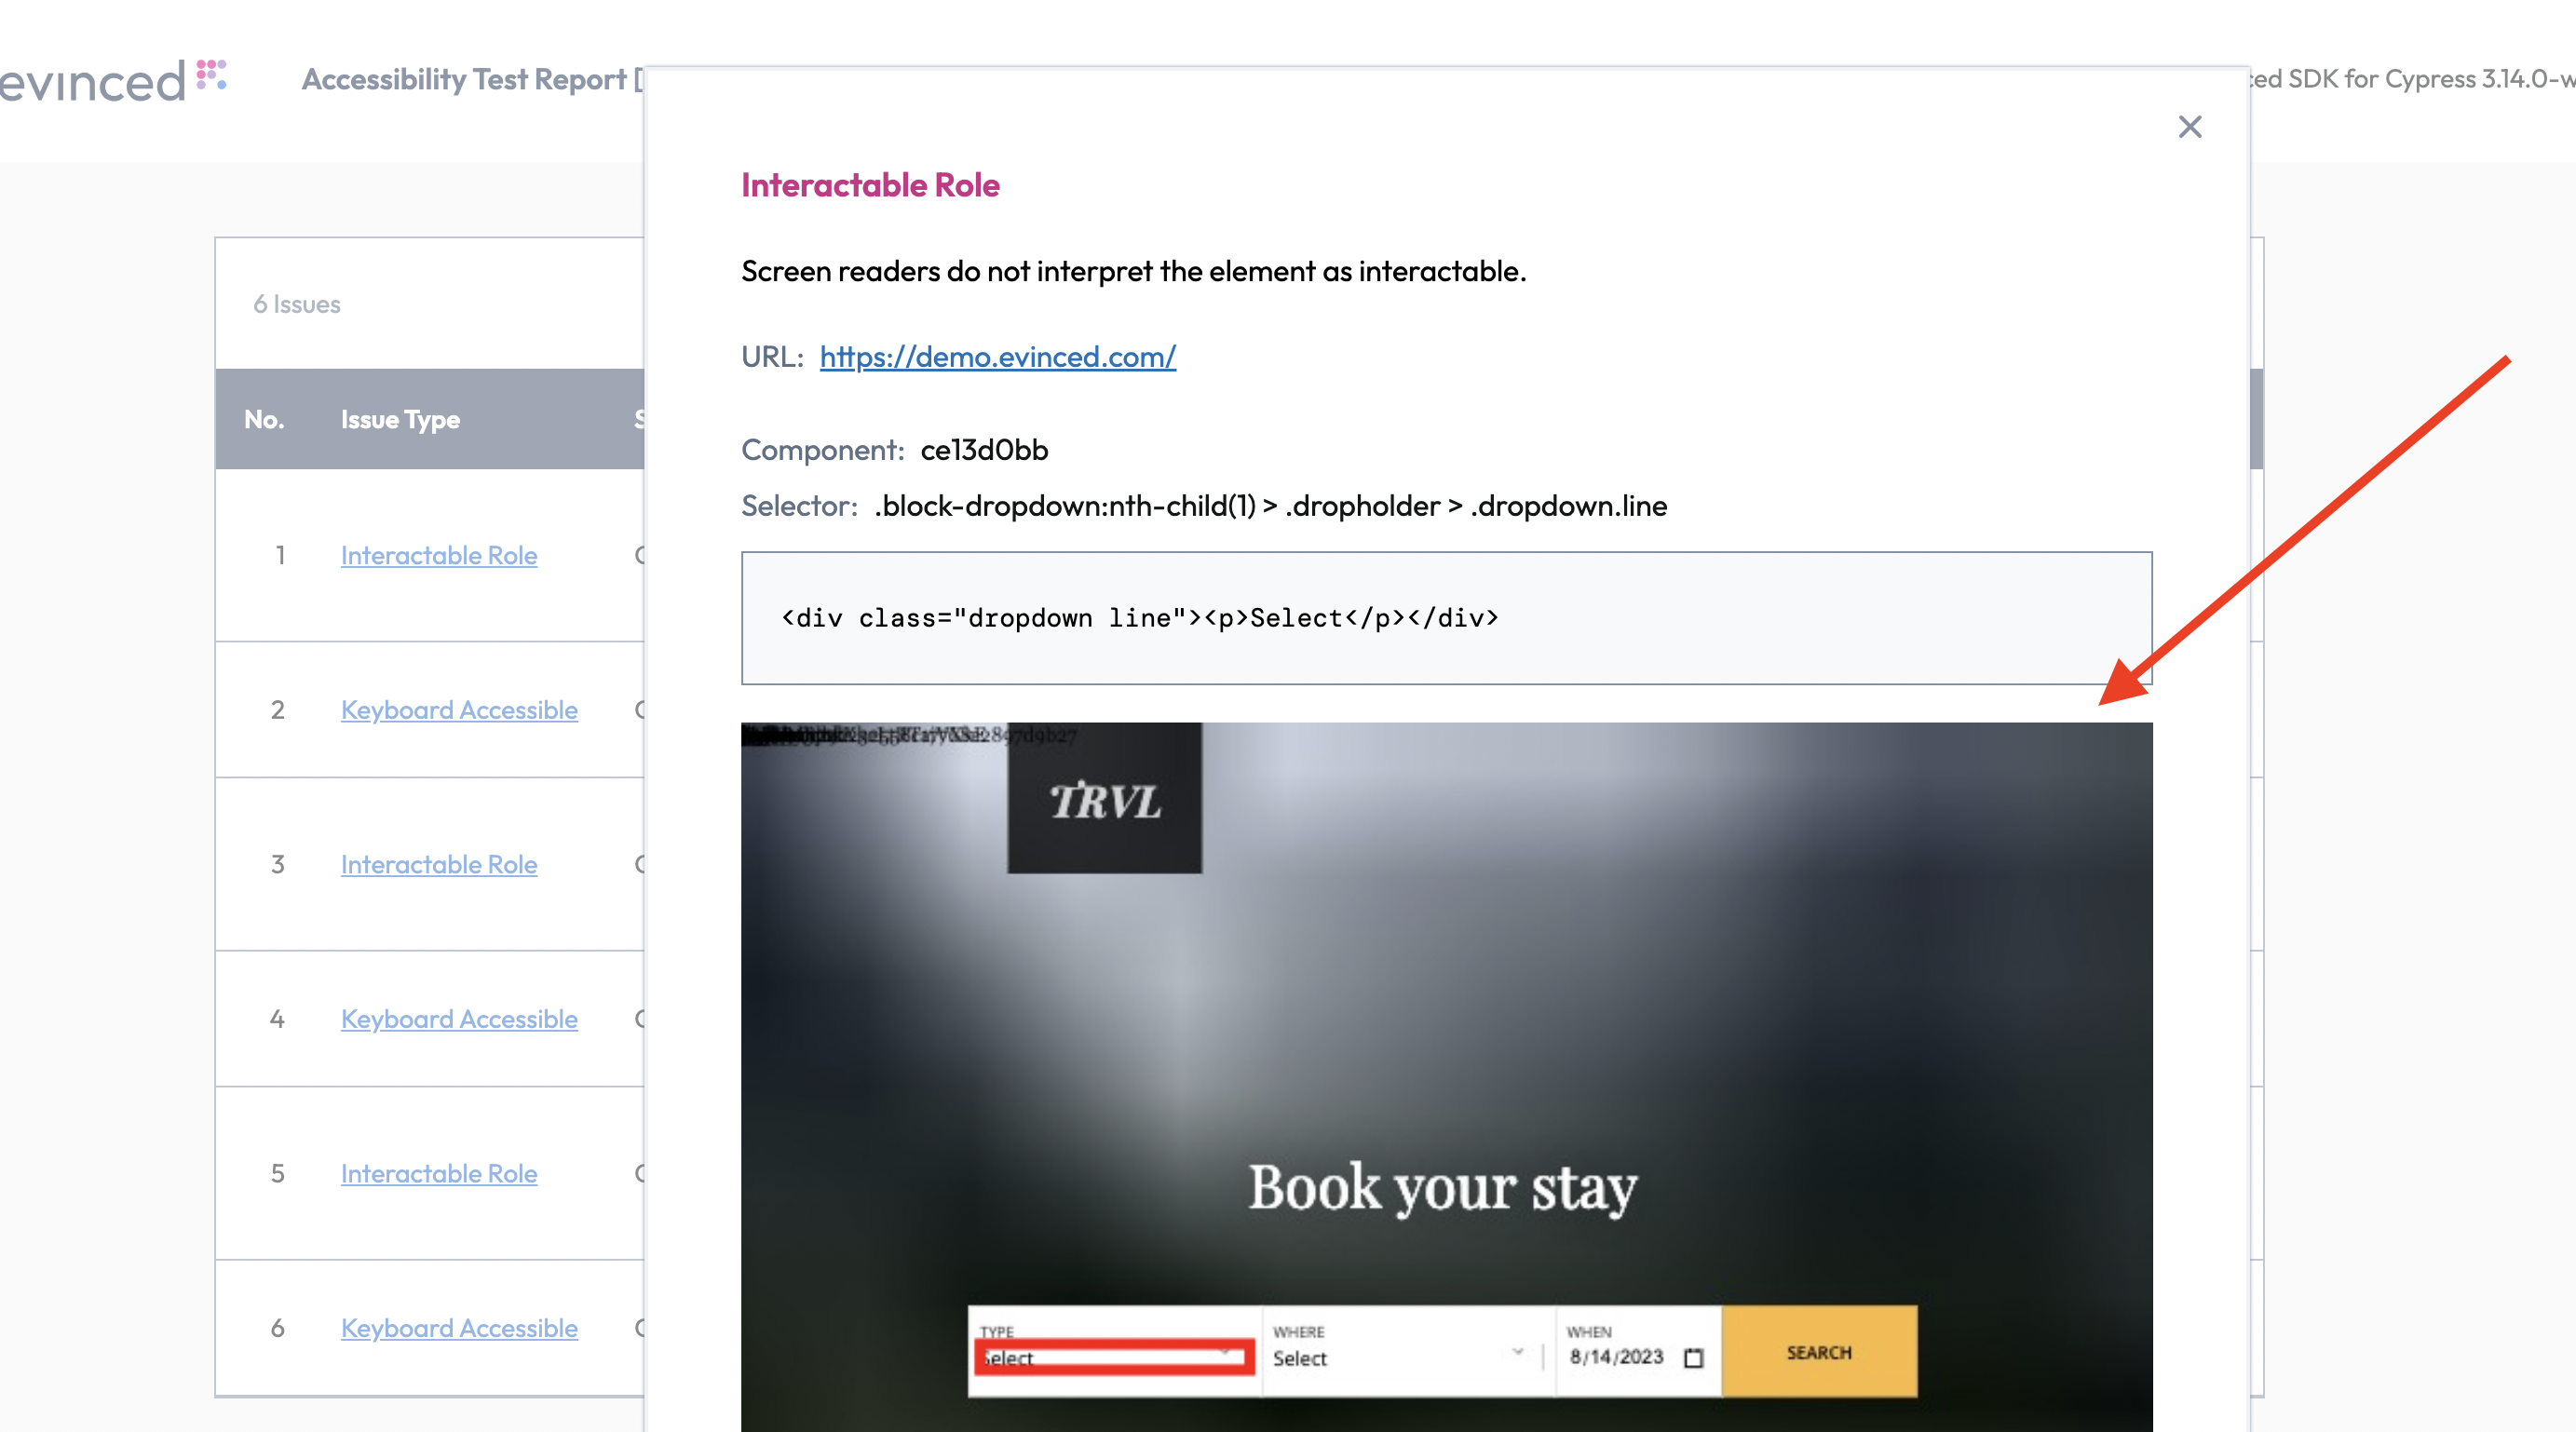
Screenshots have two independent settings: whether they're captured at all (scan.screenshots.enabled), and — once enabled — who captures them (scan.screenshots.mode).
mode wire value | Java constant | Who captures |
|---|---|---|
sdk | ScreenshotMode.SDK | The SDK itself, via Playwright's native screenshot API — full-page and throttled, batching rapid requests within a 50ms window. Default when screenshots are enabled, for EvincedOptions-only usage. |
browser | ScreenshotMode.PAGE | The accessibility engine's own in-page capture (html2canvas), viewport-limited. Default when screenshots are enabled and the legacy EvConfig object is used anywhere in configuration, to preserve pre-migration behavior. |
1scan:2 screenshots:3 enabled: true4 mode: sdk
1{2 "scan": {3 "screenshots": {4 "enabled": true,5 "mode": "sdk"6 }7 }8}
1import com.evinced.common.dto.config.ScreenshotMode;23EvincedOptions options = EvincedOptions.create()4 .scan(s -> s.screenshots(sc -> sc.enabled(true).mode(ScreenshotMode.SDK)));56EvPage evPage = EvPageFactory.create(page, options);
Deprecated — still fully supported, but new code should prefer EvincedOptions above.
EvConfig uses its own, Playwright-specific ScreenshotMode enum, which is being superseded by the shared enum used above: BROWSER corresponds to the shared PAGE, and PLAYWRIGHT corresponds to the shared SDK.
1EvConfig config = new EvConfig();2config.setScreenshotMode(ScreenshotMode.PLAYWRIGHT); // full-page, SDK-managed screenshots34EvPage evPage = EvPageFactory.create(page, config);
The older setEnableScreenshots(true/false) API also still works: setEnableScreenshots(true) is equivalent to ScreenshotMode.BROWSER, and setEnableScreenshots(false) turns screenshots off.
Toggles
Enables experimental features. Feature names and values may vary from release to release.
Example:
1analysis:2 TOGGLES:3 USE_AXE_NEEDS_REVIEW: true4 USE_AXE_BEST_PRACTICES: true
1{2 "analysis": {3 "TOGGLES": {4 "USE_AXE_NEEDS_REVIEW": true,5 "USE_AXE_BEST_PRACTICES": true6 }7 }8}
1EvincedOptions options = EvincedOptions.create()2 .analysis(a -> a3 .toggle("USE_AXE_NEEDS_REVIEW", true)4 .toggle("USE_AXE_BEST_PRACTICES", true));56EvPage evPage = EvPageFactory.create(page, options);
Deprecated — still fully supported, but new code should prefer EvincedOptions above.
1Map<String, Boolean> toggles = new HashMap<>();2toggles.put("USE_AXE_NEEDS_REVIEW", true);3toggles.put("USE_AXE_BEST_PRACTICES", true);45Global.config.setToggles(toggles);
Or one at a time:
1EvConfig config = new EvConfig();2config.addToggle("USE_AXE_NEEDS_REVIEW", true);
Skip Validations
Sets validation types to be skipped for specified URL pattern and CSS selector. Issue type IDs can be found by inspecting a JSON report as described in Web Reports.
Default: no validations skipped.
1analysis:2 SKIP_VALIDATIONS:3 - selector: 'test.1--selector'4 urlRegex: 'http://url.to.skip/path1'5 validationTypes: ['NO_DESCRIPTIVE_TEXT', 'NOT_FOCUSABLE']6 - selector: 'test.2--selector'7 urlRegex: 'http://url.to.skip/path2'8 validationTypes: ['NOT_FOCUSABLE', 'ONE_MORE_TYPE_TO_EXCLUDE', 'NO_DESCRIPTIVE_TEXT']
1{2 "analysis": {3 "SKIP_VALIDATIONS": [4 {5 "selector": "test.1--selector",6 "urlRegex": "http://url.to.skip/path1",7 "validationTypes": ["NO_DESCRIPTIVE_TEXT", "NOT_FOCUSABLE"]8 },9 {10 "selector": "test.2--selector",11 "urlRegex": "http://url.to.skip/path2",12 "validationTypes": ["NOT_FOCUSABLE", "ONE_MORE_TYPE_TO_EXCLUDE", "NO_DESCRIPTIVE_TEXT"]13 }14 ]15 }16}
1EvincedOptions options = EvincedOptions.create()2 .analysis(a -> a3 .skipValidation("test.1--selector", "http://url.to.skip/path1",4 "NO_DESCRIPTIVE_TEXT", "NOT_FOCUSABLE")5 .skipValidation("test.2--selector", "http://url.to.skip/path2",6 "NOT_FOCUSABLE", "ONE_MORE_TYPE_TO_EXCLUDE", "NO_DESCRIPTIVE_TEXT"));78EvPage evPage = EvPageFactory.create(page, options);
Deprecated — still fully supported, but new code should prefer EvincedOptions above.
1EvConfig localConfig = new EvConfig();2localConfig.skipValidation("test.1--selector", "http://url.to.skip/path1",3 "NO_DESCRIPTIVE_TEXT", "NOT_FOCUSABLE");4localConfig.skipValidation("test.2--selector", "http://url.to.skip/path2",5 "NOT_FOCUSABLE", "ONE_MORE_TYPE_TO_EXCLUDE", "NO_DESCRIPTIVE_TEXT");67evPage.evAnalyze(localConfig);
Skipping every validation type
To suppress all validation types for a selector, pass the wildcard * in place of a list of
type names.
The wildcard must be the only value. Listed alongside concrete type names it is not treated as a wildcard — the wildcard entry is ignored and only the concrete types given with it are skipped.
1analysis:2 SKIP_VALIDATIONS:3 - selector: '#parent, #parent *'4 urlRegex: 'http://url.to.skip/path1'5 validationTypes: '*'
1{2 "analysis": {3 "SKIP_VALIDATIONS": [4 {5 "selector": "#parent, #parent *",6 "urlRegex": "http://url.to.skip/path1",7 "validationTypes": "*"8 }9 ]10 }11}
1EvincedOptions options = EvincedOptions.create()2 .analysis(a -> a.skipAllValidations("#parent, #parent *", "http://url.to.skip/path1"));34EvPage evPage = EvPageFactory.create(page, options);
Deprecated — still fully supported, but new code should prefer EvincedOptions above.
1EvConfig localConfig = new EvConfig();23// Skip every validation type on #parent and everything inside it4localConfig.skipValidation("#parent, #parent *", "http://url.to.skip/path1", "*");56evPage.evAnalyze(localConfig);
A selector matches elements, not subtrees
Skip rules are evaluated against each reported element on its own, so a selector suppresses issues only on the elements it matches — not on anything nested inside them. To cover a container and its contents, list both the container and its descendants:
1#parent, #parent *
#parent alone suppresses only issues reported on #parent itself.
Include Validations
Reports only the validation types listed, and drops everything else. This is the allowlist counterpart of Skip Validations: skip removes selected types from an otherwise full report, while include restricts the report to selected types.
Use it to focus a test run on one area, such as color contrast or missing labels, without listing every other type to exclude.
Issue type IDs can be found by inspecting a JSON report as described in Web Reports.
Default: every validation type is reported.
The setting is global. Unlike Skip Validations it takes no URL pattern and no
CSS selector, and it applies to the whole scan. It is available only through the modern analysis
configuration schema shown below; there is no legacy flat spelling for it.
1analysis:2 INCLUDE_VALIDATIONS:3 - 'NO_DESCRIPTIVE_TEXT'4 - 'WRONG_SEMANTIC_ROLE'
1{2 "analysis": {3 "INCLUDE_VALIDATIONS": ["NO_DESCRIPTIVE_TEXT", "WRONG_SEMANTIC_ROLE"]4 }5}
1EvincedOptions options = EvincedOptions.create()2 .analysis(a -> a3 .raw("INCLUDE_VALIDATIONS", List.of("NO_DESCRIPTIVE_TEXT", "WRONG_SEMANTIC_ROLE")));45EvPage evPage = EvPageFactory.create(page, options);
Reporting every validation type
Leaving the setting out reports every validation type. So does the wildcard *, on its own or as
a single-item list, and so does an empty list.
A wildcard listed next to concrete type names is not a wildcard. ['NOT_FOCUSABLE', '*'] reports
only NOT_FOCUSABLE; the * entry is treated as a type name that matches nothing. This mirrors
the behavior of Skip Validations.
Combining with Skip Validations
The two settings apply together, and a result is reported only if it passes both. Include narrows the set of types; skip can still suppress individual elements within the types that remain. A type named in both is reported only on the elements its skip rule does not match.
Effect on passed validations
The setting narrows passed results as well as failed ones. Passed results appear in a report only when Passed Validations is enabled. When it is enabled, they are restricted to the same list of types.
Type names are not validated
Type names are not checked against the engine's list of issue types, so a name that is not a real type ID matches nothing.
Note: an empty list and a list of names that match nothing produce opposite results. An empty
list reports every validation type. A list such as ['NOT_FOCUSABL'] reports no issues at all. If
a run returns zero issues unexpectedly, check the type names in the list against a JSON report.
Recording Service
This setting controls how frequently event-triggered functions are executed, helping to optimize performance and responsiveness. The option does not enable or disable the event-handling service itself but determines how frequently events are processed based on the selected mode.
Available modes:
debounce- Delays execution until a set time has passed since the last event. Useful for actions triggered by continuous input, such as typing in a search box, to avoid excessive function calls.throttle- Ensures execution at fixed intervals, regardless of event frequency. Ideal for scenarios like handling window resize events or scroll tracking, where limiting execution prevents performance degradation.
Default: Functions execute as triggering events occur.
An example of how to modify settings:
1analysis:2 RECORDING_SERVICE:3 ENABLE_DEBOUNCE_NEW_SELECTORS: true4 DEBOUNCE_NEW_SELECTORS_MS: 10005 DELAY_MODE: throttle
1{2 "analysis": {3 "RECORDING_SERVICE": {4 "ENABLE_DEBOUNCE_NEW_SELECTORS": true,5 "DEBOUNCE_NEW_SELECTORS_MS": 1000,6 "DELAY_MODE": "throttle"7 }8 }9}
1EvincedOptions options = EvincedOptions.create()2 .analysis(a -> a3 .raw("RECORDING_SERVICE.ENABLE_DEBOUNCE_NEW_SELECTORS", true)4 .raw("RECORDING_SERVICE.DEBOUNCE_NEW_SELECTORS_MS", 1000)5 .raw("RECORDING_SERVICE.DELAY_MODE", "throttle"));67EvPage evPage = EvPageFactory.create(page, options);
Deprecated — still fully supported, but new code should prefer EvincedOptions above.
1RecordingServiceConfiguration recordingConfiguration = new RecordingServiceConfiguration();2recordingConfiguration.setEnableDebounceNewSelectors(true);3recordingConfiguration.setDebounceNewSelectorsMs(1000);4recordingConfiguration.setDelayMode("throttle");56EvConfig evincedConfiguration = new EvConfig();7evincedConfiguration.setRecordingConfiguration(recordingConfiguration);89EvPage evPage = EvPageFactory.create(page, evincedConfiguration);
Knowledge-Base Link Overrides
Sets customized knowledge-base links in the reports. The links are displayed in the reports “Issue Type” column, as shown in the following screenshot:
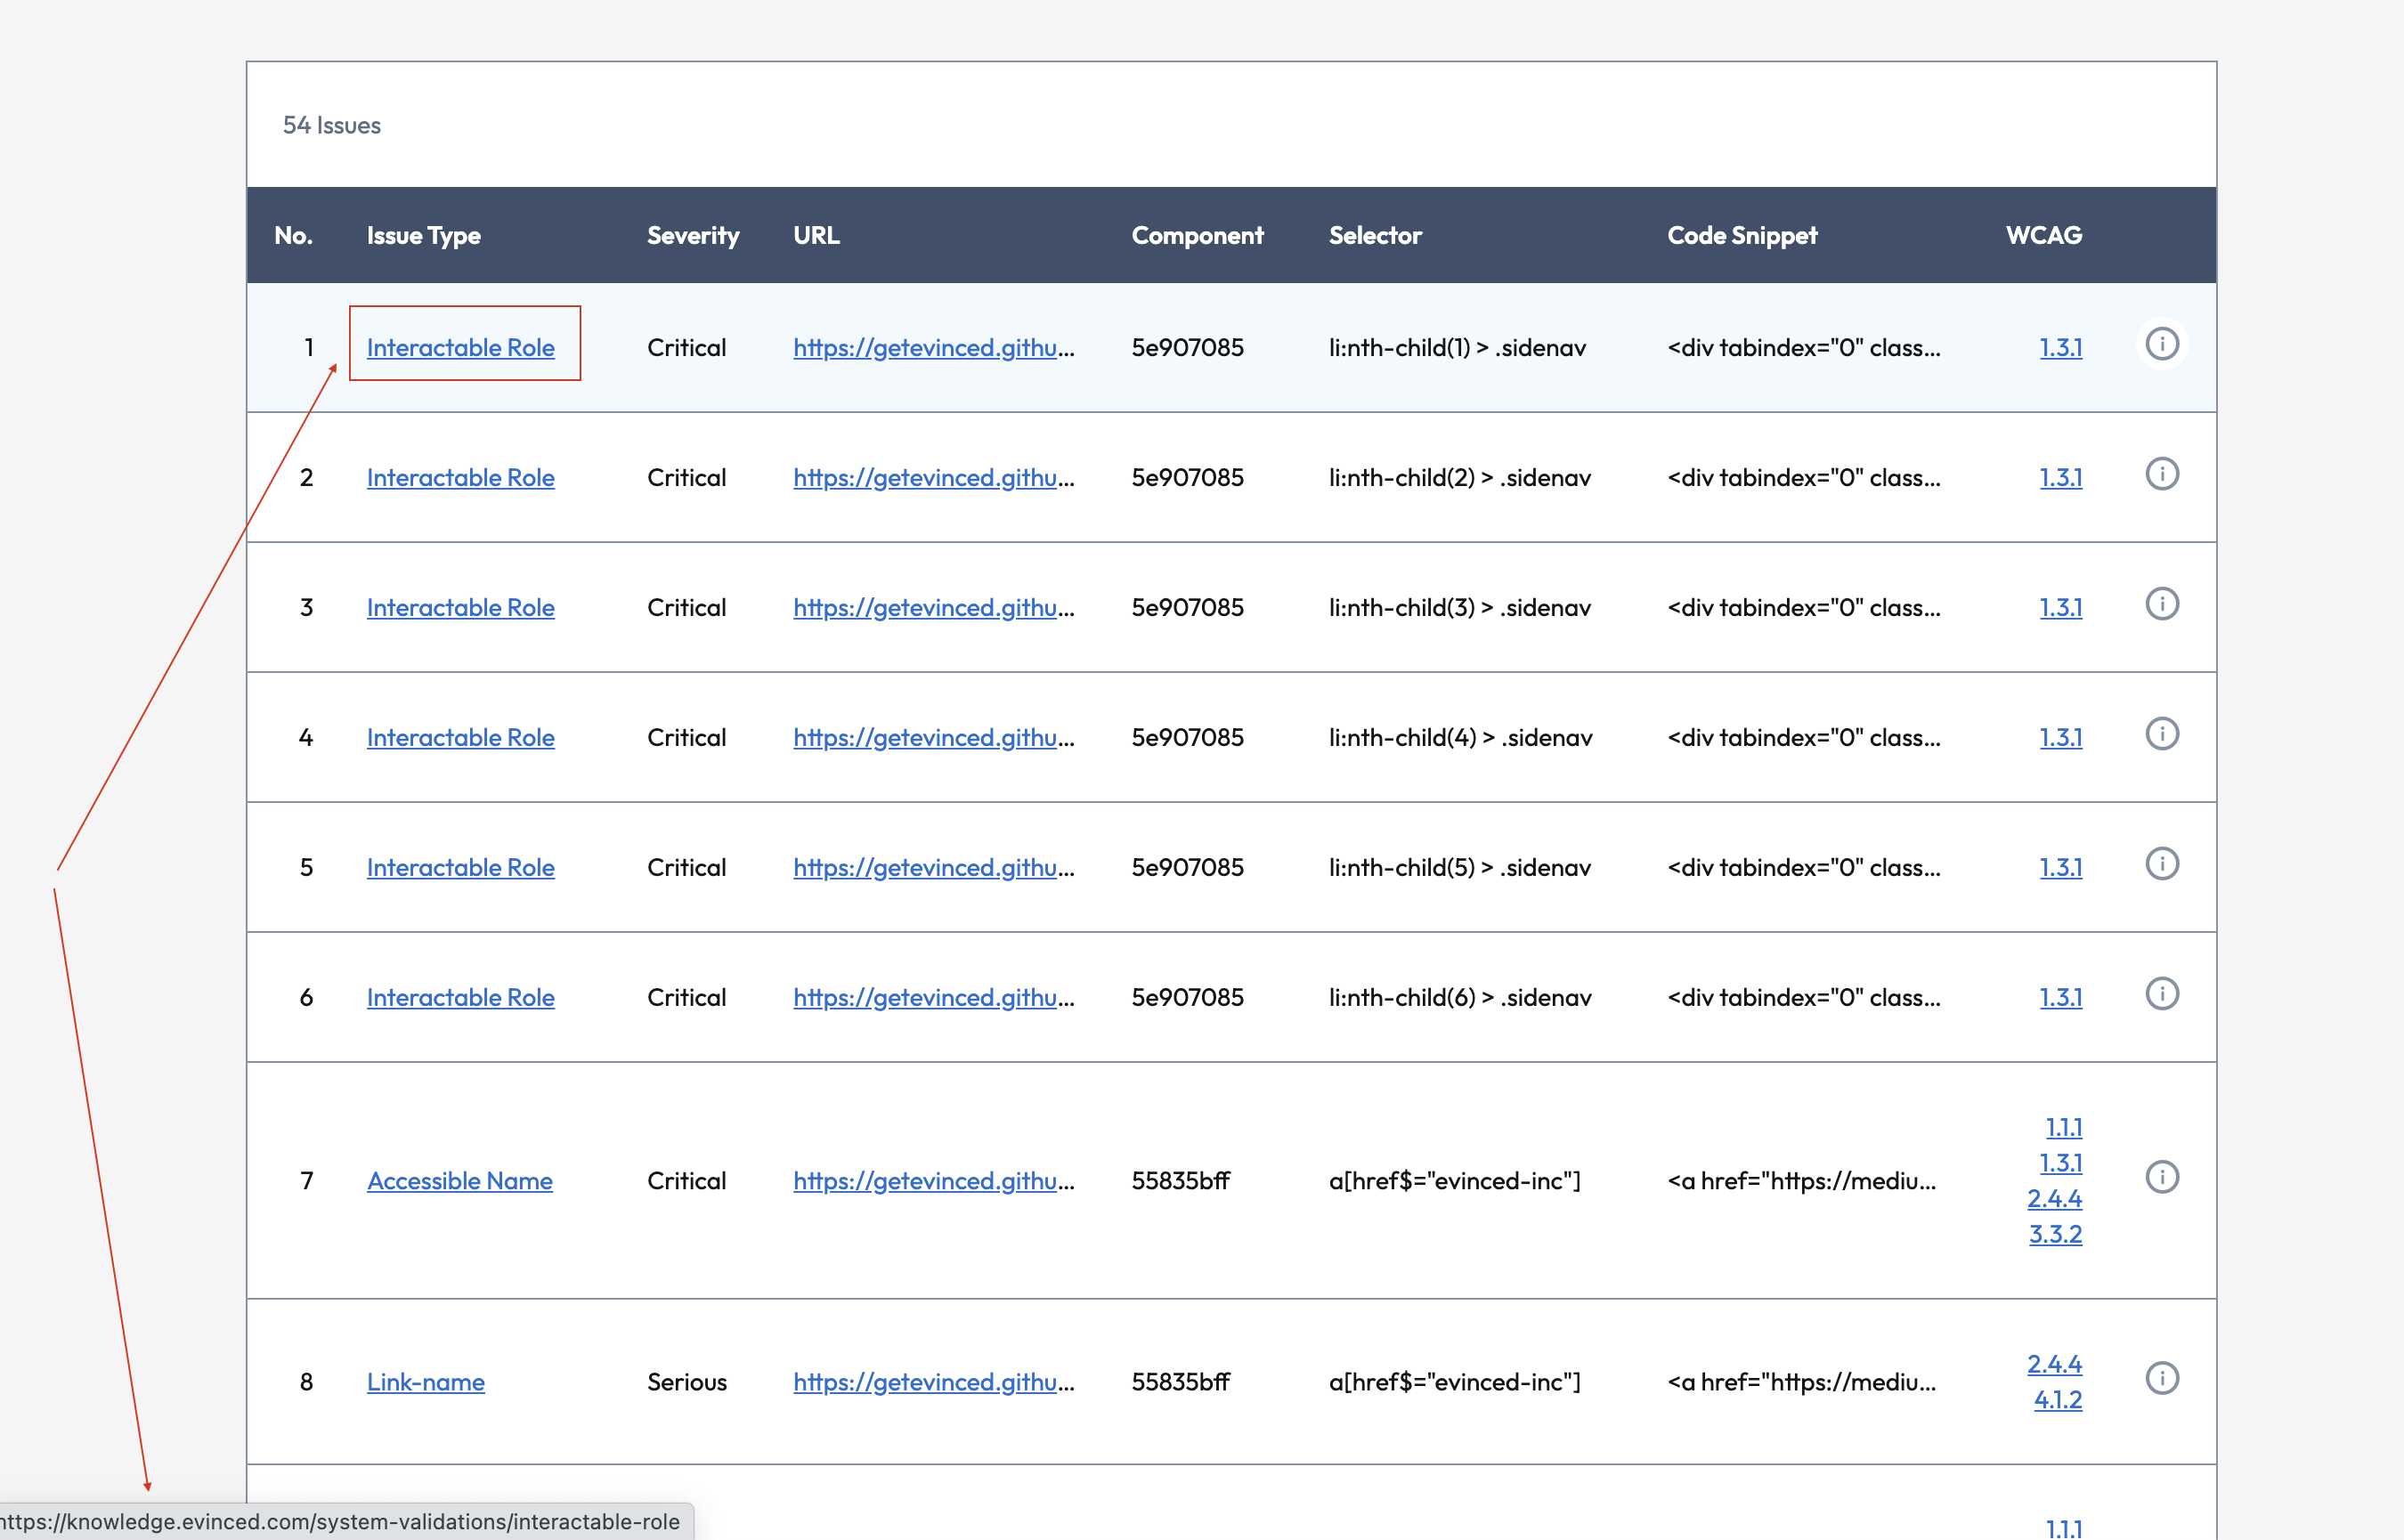
The knowledge base link can be overridden for every issue type ID.
Issue type IDs can be found by inspecting a JSON report as described in Web Reports.
For example, the issue with name Interactable Role has ID WRONG_SEMANTIC_ROLE.
Knowledge-base links can be overridden per Evinced issue type ID, and — new in this release — per axe-core rule ID, so overrides for aXe-sourced issues no longer need to go through the Evinced issue type.
1analysis:2 ISSUE_CONTENT_PER_TYPE:3 WRONG_SEMANTIC_ROLE:4 knowledgeBaseLink: 'https://kb.example.com/wrong-semantic-role'5 AXE_ISSUE_CONTENT_PER_TYPE:6 color-contrast:7 knowledgeBaseLink: 'https://kb.example.com/color-contrast'
1{2 "analysis": {3 "ISSUE_CONTENT_PER_TYPE": {4 "WRONG_SEMANTIC_ROLE": {5 "knowledgeBaseLink": "https://kb.example.com/wrong-semantic-role"6 }7 },8 "AXE_ISSUE_CONTENT_PER_TYPE": {9 "color-contrast": {10 "knowledgeBaseLink": "https://kb.example.com/color-contrast"11 }12 }13 }14}
1EvincedOptions options = EvincedOptions.create()2 .analysis(a -> a3 .knowledgeBaseLink("WRONG_SEMANTIC_ROLE", "https://kb.example.com/wrong-semantic-role")4 .axeKnowledgeBaseLink("color-contrast", "https://kb.example.com/color-contrast"));56EvPage evPage = EvPageFactory.create(page, options);
knowledgeBaseLink(issueType, url) overrides the link for an Evinced-engine issue type ID, the same IDs described in Knowledge-Base Link Overrides above. axeKnowledgeBaseLink(ruleId, url) overrides the link for an axe-core rule ID directly (for example color-contrast), which previously had no dedicated override in Playwright Java SDK.
Shadow DOM Support
Shadow DOM is now supported by default. No additional configuration is needed.
IFrames Support
When true, accessibility analysis includes iframe that exist inside the page.
Default: true.
1scan:2 iframes: false
1{2 "scan": {3 "iframes": false4 }5}
1EvincedOptions options = EvincedOptions.create().scan(s -> s.iframes(false));23EvPage evPage = EvPageFactory.create(page, options);
Deprecated — still fully supported, but new code should prefer EvincedOptions above.
1EvConfig configuration = new EvConfig();2configuration.setIFramesIncluded(false);34EvPage evPage = EvPageFactory.create(page, configuration);
Include Hidden IFrames Domain
Configures which hidden iframe domains are included in accessibility analysis. By default, hidden iframes are excluded for performance and security reasons.
This setting allows you to specify a list of domains to analyze even when the iframe is hidden.
1scan:2 iframes: true3 iframeDomains:4 - example.com5 - test.com
1{2 "scan": {3 "iframes": true,4 "iframeDomains": ["example.com", "test.com"]5 }6}
1EvincedOptions options = EvincedOptions.create()2 .scan(s -> s3 .iframes(true)4 .iframeDomains(Arrays.asList("example.com", "test.com")));56EvPage evPage = EvPageFactory.create(page, options);
Deprecated — still fully supported, but new code should prefer EvincedOptions above.
1EvConfig config = new EvConfig();2config.setIFramesIncluded(true);3config.setIncludeHiddenIframeDomains(Arrays.asList("example.com", "test.com"));45EvPage evPage = EvPageFactory.create(page, config);
Passed Validations
By default, the Evinced SDK only reports accessibility issues that have failed validation. However, you can also configure the SDK to include passed validations in your reports. Passed validations represent accessibility checks that were successfully completed without any issues found.
Why include passed validations?
Including passed validations in your reports provides several benefits:
- Comprehensive Coverage: Get a complete picture of all accessibility checks performed, not just the failures
- Compliance Documentation: Demonstrate which accessibility standards your application successfully meets
- Trend Analysis: Track improvements over time by monitoring both failed and passed validation counts
- Quality Assurance: Verify that accessibility checks are running as expected across your entire application
- Regulatory Reporting: Provide evidence of accessibility testing coverage for compliance audits
Report Structure
When passed validations are enabled, your reports will include both:
failedValidations: Array of accessibility issues that need to be fixedpassedValidations: Array of accessibility checks that passed successfully
Default: false (passed validations are not included)
Enabling passed validations has a performance impact, since the report now records every check that passed in addition to the ones that failed.
1scan:2 withPasses: true
1{2 "scan": {3 "withPasses": true4 }5}
1EvincedOptions options = EvincedOptions.create().scan(s -> s.withPasses(true));23EvPage evPage = EvPageFactory.create(page, options);4Report report = evPage.evAnalyze();56List<Issue> failedValidations = report.getFailedValidations();7List<Issue> passedValidations = report.getPassedValidations();
Deprecated — still fully supported, but new code should prefer EvincedOptions above.
1EvConfig config = new EvConfig();2config.setIncludePassedValidations(true);34EvPage evPage = EvPageFactory.create(page, config);5Report report = evPage.evAnalyze();67List<Issue> failedValidations = report.getFailedValidations();8List<Issue> passedValidations = report.getPassedValidations();
Proxy
Configures proxy server access settings. Needed to enable outbound communication to the Evinced Platform through a proxy server.
1...2BrowserType.LaunchOptions launchOptions = new BrowserType.LaunchOptions();3launchOptions.setProxy(new Proxy("ip:port").setUsername("user").setPassword("password"));4Browser browser = browserType.launch(launchOptions);5EvPage evPage = EvPageFactory.create(browser.newPage());6//if you want to use online authentication7EvincedSDK.setCredentials("serviceId", "secret");8...
Network Idle Detection
The networkIdle configuration enables the SDK to wait for all network requests to complete before
running accessibility analysis. This is particularly useful for modern web applications that load
content dynamically after the initial page load.
Why use Network Idle Detection?
When testing modern web applications, accessibility analysis may run before all content has loaded, resulting in:
- Incomplete results: Dynamic content not yet rendered won't be analyzed
- False negatives: Accessibility issues in delayed content won't be detected
- Inconsistent results: Analysis timing may vary between test runs
Network idle detection solves this by ensuring all network activity has settled before analysis begins.
Configuration Options:
| Option | Type | Default | Description |
|---|---|---|---|
enabled | boolean | false | Enables or disables network idle detection |
idleTimeout | number | 300 | Time in milliseconds to wait after the last network request completes before considering the network idle |
maxWaitTime | number | 7500 | Maximum time in milliseconds to wait for network idle. If exceeded, analysis proceeds with a warning |
Network idle detection can be configured globally during SDK initialization or per-command for granular control.
1network:2 idle:3 enabled: true4 maxWait: 7500
1{2 "network": {3 "idle": {4 "enabled": true,5 "maxWait": 75006 }7 }8}
1EvincedOptions options = EvincedOptions.create()2 .network(n -> n.idle(i -> i3 .enabled(true)4 .maxWait(7500)));56EvPage evPage = EvPageFactory.create(page, options);
Per-call, EvincedOptions also works with evStart() and evAnalyze():
1evPage.evStart(EvincedOptions.create().network(n -> n.idle(i -> i.enabled(true).maxWait(10000))));
Deprecated — still fully supported, but new code should prefer EvincedOptions above.
1NetworkIdleConfiguration idleConfig = new NetworkIdleConfiguration()2 .setEnabled(true)3 .setMaxWait(7500);45EvConfig configuration = new EvConfig();6configuration.setNetworkIdleConfiguration(idleConfig);78EvPage evPage = EvPageFactory.create(page, configuration);
Implementation note: on Playwright Java SDK, network-idle detection is built on Playwright's own network-idle wait. The timeout setting has no effect here — Playwright's internal idle window is fixed — only enabled and maxWait change behavior.
How It Works:
The SDK monitors all network requests and waits for the network to become idle before proceeding with analysis:
- Network is considered "idle" when no requests are active for at least
idleTimeoutmilliseconds - Analysis waits for idle state or
maxWaitTime, whichever comes first - Configuration from
evStart()automatically applies to subsequent page navigations andevStop()
Best Practices:
- Start with defaults: Enable with default settings and adjust only if needed
- Increase timeout for slow APIs: If your backend is slow, increase
maxWaitTime - Use per-command for specific pages: Enable only for pages with dynamic content
Important Notes:
- Disabled by default: The feature is opt-in to maintain backward compatibility
- No overhead when disabled: When not enabled, there is zero performance impact
- Automatic timeout extension: Command timeouts are automatically adjusted based on
maxWaitTime - Warning on timeout: If
maxWaitTimeis exceeded, the SDK logs a warning and proceeds with analysis
Custom SSL Trust Store
Some enterprise environments route outbound HTTPS traffic through a corporate
proxy that performs TLS inspection. The proxy re-signs every connection with
an internal Certificate Authority (CA) that the JVM does not recognise out of
the box, and SDK network calls fail with PKIX path building failed: unable
to find valid certification path to requested target.
The SDK funnels every outbound HTTPS call through a single network layer, so this affects all SDK traffic — license validation, anonymized telemetry, component-recognition backends, and uploading reports to the Evinced Platform. Depending on which destinations your proxy intercepts you may see some or all of these failures in the SDK log.
The fix is a configuration option on the SDK: you build an SSLContext that
trusts your internal root CA, attach it to the SDK's configuration object,
and pass that configuration to the SDK entry point. The SDK takes care of
the rest. The JVM-wide truststore is not modified, and the rest of your
application's HTTPS traffic is untouched. You never need to call internal
SDK APIs directly.
Default: no value — the SDK falls back to the JVM default truststore and
honours -Djavax.net.ssl.trustStore=... when set.
Trust an internal Certificate Authority from a PEM/DER file
Most environments only need to trust one extra root CA — the one used by the
corporate proxy. The bundled SslContextFactory builds an SSLContext that
combines the JVM defaults with your additional certificate(s).
An SSLContext instance can't be expressed in an evConfig file or an
environment variable, so this setting is programmatic-only, either through
EvincedOptions or the deprecated configuration object:
1import com.evinced.EvPage;2import com.evinced.EvPageFactory;3import com.evinced.common.network.SslContextFactory;4import com.evinced.dto.configuration.EvincedOptions;56import com.microsoft.playwright.Browser;7import com.microsoft.playwright.Playwright;89import javax.net.ssl.SSLContext;10import java.io.InputStream;1112EvincedOptions options;13try (InputStream rootCa = MyTest.class.getResourceAsStream("/corp-root.pem")) {14 SSLContext sslContext = SslContextFactory.composedWithDefaults(rootCa);15 options = EvincedOptions.create().network(n -> n.sslContext(sslContext));16}1718// The SDK uses the supplied SSLContext for every outbound HTTPS call —19// license validation, telemetry, component-recognition backends, and20// uploads to the Evinced Platform.21Playwright playwright = Playwright.create();22Browser browser = playwright.chromium().launch();23EvPage page = EvPageFactory.create(browser.newPage(), options);
Deprecated — still fully supported, but new code should prefer EvincedOptions above.
1import com.evinced.EvPage;2import com.evinced.EvPageFactory;3import com.evinced.common.network.NetworkManagerConfig;4import com.evinced.common.network.SslContextFactory;5import com.evinced.impl.config.EvConfig;67import com.microsoft.playwright.Browser;8import com.microsoft.playwright.Playwright;910import javax.net.ssl.SSLContext;11import java.io.InputStream;1213EvConfig config = new EvConfig();14try (InputStream rootCa = MyTest.class.getResourceAsStream("/corp-root.pem")) {15 SSLContext sslContext = SslContextFactory.composedWithDefaults(rootCa);16 config.setNetworkConfiguration(new NetworkManagerConfig().withSslContext(sslContext));17}1819Playwright playwright = Playwright.create();20Browser browser = playwright.chromium().launch();21EvPage page = EvPageFactory.create(browser.newPage(), config);
Both PEM (-----BEGIN CERTIFICATE----- / -----END CERTIFICATE-----) and DER
(binary) inputs are accepted. You can pass several streams in one call if your
proxy chains multiple internal CAs.
Re-use an SSLContext you already have
If your application already builds an SSLContext (for example via Spring's
SslBundles or your own keystore loader), pass it in directly — there is no
requirement to use SslContextFactory:
1SSLContext myContext = ...; // already configured elsewhere23EvincedOptions options = EvincedOptions.create().network(n -> n.sslContext(myContext));45EvPage page = EvPageFactory.create(browser.newPage(), options);
Verify it worked
If the trust chain is still broken, the SDK short-circuits each affected
network call instead of retrying three times. Look for this WARN line in
the SDK log — it can appear against any *.evinced.com host the SDK
contacts:
1[NetworkManager] TLS trust failure for https://host.evinced.com/... —2PKIX path building failed: ...
If you see it, the certificate you supplied does not match the chain the proxy presents — re-export the proxy's root CA from the browser and try again. If SDK network calls succeed, no TLS-related warnings appear at all.
Global Switch
When false, disables Evinced functionality. Enabled by default, use this setting to disable
Evinced accessibility analysis when not needed during test development or when running CI jobs
where accessibility testing is not intended.
Default: true.
When switched off:
evStart()andevSaveFile()will be bypassed.evStop()andevAnalyze()will return an empty report.
Switching Evinced Functionality Off in Configuration
1switchOn: false
1{2 "switchOn": false3}
1EvincedOptions options = EvincedOptions.create().switchOn(false);23EvPage evPage = EvPageFactory.create(page, options);
Deprecated — still fully supported, but new code should prefer EvincedOptions above.
The static EvincedSDK.switchOn(...) call always takes precedence over every other layer, including the evConfig file and EvincedOptions:
1EvincedSDK.switchOn(false);
Important! Global Switch environment variable overrides the global configuration option.
Switching Evinced Functionality Off in Environment
1export EV_SWITCH_ON=false
Baseline Comparison
Pilot Feature
Baseline comparison is currently in a pilot phase. The API is stable and ready to use; some details may be refined before general availability.
Baseline comparison lets you detect accessibility regressions between test runs. You save a scan result as a JSON baseline, then compare every subsequent run against that file. Each issue in the new scan is classified as:
new— appeared since the baseline was saved (a regression you need to address)persistent— present in both the baseline and the current scanresolved— present in the baseline but no longer detected (an improvement)
This approach lets CI gates act on changes rather than the raw issue count, so you can catch regressions without being blocked by pre-existing known issues.
Workflow Overview
Baseline comparison runs in two phases:
- Bootstrap — run your tests, save the scan results as a JSON baseline file.
- Compare — run the same tests again and call
evCompare()to classify every issue against the saved baseline.
Step 1 — Save a Baseline
To create your baseline:
- Run your test to collect the current accessibility issues.
- Save the results as a JSON file using
evSaveFile(). - Commit the file to a dedicated folder in your repository (for example
./baseline/) so that every CI run compares against the same fixed reference point.
1@Test2public void saveAccessibilityBaseline() {3 Playwright playwright = Playwright.create();4 Browser browser = playwright.chromium().launch();5 EvPage page = EvPageFactory.create(browser.newPage());67 try {8 page.navigate("https://your-app.com/");9 Report report = page.evAnalyze();1011 // Save as JSON to a committed folder — this file is your baseline12 EvincedSDK.evSaveFile("./baseline/home-page", report, FileFormat.JSON);13 } finally {14 playwright.close();15 }16}
Note: every JSON report written by
evSaveFile()automatically includes a nestedmetadataobject with the producing SDK's name and version — no extra setup required:1{2 "testId": "...",3 "metadata": {4 "sdkName": "java-playwright-sdk",5 "sdkVersion": "2.32.2"6 },7 "issues": [ ... ]8}
evCompare()reads this envelope to detect when a baseline was produced by a different SDK or SDK version and surfaces a warning inresult.getWarnings()(see Result Shape). Baseline files saved before this field existed are still accepted — no warning is raised in that case.
Step 2 — Compare Against the Baseline
Call evCompare() with a fresh scan result and the path to the saved baseline file. Each issue in the new scan is classified as new, persistent, or resolved.
Single-page scan (evAnalyze):
1@Test2public void detectNewAccessibilityRegressions() {3 Playwright playwright = Playwright.create();4 Browser browser = playwright.chromium().launch();5 EvPage page = EvPageFactory.create(browser.newPage());67 try {8 page.navigate("https://your-app.com/");9 Report report = page.evAnalyze();1011 BaselineCompareResult comparison = page.evCompare(report, "./baseline/home-page.json");1213 // Fail the test only when new issues have been introduced14 assertEquals("New accessibility regressions detected",15 0, comparison.getSummary().getNewCount());16 } finally {17 playwright.close();18 }19}
Multi-page flow (evStop):
1@Test2public void regressionCheckAcrossAUserFlow() {3 Playwright playwright = Playwright.create();4 Browser browser = playwright.chromium().launch();5 EvPage page = EvPageFactory.create(browser.newPage());67 try {8 page.evStart();910 page.navigate("https://your-app.com/");11 page.click("text=Add to cart");12 page.click("text=Checkout");1314 Report report = page.evStop();1516 EvincedOptions options = EvincedOptions.create().baseline(b -> b.failOnNew(true));17 BaselineCompareResult comparison = page.evCompare(report, "./baseline/checkout-flow.json", options);1819 // Skipped runs (SDK disabled or baseline.enabled=false) are not a pass — see CI Gate below20 if (!comparison.isSkipped()) {21 assertFalse(comparison.getFailureReason(), comparison.isFailed());22 }23 } finally {24 playwright.close();25 }26}
Issue Classification
Each entry in comparison.getIssues() is an Issue carrying a baselineStatus field (new, persistent, or resolved). The field is null on issues outside a baseline comparison result, and omitted from ordinary JSON reports.
| Status | Meaning |
|---|---|
new | Found in the current scan, not in the baseline — a regression |
persistent | Present in both the baseline and the current scan |
resolved | Present in the baseline, no longer detected — an improvement |
Resolved issues are returned separately from comparison.getResolvedIssues() and are only populated when includeResolved: true is set.
CI Gate with failOnNew
Use failOnNew: true to record a failure in the result when new issues are found. Gate your CI pipeline on the result, checking isSkipped() first so that a disabled SDK is never mistaken for a clean pass.
1EvincedOptions options = EvincedOptions.create().baseline(b -> b.failOnNew(true));2BaselineCompareResult comparison = page.evCompare(report, "./baseline/home-page.json", options);34if (comparison.isSkipped()) {5 // SDK kill-switch is off, or baseline.enabled=false — comparison did not run, so this is not a pass6 log.warn("Evinced SDK disabled or baseline comparison disabled — comparison skipped");7} else {8 // result.isFailed() is true when failOnNew is set and new issues were detected9 assertFalse(comparison.getFailureReason(), comparison.isFailed());10}
Result Shape
evCompare() returns a BaselineCompareResult. It never throws for baseline-domain failures (missing file, invalid JSON, unrecognised schema) — those are reported in result.getErrors(). Programmer errors (a null report/options, or a null/blank baseline path) still throw IllegalArgumentException, unless the kill-switch or baseline.enabled=false short-circuit applies first.
1public final class BaselineCompareResult {2 // All new and persistent issues, each with its baselineStatus field populated3 List<Issue> getIssues();45 // Resolved issues — only populated when includeResolved: true6 List<Issue> getResolvedIssues();78 BaselineSummary getSummary();9 // summary.getNewCount() / getPersistentCount() / getResolvedCount()10 // summary.getBaselineIssueCount() / getNewScanIssueCount()11 // summary.getBaselineProducer() — sdkName/sdkVersion that produced the baseline file12 // (from its metadata envelope); empty strings when the baseline predates metadata support1314 // true only when a comparison ran and (failOnNew is not set, or no new issues were detected)15 boolean isPassed();16 // true when failOnNew: true and at least one new issue was detected, or on a read/parse error17 boolean isFailed();18 // true when no comparison ran because the SDK kill-switch is off, or baseline.enabled=false.19 // isPassed() and isFailed() are then both false, so a CI gate must check isSkipped() first.20 boolean isSkipped();21 // Human-readable explanation when isFailed() is true22 String getFailureReason();2324 // Advisory messages — for example when the baseline's metadata (see Step 1)25 // shows it was produced by a different SDK or SDK version, or when the comparison was skipped26 List<String> getWarnings();2728 // Populated when comparison cannot proceed (file missing, invalid JSON, etc.)29 // When present and non-empty, isFailed() is true and all summary counts are 030 List<BaselineCompareError> getErrors();31}
Error handling example:
1BaselineCompareResult comparison = page.evCompare(report, "./baseline/home-page.json");23if (comparison.getErrors() != null && !comparison.getErrors().isEmpty()) {4 log.error("Baseline comparison failed: {}", comparison.getErrors());5 // Consider bootstrapping a new baseline here6}78assertEquals(0, comparison.getSummary().getNewCount());
Options
| Option | Type | Default | Description |
|---|---|---|---|
enabled | boolean | true | Master switch. When false, evCompare() returns a skipped result without reading the baseline file |
failOnNew | boolean | false | Set isFailed() to true if any new issues are found |
includeResolved | boolean | false | Populate getResolvedIssues() with issues that are no longer detected |
Configuration File
Default options can be set in your evConfig.yaml (or evConfig.json) under the baseline key, or overridden per call via EvincedOptions.create().baseline(...) passed directly to evCompare(). Only the baseline.* section of that EvincedOptions instance is honored by evCompare() — any other section set on it (network, telemetry, switchOn, ...) is ignored.
1baseline:2 failOnNew: true3 includeResolved: false
1{2 "baseline": {3 "failOnNew": true,4 "includeResolved": false5 }6}
1EvincedOptions options = EvincedOptions.create().baseline(b -> b2 .failOnNew(true)3 .includeResolved(false));45BaselineCompareResult comparison = page.evCompare(report, "./baseline/home-page.json", options);
Per-call options passed directly to evCompare() always take precedence over the configuration file.
Uploading Reports to Evinced Platform
Introduction
Evinced Platform allows you to seamlessly collect, organize, visualize and monitor Evinced accessibility reports in one place. In this section, we will guide you through the key functionalities of the upload methods of the accessibility reports from the Evinced SDK to the Evinced Platform, which was introduced in version 2.3.2. This upload method is fully compatible with the previous versions of the Evinced SDK API, and is disabled by default.
Enable Upload Report to Platform
To enable the uploading functionality of accessibility reports to
the Evinced Platform you will need to set the enableUploadToPlatform method to "true":
1EvincedSDK.enableUploadToPlatform(true);
Note: Using PlatformUpload.ENABLED in method parameters (e.g., evPage.evAnalyze(PlatformUpload.ENABLED)) is not sufficient on its own. You must first enable the feature by calling EvincedSDK.enableUploadToPlatform(true). The method parameter only controls whether a specific report uploads when the feature is already enabled.
Automatic Report Upload
Once the enableUploadToPlatform method is set to true and setUploadToPlatformDefault is true (which is the default),
all generated reports will be automatically uploaded to the Platform immediately upon calling the evStop() or evAnalyze() command.
How it works:
- When
enableUploadToPlatform: trueandsetUploadToPlatformDefault: true (default), upload happens automatically - No additional code is needed - just call
evAnalyze()orevStop()and the report uploads - Upload occurs synchronously as part of the command execution
If you want to change this behavior and control uploads manually, set the setUploadToPlatformDefault feature flag to false.
1EvincedSDK.setUploadToPlatformDefault(false);
If the setUploadToPlatformDefault is disabled, you can still upload
selected reports to the platform.
For that, use the following parameter in the evStop() command:
1...2evPage.evStop(PlatformUpload.ENABLED);
Or, in the evAnalyze() command:
1evPage.evAnalyze(PlatformUpload.ENABLED);
Uploading Reports With No Issues
When report upload is enabled, a run with no accessibility issues is uploaded to the Evinced Platform. Set platform.upload.emptyResults to false to skip those runs. A run that found issues is still uploaded.
Default: true.
This behavior applies starting with version 2.36.1. Earlier versions skipped runs that found no issues.
1platform:2 upload:3 enabled: true4 emptyResults: false
1{2 "platform": {3 "upload": {4 "enabled": true,5 "emptyResults": false6 }7 }8}
1EvincedOptions options = EvincedOptions.create()2 .platformUpload(u -> u.enabled(true).emptyResults(false));34EvPage evPage = EvPageFactory.create(page, options);
Test Names
To facilitate report management and be able to distinguish between different reports on the Platform, use the setTestInfo method to inform the test name and test class.
It’s recommended to do that in the “beforeEach” hook.
TestNG:
1@BeforeEach2public void platformUploadingTestSetup(TestInfo testInfo){3 evPage.setTestInfo(testInfo.getDisplayName(), this.getClass().getCanonicalName());4}
Labels and Custom Fields
You can attach labels and custom fields to your report to enhance readability and organization in the platform. Labels help you filter, search, and organize reports on the Evinced Platform.
There are two types of labels:
Built-in Labels: Pre-defined labels that can be set using the addLabel method. Available built-in labels include:
testName- The name of the testtestFile- The file path of the testenvironment- The environment where the test runs (e.g., "Development", "Staging", "Production")flow- The test flow identifiergitBranch- The Git branch namegitUserName- The Git user namegitVersion- The Git commit version
Custom Labels: Flexible key-value pairs that can be set using the customLabel method. You can use any custom key-value pairs, including:
- Single values:
{ productVersion: '1.0.0' } - Multiple values (arrays):
{ browsers: ['Chrome', 'Firefox'] } - Special label
unitId: Use this to tag tests for relevant units within your organization
See the following code examples of how to set up labels:
1EvincedSDK.getTestRunInfo()2 .addLabel(Parameter.GIT_USER_NAME, "git")3 .addLabel(Parameter.GIT_BRANCH, "main")4 .addLabel(Parameter.USER_AGENT, "agent007")5 .addLabel(Parameter.ENVIRONMENT, "production")6 .addLabel(Parameter.FLOW, "standard")7 .customLabel("Product version", "1.2.3")8 .customLabel("OS Type", "Linux")9 .customLabel("OS Name", "openSuse");
Use of beforeEach and afterEach Hooks
We recommend using the beforeEach and afterEach hooks to control analysis sessions and upload reports to the platform. This way, each test will be uploaded separately with its own report.
In beforeEach hook use evStart() to start Evinced analysis and set any labels
you want for the report to contain when uploading to the platform.
In the afterEach hook call evStop() to stop analysis and upload reports to the platform.
See this code example:
1@BeforeMethod2protected void evStartBeforeMethod(ITestContext context, ITestResult result) {3 evPage.setTestInfo(testInfo.getDisplayName(), this.getClass().getCanonicalName());4 evPage.evStart();5}67@AfterMethod8protected void evStopAfterMethod(ITestContext context, ITestResult result) {9 evPage.evStop();10}
Putting All of This Together
Here is a complete code snippet of how to perform uploads to the platform on a per-test basis.
1package com.evinced.example;23import com.evinced.EvPage;4import com.evinced.EvPageFactory;5import com.evinced.EvincedSDK;6import com.evinced.impl.resultsUpload.TestRunInfo;7import com.microsoft.playwright.Browser;8import com.microsoft.playwright.Playwright;9import org.testng.annotations.*;10import org.testng.ITestContext;11import org.testng.ITestResult;121314public class TestExample {15 private static Playwright playwright;16 protected Browser browser;17 protected EvPage evPage;1819 @BeforeSuite20 protected void beforeSuite() {21 EvincedSDK.setOfflineCredentials(System.getenv("AUTH_SERVICE_ID"), System.getenv("AUTH_TOKEN"));22 EvincedSDK.enableUploadToPlatform(true);2324 EvincedSDK.getTestRunInfo()25 .addLabel(TestRunInfo.Parameter.GIT_USER_NAME, "git")26 .addLabel(TestRunInfo.Parameter.GIT_BRANCH, "master")27 .customLabel("Testing purpose", "Test platform uploading feature");28 }2930 @BeforeTest31 protected void beforeTest() {32 browser = getBrowser();33 evPage = EvPageFactory.create(browser.newPage());34 }3536 @AfterTest37 protected void afterTest() {38 playwright.close();39 }4041 @BeforeMethod42 protected void evStartBeforeMethod(ITestContext context, ITestResult result) {43 evPage.setTestInfo(result.getMethod().getMethodName(), result.getTestClass().getName());44 evPage.evStart();45 }4647 @AfterMethod48 protected void evStopAfterMethod(ITestContext context, ITestResult result) {49 evPage.evStop();50 }5152 public static Browser getBrowser() {53 playwright = Playwright.create();54 return playwright.chromium().launch();55 }565758 @Test(testName = "Test url")59 public void testUrl() {60 evPage.navigate("https://demo.evinced.com");61 }62}63
Tutorials
You can find fully functional example projects on our GitHub.
Step-by-step adding Evinced to existing test suite.
Preface: Existing test suite
1package tutorial;23import com.microsoft.playwright.Browser;4import com.microsoft.playwright.Page;5import com.microsoft.playwright.Playwright;6import org.junit.jupiter.api.*;78import static org.junit.jupiter.api.Assertions.assertTrue;91011public class TutorialTest1 {12 private static Playwright playwright;13 private static Browser browser;14 private Page page;1516 private interface Selectors {17 String HOUSE_DROPDOWN = "#gatsby-focus-wrapper > main > div.wrapper-banner > div.filter-container > div:nth-child(1) > div > div.dropdown.line";18 String TENT_OPTION = "#gatsby-focus-wrapper > main > div.wrapper-banner > div.filter-container > div:nth-child(1) > div > ul > li:nth-child(4)";19 String LOCATION_DROPDOWN = "#gatsby-focus-wrapper > main > div.wrapper-banner > div.filter-container > div:nth-child(2) > div > div.dropdown.line";20 String CANADA_OPTION = "#gatsby-focus-wrapper > main > div.wrapper-banner > div.filter-container > div:nth-child(2) > div > ul > li:nth-child(1)";21 String SEARCH_BUTTON = "#gatsby-focus-wrapper > main > div.wrapper-banner > div.filter-container > a";22 String SEARCH_RESULTS = "#gatsby-focus-wrapper > main > h1";23 }242526 @BeforeAll27 private static void launchBrowser() {28 playwright = Playwright.create();29 browser = playwright.chromium().launch();30 }3132 @AfterAll33 private static void closeBrowser() {34 playwright.close();35 }3637 @BeforeEach38 private void setUp(){39 page = browser.newPage();40 }4142 @AfterEach43 private void tearDown(){44 page.close();45 }4647 @Test48 public void tutorialTest1(){49 page.navigate("https://demo.evinced.com");50 assertTrue(page.isVisible(Selectors.SEARCH_BUTTON));51 }5253 @Test54 public void tutorialTest2(){55 page.navigate("https://demo.evinced.com");56 page.click(Selectors.HOUSE_DROPDOWN);57 page.click(Selectors.TENT_OPTION);58 page.click(Selectors.LOCATION_DROPDOWN);59 page.click(Selectors.CANADA_OPTION);60 page.click(Selectors.SEARCH_BUTTON);61 page.waitForLoadState();62 assertTrue(page.isVisible(Selectors.SEARCH_RESULTS));63 }64}
Step 1: Add Evinced, use snapshot scan and partial report
1package tutorial;23import com.evinced.*;4import com.microsoft.playwright.Browser;5import com.microsoft.playwright.Playwright;6import org.junit.jupiter.api.*;78import static org.junit.jupiter.api.Assertions.assertEquals;9import static org.junit.jupiter.api.Assertions.assertTrue;101112public class TutorialTest2 {13 private static Playwright playwright;14 private static Browser browser;15 // Change type from Page to EvPage16 private EvPage page;1718 private interface Selectors {19 String HOUSE_DROPDOWN = "#gatsby-focus-wrapper > main > div.wrapper-banner > div.filter-container > div:nth-child(1) > div > div.dropdown.line";20 String TENT_OPTION = "#gatsby-focus-wrapper > main > div.wrapper-banner > div.filter-container > div:nth-child(1) > div > ul > li:nth-child(4)";21 String LOCATION_DROPDOWN = "#gatsby-focus-wrapper > main > div.wrapper-banner > div.filter-container > div:nth-child(2) > div > div.dropdown.line";22 String CANADA_OPTION = "#gatsby-focus-wrapper > main > div.wrapper-banner > div.filter-container > div:nth-child(2) > div > ul > li:nth-child(1)";23 String SEARCH_BUTTON = "#gatsby-focus-wrapper > main > div.wrapper-banner > div.filter-container > a";24 String SEARCH_RESULTS = "#gatsby-focus-wrapper > main > h1";25 }262728 @BeforeAll29 private static void launchBrowser() {30 playwright = Playwright.create();31 browser = playwright.chromium().launch();32 // Add evinced licensing33 EvincedSDK.setOfflineCredentials(System.getenv("AUTH_SERVICE_ID"), System.getenv("AUTH_TOKEN"));34 }3536 @AfterAll37 private static void closeBrowser() {38 playwright.close();39 }4041 @BeforeEach42 private void setUp(){43 // Wrap Playwright's page44 // You can access the original page with page.getWrappedPage();45 page = EvPageFactory.create(browser.newPage());46 }4748 @AfterEach49 private void tearDown(){50 page.close();51 }5253 @Test54 public void tutorialTest1(){55 page.navigate("https://demo.evinced.com");56 assertTrue(page.isVisible(Selectors.SEARCH_BUTTON));57 // Get issues snapshot on the page58 Report report = page.evAnalyze();59 // Save partial report for the single scan60 EvincedSDK.evSaveFile("/tmp/ev-standalone-report.json", report, FileFormat.JSON);61 }6263 @Test64 public void tutorialTest2(){65 page.navigate("https://demo.evinced.com");66 page.click(Selectors.HOUSE_DROPDOWN);67 page.click(Selectors.TENT_OPTION);68 page.click(Selectors.LOCATION_DROPDOWN);69 page.click(Selectors.CANADA_OPTION);70 page.click(Selectors.SEARCH_BUTTON);71 page.waitForLoadState();72 assertTrue(page.isVisible(Selectors.SEARCH_RESULTS));73 // Get issues snapshot on the result page74 Report report = page.evAnalyze();75 // Assert page does not contain accessibility issues76 assertEquals(0, report.getIssues().size());77 }78}
Step 2: Use continuous mode and aggregated report
Let's do a step back to the original test and start modifying it again. Some steps will be similar.
1package tutorial;23import com.evinced.*;4import com.microsoft.playwright.Browser;5import com.microsoft.playwright.Playwright;6import org.junit.jupiter.api.*;78import static org.junit.jupiter.api.Assertions.assertTrue;91011public class TutorialTest3 {12 private static Playwright playwright;13 private static Browser browser;14 // Change type from Page to EvPage15 private EvPage page;1617 private interface Selectors {18 String HOUSE_DROPDOWN = "#gatsby-focus-wrapper > main > div.wrapper-banner > div.filter-container > div:nth-child(1) > div > div.dropdown.line";19 String TENT_OPTION = "#gatsby-focus-wrapper > main > div.wrapper-banner > div.filter-container > div:nth-child(1) > div > ul > li:nth-child(4)";20 String LOCATION_DROPDOWN = "#gatsby-focus-wrapper > main > div.wrapper-banner > div.filter-container > div:nth-child(2) > div > div.dropdown.line";21 String CANADA_OPTION = "#gatsby-focus-wrapper > main > div.wrapper-banner > div.filter-container > div:nth-child(2) > div > ul > li:nth-child(1)";22 String SEARCH_BUTTON = "#gatsby-focus-wrapper > main > div.wrapper-banner > div.filter-container > a";23 String SEARCH_RESULTS = "#gatsby-focus-wrapper > main > h1";24 }252627 @BeforeAll28 private static void launchBrowser() {29 playwright = Playwright.create();30 browser = playwright.chromium().launch();31 // Add evinced licensing32 EvincedSDK.setOfflineCredentials(System.getenv("AUTH_SERVICE_ID"), System.getenv("AUTH_TOKEN"));33 }3435 @AfterAll36 private static void closeBrowser() {37 playwright.close();38 // Save the aggregated report for all the issues found during test run39 EvincedSDK.evSaveFile("/tmp/ev-aggregated-report.html", FileFormat.HTML);40 }4142 @BeforeEach43 private void setUp(){44 // Wrap Playwright's page45 // You can access the original page with page.getWrappedPage();46 page = EvPageFactory.create(browser.newPage());47 // Start gathering issues48 page.evStart();49 }5051 @AfterEach52 private void tearDown(){53 // Stop gathering issues54 // If you want you can work with returned set of issues gathered between evStart and evStop55 Report report = page.evStop();56 System.out.println("Found issues: " + report.getIssues().size());57 page.close();58 }5960 @Test61 public void tutorialTest1(){62 page.navigate("https://demo.evinced.com");63 assertTrue(page.isVisible(Selectors.SEARCH_BUTTON));64 }6566 @Test67 public void tutorialTest2(){68 page.navigate("https://demo.evinced.com");69 page.click(Selectors.HOUSE_DROPDOWN);70 page.click(Selectors.TENT_OPTION);71 page.click(Selectors.LOCATION_DROPDOWN);72 page.click(Selectors.CANADA_OPTION);73 page.click(Selectors.SEARCH_BUTTON);74 page.waitForLoadState();75 assertTrue(page.isVisible(Selectors.SEARCH_RESULTS));76 }77}
Fail the test if critical issues are found
Here you can see a way of failing your test if critical accessibility issues are found using the Playwright Java SDK.
Using evAnalyze:
1Report report = driver.evAnalyze();23List<Issue> criticalIssues = report.getIssues().stream()4 .filter(issue -> "Critical".equals(issue.getSeverity().getName()))5 .collect(Collectors.toList());67assertTrue(criticalIssues.isEmpty(), "Critical issues are found");
Using evStart/evStop:
1driver.evStart();2Report report = driver.evStop();34List<Issue> criticalIssues = DATA.getReport().getIssues().stream()5.filter(issue -> "Critical".equals(issue.getSeverity().getName()))6.collect(Collectors.toList());78assertTrue(criticalIssues.isEmpty(), "Critical issues are found");
The criticalIssues array will contain all the critical issues found during the scan. If the array is not empty, the test will fail on the assertion.
Support
Please feel free to reach out to support@evinced.com with any questions.
FAQ
- Can I configure which validations to run?
Yes, see the Configuration section for details on how to configure Axe validations to your needs.
- Can I run tests with Evinced using cloud-based services like Sauce Labs, Perfecto, or BrowserStack?
Yes, we have tested the Evinced SDK on many of these types of cloud-based services and expect no issues.