Cypress JS SDK
The Evinced Cypress JS SDK integrates with new or existing Cypress tests to automatically detect accessibility issues. By adding a few lines of code to your Cypress project, you can begin analyzing all the web pages and DOM changes to provide a dynamic view of how your site can become more accessible. As a result of the test, a rich and comprehensive report is generated to easily track issues to resolution.
Interested in seeing this in action? Contact us to get started!
Prerequisites
- Cypress version 10.0.0 or higher
Get started
Installation
To install Cypress JS SDK you will need either a file provided by Evinced Support or access to a remote repository that provides it. If you have neither, contact us to get started.
Installation with a locally provided file
With a local copy of the Cypress JS SDK gzipped tar package (.tgz extension), install it in your project using NPM or Node package manager of your choice:
1# Using NPM2npm install -D <path to cypress-sdk-<version>.tgz file>
Installation from a remote repository
Evinced Customers have the option of accessing Cypress JS SDK from a remote repository — the Evinced Jfrog Artifactory — to keep their SDK version up-to-date and to share the SDK internally at their organization.
When access is enabled, Cypress JS SDK is available at
https://evinced.jfrog.io/artifactory/restricted-npm/%40evinced/cypress-sdk.
Installation using NPM:
1npm install @evinced/cypress-sdk
AI Skills
The @evinced/cypress-sdk package ships with built-in AI agent skills that guide your AI assistant through integrating the Evinced SDK — from initial setup and writing tests to configuring rules and generating reports.
To activate AI Skills, add the following to your project's AGENTS.md file (create it at the root of your project if it does not exist):
1## Context23Before working on any accessibility testing task, always read:45`node_modules/@evinced/cypress-sdk/evinced-ai/entry.mdc`67The entry.mdc file contains:8- Integration rules for the Evinced Cypress JS SDK9- Skills for setup, test writing, configuration, reporting, and logging10- Links to detailed documentation for each task type1112## When to use1314When the user asks about accessibility testing, WCAG compliance, ARIA attributes, Evinced SDK usage, or accessibility reports or scans, read the entry point file listed under Context.1516## Capabilities1718- Set up the Evinced SDK in Cypress projects19- Write accessibility tests using `evAnalyze`, `evStart`, `evStop`20- Configure accessibility rules and scopes21- Generate HTML, JSON, SARIF, or CSV reports22- Configure the SDK — proxy, screenshots, iframes, and `evConfig.json`23- Enable and tune SDK logging and log levels24- Control SDK toggles — kill switch, analytics opt-out, and mock engine25- Integrate accessibility checks into CI/CD pipelines
Note for monorepos: with pnpm, or yarn/npm workspaces, the package may be hoisted to the workspace root. If the path above does not exist, look for evinced-ai/entry.mdc under the workspace root's node_modules instead.
This works with any AI assistant that reads project context files (Cursor, Claude, Copilot, Windsurf, Gemini, and others).
Try asking your AI assistant:
- "Set up the Evinced SDK in my project"
- "Add accessibility checks to my existing Cypress test"
- "Scope the scan to only the navigation bar"
Authentication
To launch Cypress JS SDK, you need to have a Service ID and an API Key.
Where to find your Evinced SDK credentials
These credentials are available via the Evinced Product Hub in the “Automation for Web” or “Automation for Mobile” product areas. Click the “Get SDK” button to see the Service Account ID and API Key at the bottom of the page.
Authenticate for Offline Testing
There are two methods to provide the token: online mode and offline mode. Online mode contacts the Evinced Licensing Server. Offline mode assumes that an Evinced employee has supplied a JSON Web Token (JWT). If an offline token is required, please reach out to your account team or support@evinced.com.
Please set credentials in environment variables and reference the environment variables in code.
1# Online mode2export CYPRESS_EVINCED_SERVICE_ID=<serviceId>3export CYPRESS_EVINCED_API_KEY=<apiKey>45# Offline mode6export CYPRESS_EVINCED_SERVICE_ID=<serviceId>7export CYPRESS_EVINCED_AUTH_TOKEN=<token>
See the official Cypress environment variables documentation.
Setting credentials, an example:
1// Set online credentials method2Evinced.setCredentials({3 serviceId: Cypress.env('CYPRESS_EVINCED_SERVICE_ID'),4 secret: Cypress.env('CYPRESS_EVINCED_API_KEY'),5});67// OR89// If provided a JWT by Evinced10// Set offline credentials method11Evinced.setOfflineCredentials({12 serviceId: Cypress.env('CYPRESS_EVINCED_SERVICE_ID'),13 token: Cypress.env('CYPRESS_EVINCED_AUTH_TOKEN'),14});15
Your First Test
SDK Initialization
To use Cypress JS SDK, you first need to authenticate. Please refer to Authentication for details.
In the cypress/support/e2e.js file add the following lines to initialize SDK and provide either offline or online token.
Note: for Cypress version <10 the file cypress/support/index.js should be used.
cypress.config.js with expose (Cypress 15.10+ / 16):
1const { defineConfig } = require('cypress');2const { cyEvTask, cyTaskUploadToPlatform } = require('@evinced/cypress-sdk');34module.exports = defineConfig({5 e2e: {6 setupNodeEvents(on) {7 on('task', { ...cyEvTask, ...cyTaskUploadToPlatform });8 }9 },10 expose: {11 evincedConfig: {12 switchOn: true,13 scan: { iframes: true, rootSelector: '#main' },14 report: {15 format: 'html',16 outputDir: './evincedReports',17 fileName: 'aggregatedReport'18 },19 platform: { upload: { enabled: false } }20 }21 },22 env: {23 AUTH_SERVICE_ID: 'your-service-id',24 AUTH_TOKEN: 'your-offline-token'25 }26});
cypress.config.js with env (Cypress 12–15):
1module.exports = {2 e2e: {3 setupNodeEvents(on) {4 on('task', {5 evTask: require('@evinced/cypress-sdk').cyEvTask6 });7 }8 },9 env: {10 evincedConfig: {11 switchOn: true,12 scan: { iframes: true, rootSelector: '#main' },13 report: {14 format: 'html',15 outputDir: './evincedReports',16 fileName: 'aggregatedReport'17 },18 platform: { upload: { enabled: false } }19 },20 AUTH_SERVICE_ID: 'your-service-id',21 AUTH_TOKEN: 'your-offline-token'22 }23};
Evinced.init() with modern nested keys:
1import Evinced from '@evinced/cypress-sdk';23Evinced.init({4 scan: { iframes: true, rootSelector: '#main' },5 report: {6 format: 'html',7 outputDir: './evincedReports',8 fileName: 'aggregatedReport'9 },10 platform: { upload: { enabled: false } }11});
Deprecated (legacy flat keys only — not the Evinced.init() API):
1Evinced.init({2 enableScreenshots: false,3 reporterOptions: {4 reportFormat: 'html',5 filePath: './evincedReports/aggregatedReport.html'6 }7});
1import Evinced from '@evinced/cypress-sdk';23// Initialize SDK4Evinced.init();56// Set online credentials7Evinced.setCredentials({8 serviceId: Cypress.env('EVINCED_SERVICE_ID'),9 secret: Cypress.env('EVINCED_API_KEY'),10});1112// Set offline credentials13Evinced.setOfflineCredentials({14 serviceId: Cypress.env('EVINCED_SERVICE_ID'),15 token: Cypress.env('EVINCED_AUTH_TOKEN'),16});
Register Required Tasks
Starting from version 5.0.0, it is mandatory to register the 'evTask' in your cypress.config.js.
Version 5.0.0+
1const { defineConfig } = require("cypress");2const Evinced = require("@evinced/cypress-sdk").default;34module.exports = defineConfig({5 e2e: {6 setupNodeEvents(on) {7 on("task", {8 evTask: Evinced.cyEvTask9 });10 }11 }12});
Note: If you are using an earlier version of the Cypress SDK and want to upload to the platform, please reach out to Evinced support.
Add Evinced Accessibility Checks (Single Run Mode)
This is a simple example of how to add an Evinced accessibility scan to a test. Please note the inline comments that give detail on each test step.
1it("Evinced basic example", () => {2 // Navigate to site3 cy.visit("https://demo.evinced.com/");4 //Scan for a11y issues, get the result and assert on the number of issues found5 cy.evAnalyze().should((issues) => {6 expect(issues).to.be.empty();7 });8});
Add Evinced Accessibility Checks (Continuous Mode)
This is an example of how to add a continuous Evinced accessibility scan to a test. Using the
evStart() and evStop() methods, the Evinced engine will continually scan in the background capturing all DOM changes and page navigation as the test is executed. This will capture all accessibility issues as clicking on drop-downs or similar interactions reveals more of the page. The advantage of continuous mode is that no interaction with the actual test code is needed.
1context('Evinced Demo Site tests', () => {23 it('Search Test', () => {4 cy.visit('https://demo.evinced.com/');56 // Start the Evinced engine7 cy.evStart();89 const BASE_FORM_SELECTOR = '#gatsby-focus-wrapper > main > div.wrapper-banner > div.filter-container';10 const SELECT_HOME_DROPDOWN = `${BASE_FORM_SELECTOR} > div:nth-child(1) > div > div.dropdown.line`;11 const SELECT_WHERE_DROPDOWN = `${BASE_FORM_SELECTOR} > div:nth-child(2) > div > div.dropdown.line`;12 const TINY_HOME_OPTION = `${BASE_FORM_SELECTOR} > div:nth-child(1) > div > ul > li:nth-child(2)`;13 const EAST_COST_OPTION = `${BASE_FORM_SELECTOR} > div:nth-child(2) > div > ul > li:nth-child(3)`;14 cy.get(SELECT_HOME_DROPDOWN).click();15 cy.get(TINY_HOME_OPTION).click();16 cy.get(SELECT_WHERE_DROPDOWN).click();17 cy.get(EAST_COST_OPTION).click();1819 // Conclude the scan, print issues to cy.log with logIssues and print the report JSON object to browser's console20 cy.evStop({logIssues: true}).should((issues) => {21 console.log(JSON.stringify(issues, null, 2));22 });23 });24});
API
Evinced.init(options)
Prepares the Evinced object for use in the project.
1import Evinced from "@evinced/cypress-sdk";2Evinced.init();
Note: this call is intended to be done only once in support file. Second call of this method will lead to the error.
Refer to Configuration to see examples of initializing with options.
Implementation Details
- Listens to Cypress events
window:before:load- Injects Evinced to the page, continues recording if neededwindow:before:unload- Stores the state of the current pagetest:before:run- Initializes test scope state
- Registers
evcommandsevAnalyze()evStart()evStop()evSaveFile()
- Registers Chai assertions
evValid()
evAnalyze(options)
Scans the current page and returns a list of accessibility issues. This is the recommended method for static page analysis.
Note: This method is not supported if evStart() is already running.
Recommended:
1cy.evAnalyze({ scan: { rootSelector: "#some .selector" } }).should((issues) => {2 expect(issues).to.have.length(6);3});
Deprecated:
1cy.evAnalyze({ rootSelector: "#some .selector" }).should((issues) => {2 expect(issues).to.have.length(6);3});
Returns Promise<Issue[]>.
The returned report object contains a list of accessibility issues.
For more information regarding reports as well as the report object itself, please refer to our detailed Web Reports page.
evStart(options)
Continually watches for DOM mutations and page navigation, recording accessibility issues
until the evStop() method is called. This method is recommended for dynamic page flows.
Recommended:
1cy.visit("https://example.com/page-a");2cy.evStart({ scan: { rootSelector: "#some .selector" } });3cy.visit("https://example.com/page-b");4cy.evStop().should((issues) => {5 expect(issues).to.have.length(6);6});
Deprecated:
1cy.visit("https://example.com/page-a");2cy.evStart({ rootSelector: "#some .selector" });3cy.visit("https://example.com/page-b");4cy.evStop().should((issues) => {5 expect(issues).to.have.length(6);6});
Returns Promise<void>.
evStop(options)
Stops the issue-gathering process started by evStart().
1cy.visit('https://example.com/page-a');2cy.evStart();3cy.get('#some .selector').click();4cy.visit('https://example.com/page-b');5cy.get('#another .selector').click();6cy.evStop({logIssues: true}).should((issues) => {7 expect(issues).to.have.length(10);8});
Returns Promise<Issue[]>.
The returned report object includes all accessibility issues detected between
the evStart() and evStop() method calls.
For more information regarding reports as well as the report object itself, please refer to our detailed Web Reports page.
1{2 logIssues: false // Will log every accessibility issue to Cypress console when true3}
evSaveFile(issues, format, destination)
Saves issues in a file with the specified format and location.
Supported formats are json, html, sarif, and csv.
Find detailed information in the Web Reports page.
1const filePathJson = "./reports/results.json";2const filePathSarif = "./reports/results.sarif.json";3const filePathHtml = "./reports/results.html";4const filePathCsv = "./reports/results.csv";5cy.visit("https://example.com/page-a");6cy.evAnalyze().then((issues) => {7 cy.evSaveFile(issues, "json", filePathJson);8 cy.evSaveFile(issues, "sarif", filePathSarif);9 cy.evSaveFile(issues, "html", filePathHtml);10 cy.evSaveFile(issues, "csv", filePathCsv);11 cy.readFile(filePath).should("exist");12});
Returns Promise<void>.
evValid(options)
Throws a chai exception if any issues exist that don’t match the provided filters.
1cy.evAnalyze().should("be.evValid", {2 ignoreSeverities: ["CRITICAL"],3 ignoreTypes: ["NOT_FOCUSABLE"],4});
Default options:
1{2 ignoreSeverities: [],3 ignoreTypes: []4}
Aggregated Report
The aggregated report feature allows you to have a general aggregated report for
the whole run (not only for one test or suite). This report will contain all the
issues found by the tests where evStart() and
evStop() commands were called. It is still possible to use the
evSaveFile() command in any place of your code along with this
Aggregated Report feature.
Important! The feature is not supported by the Cypress frameworks versions <10.
Recommended (cypress.config.js):
1module.exports = {2 env: {3 evincedConfig: {4 report: {5 format: 'html', // Sets a desired format for the report. Available options are: html, json, csv, and sarif.6 fileName: 'aggregatedReport', // Specifies a name of the final report. Mandatory.7 outputDir: './evincedReports', // Specifies a path to the final aggregated report file. Mandatory.8 tmpDir: './evincedReports/tmp' // A directory for storing Evinced tmp files. Optional.9 }10 }11 }12};
Available formats: html, json, csv, sarif. The Cypress aggregated reporter generates one report per run — specify a single format string (not an array).
report.cleanup defaults to true (legacy: reporterOptions.deleteTmpFiles). Set report.cleanup: false to keep per-spec tmp files after the run.
Deprecated (cypress.config.js — legacy flat reporterOptions):
1const os = require('os');23module.exports = {4 env: {5 evincedConfig: {6 reporterOptions: {7 reportFormat: 'html', // Sets a desired format for the report. Available options are: html, sarif, and json.8 filePath: './evincedReports/aggregatedReport.html', // Specifies a path to the final aggregated report file.9 tmpDir: os.tmpdir(), // Specifies the temporary directory to store temporary report files.10 reportTimeStamp: new Date().toISOString() // Unique timestamp for the test run. Do not change unless you know why.11 }12 }13 }14};
Configuration
The same configuration object can be used when initializing the Evinced object
using Evinced.init and when calling the evStart()
and evAnalyze() methods but with a bit different consequences.
Providing options when initializing defines a global configuration for all calls
of evAnalyze() and evStart(), while providing options to
either of those methods affect only the test in which they are called.
Options provided in either evAnalyze() or evStart() override
those set in Evinced engine initialization.
Engines Configuration
Evinced uses two separate engines when scanning for accessibility issues, one is the aXe engine and the other is the Evinced engine. By default, Evinced disables the aXe Needs Review and Best Practices issues based on customer request and due to the fact they are mostly false positives. Please note this setting when comparing issue counts directly. See an example of how to enable Needs Review and Best practices issues in the Toggles section.
Configuration Object
Configure the Cypress SDK through cypress.config.js and Evinced.init(). Both accept the modern nested structure below. Cypress does not load evConfig.json, evConfig.yaml, or evConfig.yml files.
Cypress 16 Migration
Starting in Cypress 15.10+, Cypress.env() is deprecated for non-secret configuration. These settings should now be placed under the expose property in cypress.config.js.
Action required: Move evincedConfig and any EV_* overlay keys to expose. See the recommended cypress.config.js example below.
Important: Do not move secrets to
expose. KeepAUTH_TOKENandAUTH_SERVICE_IDinsideenvonly.
Backward compatibility: You do not need to rush this change. Cypress 12–15 projects continue to work completely unchanged — the Evinced SDK reads Cypress.expose() first and automatically falls back to Cypress.env() when expose is absent.
1type SkipValidation = {2 selector: string;3 urlRegex: string;4 validationTypes: string[];5};67type EvConfig = {8 switchOn?: boolean;9 scan?: {10 rootSelector?: string;11 iframes?: boolean;12 iframeDomains?: string[];13 screenshots?: { enabled?: boolean };14 withPasses?: boolean;15 };16 analysis?: {17 AXE_CONFIG?: Record<string, unknown>;18 TOGGLES?: Record<string, boolean>;19 SKIP_VALIDATIONS?: SkipValidation[];20 ISSUE_CONTENT_PER_TYPE?: Record<string, { knowledgeBaseLink: string }>;21 RECORDING_SERVICE?: Record<string, unknown>;22 [key: string]: unknown;23 };24 report?: {25 format?: 'json' | 'html' | 'csv' | 'sarif';26 outputDir?: string;27 fileName?: string;28 aggregate?: boolean;29 cleanup?: boolean;30 tmpDir?: string;31 };32 platform?: {33 upload?: { enabled?: boolean; autoUpload?: boolean };34 };35 logging?: {36 preset?: 'errors' | 'standard' | 'diagnostic';37 channels?: { engine?: boolean; sdk?: boolean };38 };39 network?: {40 idle?: { enabled?: boolean; timeout?: number; maxWait?: number };41 proxy?: Record<string, unknown>;42 };43};
cypress.config.js with expose (Cypress 15.10+ / 16):
1const { defineConfig } = require('cypress');23module.exports = defineConfig({4 expose: {5 evincedConfig: {6 switchOn: true,7 scan: { rootSelector: '#main', iframes: true }8 }9 },10 env: {11 AUTH_SERVICE_ID: 'your-service-id',12 AUTH_TOKEN: 'your-offline-token'13 }14});
cypress.config.js with env (Cypress 12–15):
1module.exports = {2 env: {3 evincedConfig: {4 switchOn: true,5 scan: { rootSelector: '#main' }6 }7 }8};
Evinced.init():
1Evinced.init({2 scan: { rootSelector: '#main' }3});
Deprecated (legacy flat keys only — not the Evinced.init() API):
1Evinced.init({2 rootSelector: '#main',3 enableScreenshots: false,4 axeConfig: { rules: { 'link-name': { enabled: false } } },5 toggles: { USE_AXE_NEEDS_REVIEW: true },6 skipValidations: [],7 issuesContentPerType: {},8 sdkLogging: { enable: true, level: 'debug' },9 reporterOptions: { reportFormat: 'html', filePath: './evincedReports/aggregatedReport.html' },10 uploadToPlatformOptions: { enableUploadToPlatform: true }11});
Log Issues
Enables inclusion of issues in Cypress logs.
logIssues is a Cypress-specific option. Configure it via Evinced.init() or per-command options. It is not part of the unified EvConfig type block below yet; TypeScript definitions will be added in an upcoming Cypress SDK release.
1Evinced.init({ logIssues: true });
Root Selector
Sets a CSS selector to limit the Evinced Engine to scan only the selected element and its children. Must be a valid CSS selector. If not set, the Evinced Engine will scan the entire document.
Default: no value
Recommended (per command):
1cy.evAnalyze({ scan: { rootSelector: '#some .selector' } }).should((issues) => {2 expect(issues).to.have.length(6);3});
Deprecated (per command — legacy flat rootSelector):
1cy.evAnalyze({ rootSelector: '#some .selector' }).should((issues) => {2 expect(issues).to.have.length(6);3});
Axe Configuration
Configures Axe open-source accessibility toolkit, which the Evinced engine includes with its own, more extensive accessibility detection. For full Axe config options, see Axe Core API.
Recommended:
1const axeConfig = {2 rules: {3 'link-name': { enabled: false }4 }5};67// Global config (modern nested key)8Evinced.init({9 analysis: { AXE_CONFIG: axeConfig }10});1112// Command config13cy.evAnalyze({14 analysis: { AXE_CONFIG: axeConfig }15});16cy.evStart({17 analysis: { AXE_CONFIG: axeConfig }18});
Deprecated (legacy flat axeConfig key in env.evincedConfig or Evinced.init()):
1const axeConfig = {2 rules: {3 'link-name': { enabled: false }4 }5};67Evinced.init({ axeConfig });8cy.evAnalyze({ axeConfig });9cy.evStart({ axeConfig });
Errors Strict Mode
When true, stops current test execution when Evinced SDK non-critical
errors are thrown as runtime errors. Otherwise non-critical errors
are printed to console.
Default: false
strict is a Cypress-specific option. Configure it via Evinced.init() or per-command options. It is not part of the unified EvConfig type block below yet; TypeScript definitions will be added in an upcoming Cypress SDK release.
1Evinced.init({ strict: true });
Engine Logging
Set level of messages the Evinced engine will print to the console.
Valid levels are "debug", "info", "warn" and "error".
Default: "error"
Configure SDK log output with the logging.* section. To include analysis-engine messages in the console, set logging.channels.engine: true or use preset diagnostic (includes engine channel).
Recommended (cypress.config.js):
1module.exports = {2 env: {3 evincedConfig: {4 logging: { preset: 'diagnostic' }5 }6 }7};
Recommended (enable engine channel only):
1module.exports = {2 env: {3 evincedConfig: {4 logging: { channels: { engine: true } }5 }6 }7};
Deprecated (legacy flat sdkLogging in env.evincedConfig or Evinced.init()):
1Evinced.init({2 sdkLogging: { enable: true, level: 'debug', enableEngineLogs: true }3});
Reports Screenshots
When true, the Evinced SDK will include screenshots in its reports that
highlight elements with accessibility issues.
Default: false.
Note: Enabling screenshots may affect test run performance.
For enabling the Screenshots feature set scan.screenshots.enabled to true. It can be done in two ways:
Recommended (global config):
1Evinced.init({2 scan: { screenshots: { enabled: true } }3});
Recommended (per command):
1cy.evAnalyze({2 scan: { screenshots: { enabled: true } }3});4cy.evStart({5 scan: { screenshots: { enabled: true } }6});
Deprecated (global config — legacy flat enableScreenshots):
1Evinced.init({2 enableScreenshots: true3});
Deprecated (per command — legacy flat enableScreenshots):
1cy.evAnalyze({ enableScreenshots: true });2cy.evStart({ enableScreenshots: true });
Toggles
Enables experimental features. Feature names and values may vary from release to release.
Example: Recommended:
1Evinced.init({2 analysis: {3 TOGGLES: {4 USE_AXE_NEEDS_REVIEW: true,5 USE_AXE_BEST_PRACTICES: true6 }7 }8});
Deprecated (legacy flat toggles):
1Evinced.init({2 toggles: { USE_AXE_NEEDS_REVIEW: true, USE_AXE_BEST_PRACTICES: true }3});
Skip Validations
Sets validation types to be skipped for specified URL pattern and CSS selector. Issue type IDs can be found by inspecting a JSON report as described in Web Reports.
Default: no validations skipped.
Recommended (per command):
1const skipValidationsParametersForEvStart = [2 {3 selector: 'span.slds-checkbox--faux',4 urlRegex: 'www\\.example\\.org',5 validationTypes: [6 'WRONG_SEMANTIC_ROLE',7 'NOT_FOCUSABLE',8 'NO_DESCRIPTIVE_TEXT'9 ]10 },11 {12 selector: 'div.showtime-b > figure',13 urlRegex: 'www\\.example\\.org',14 validationTypes: [15 'WRONG_SEMANTIC_ROLE',16 'NOT_FOCUSABLE'17 ]18 }19];20cy.evStart({21 analysis: { SKIP_VALIDATIONS: skipValidationsParametersForEvStart }22});
Deprecated (per command — legacy flat skipValidations):
1cy.evStart({2 skipValidations: skipValidationsParametersForEvStart3});
Recording Service
This setting controls how frequently event-triggered functions are executed, helping to optimize performance and responsiveness. The option does not enable or disable the event-handling service itself but determines how frequently events are processed based on the selected mode.
Available modes:
debounce– Delays execution until a set time has passed since the last event. Useful for actions triggered by continuous input, such as typing in a search box, to avoid excessive function calls.throttle– Ensures execution at fixed intervals, regardless of event frequency. Ideal for scenarios like handling window resize events or scroll tracking, where limiting execution prevents performance degradation.
Default: Functions execute as triggering events occur.
An example of how to modify settings: Recommended (per command):
1cy.evStart({2 analysis: {3 RECORDING_SERVICE: {4 ENABLE_DEBOUNCE_NEW_SELECTORS: true,5 DEBOUNCE_NEW_SELECTORS_MS: 500,6 DELAY_MODE: 'throttle'7 }8 }9});1011cy.visit('https://demo.evinced.com/');1213cy.evStop();
Deprecated (per command — legacy flat recordingService):
1cy.evStart({2 recordingService: {3 ENABLE_DEBOUNCE_NEW_SELECTORS: true,4 DEBOUNCE_NEW_SELECTORS_MS: 500,5 DELAY_MODE: 'throttle'6 }7});89cy.visit('https://demo.evinced.com/');1011cy.evStop();
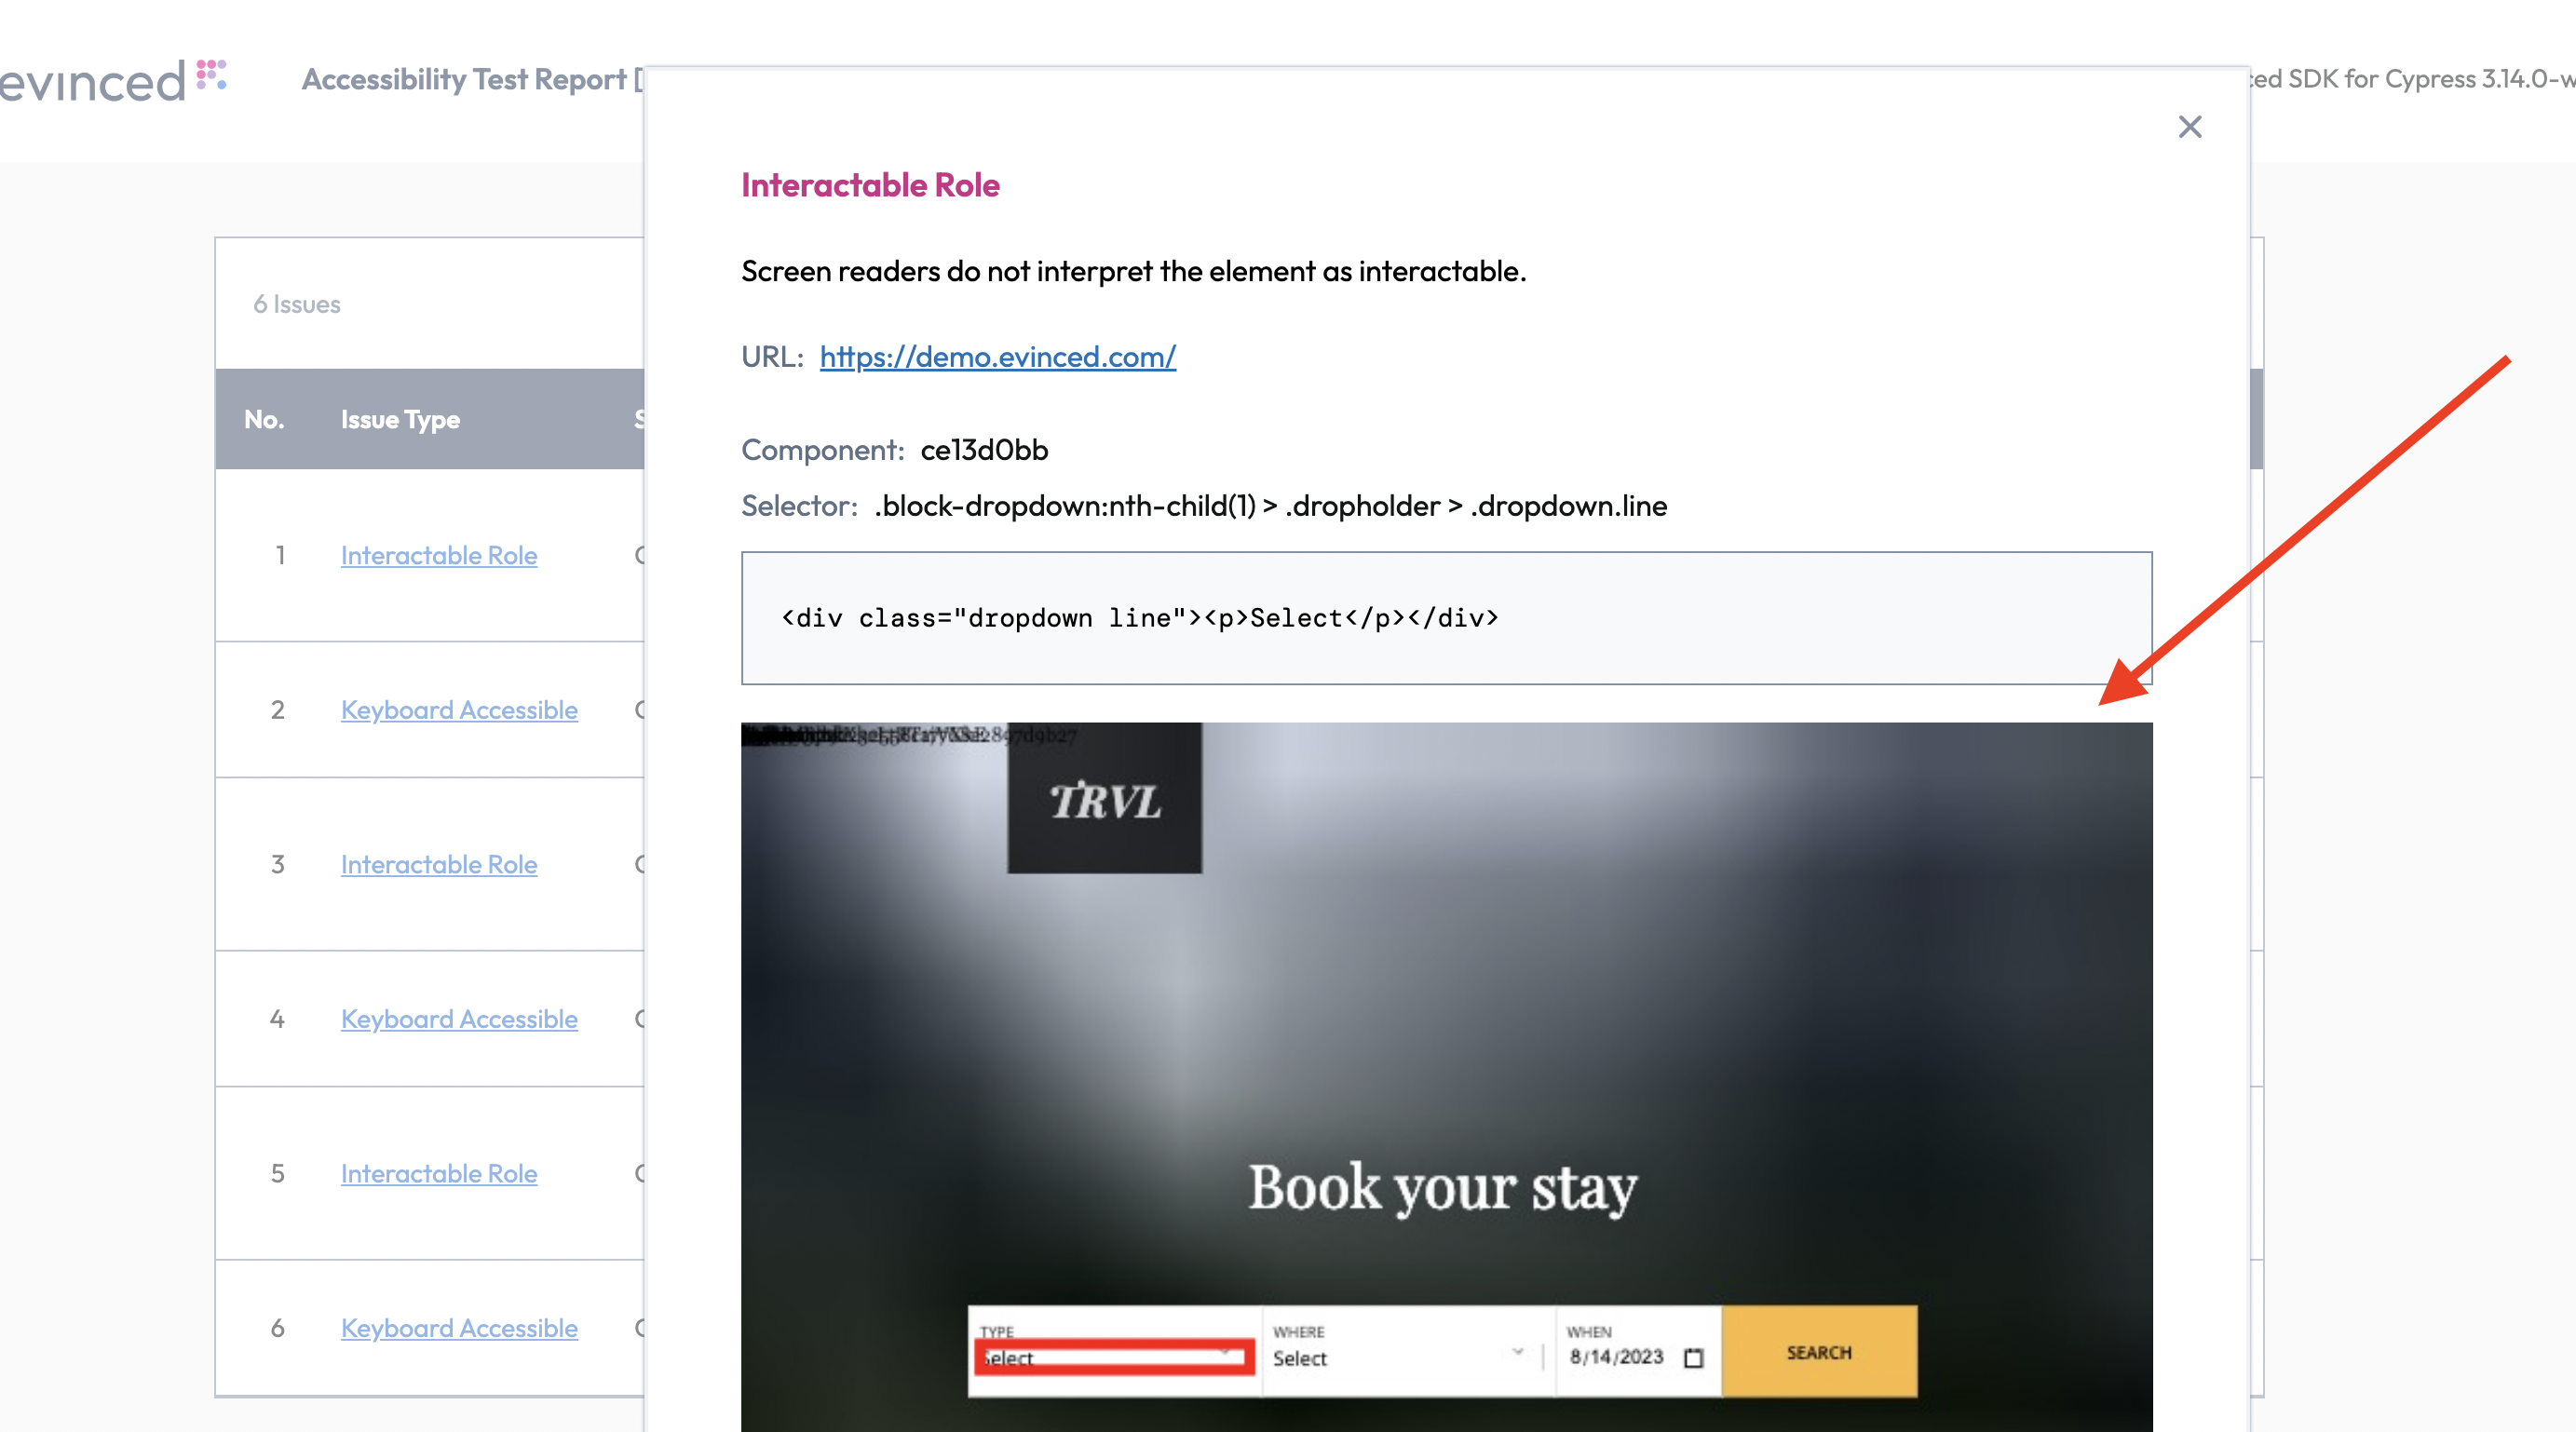
Knowledge-Base Link Overrides
Sets customized knowledge-base links in the reports. The links are displayed in the reports “Issue Type” column, as shown in the following screenshot:
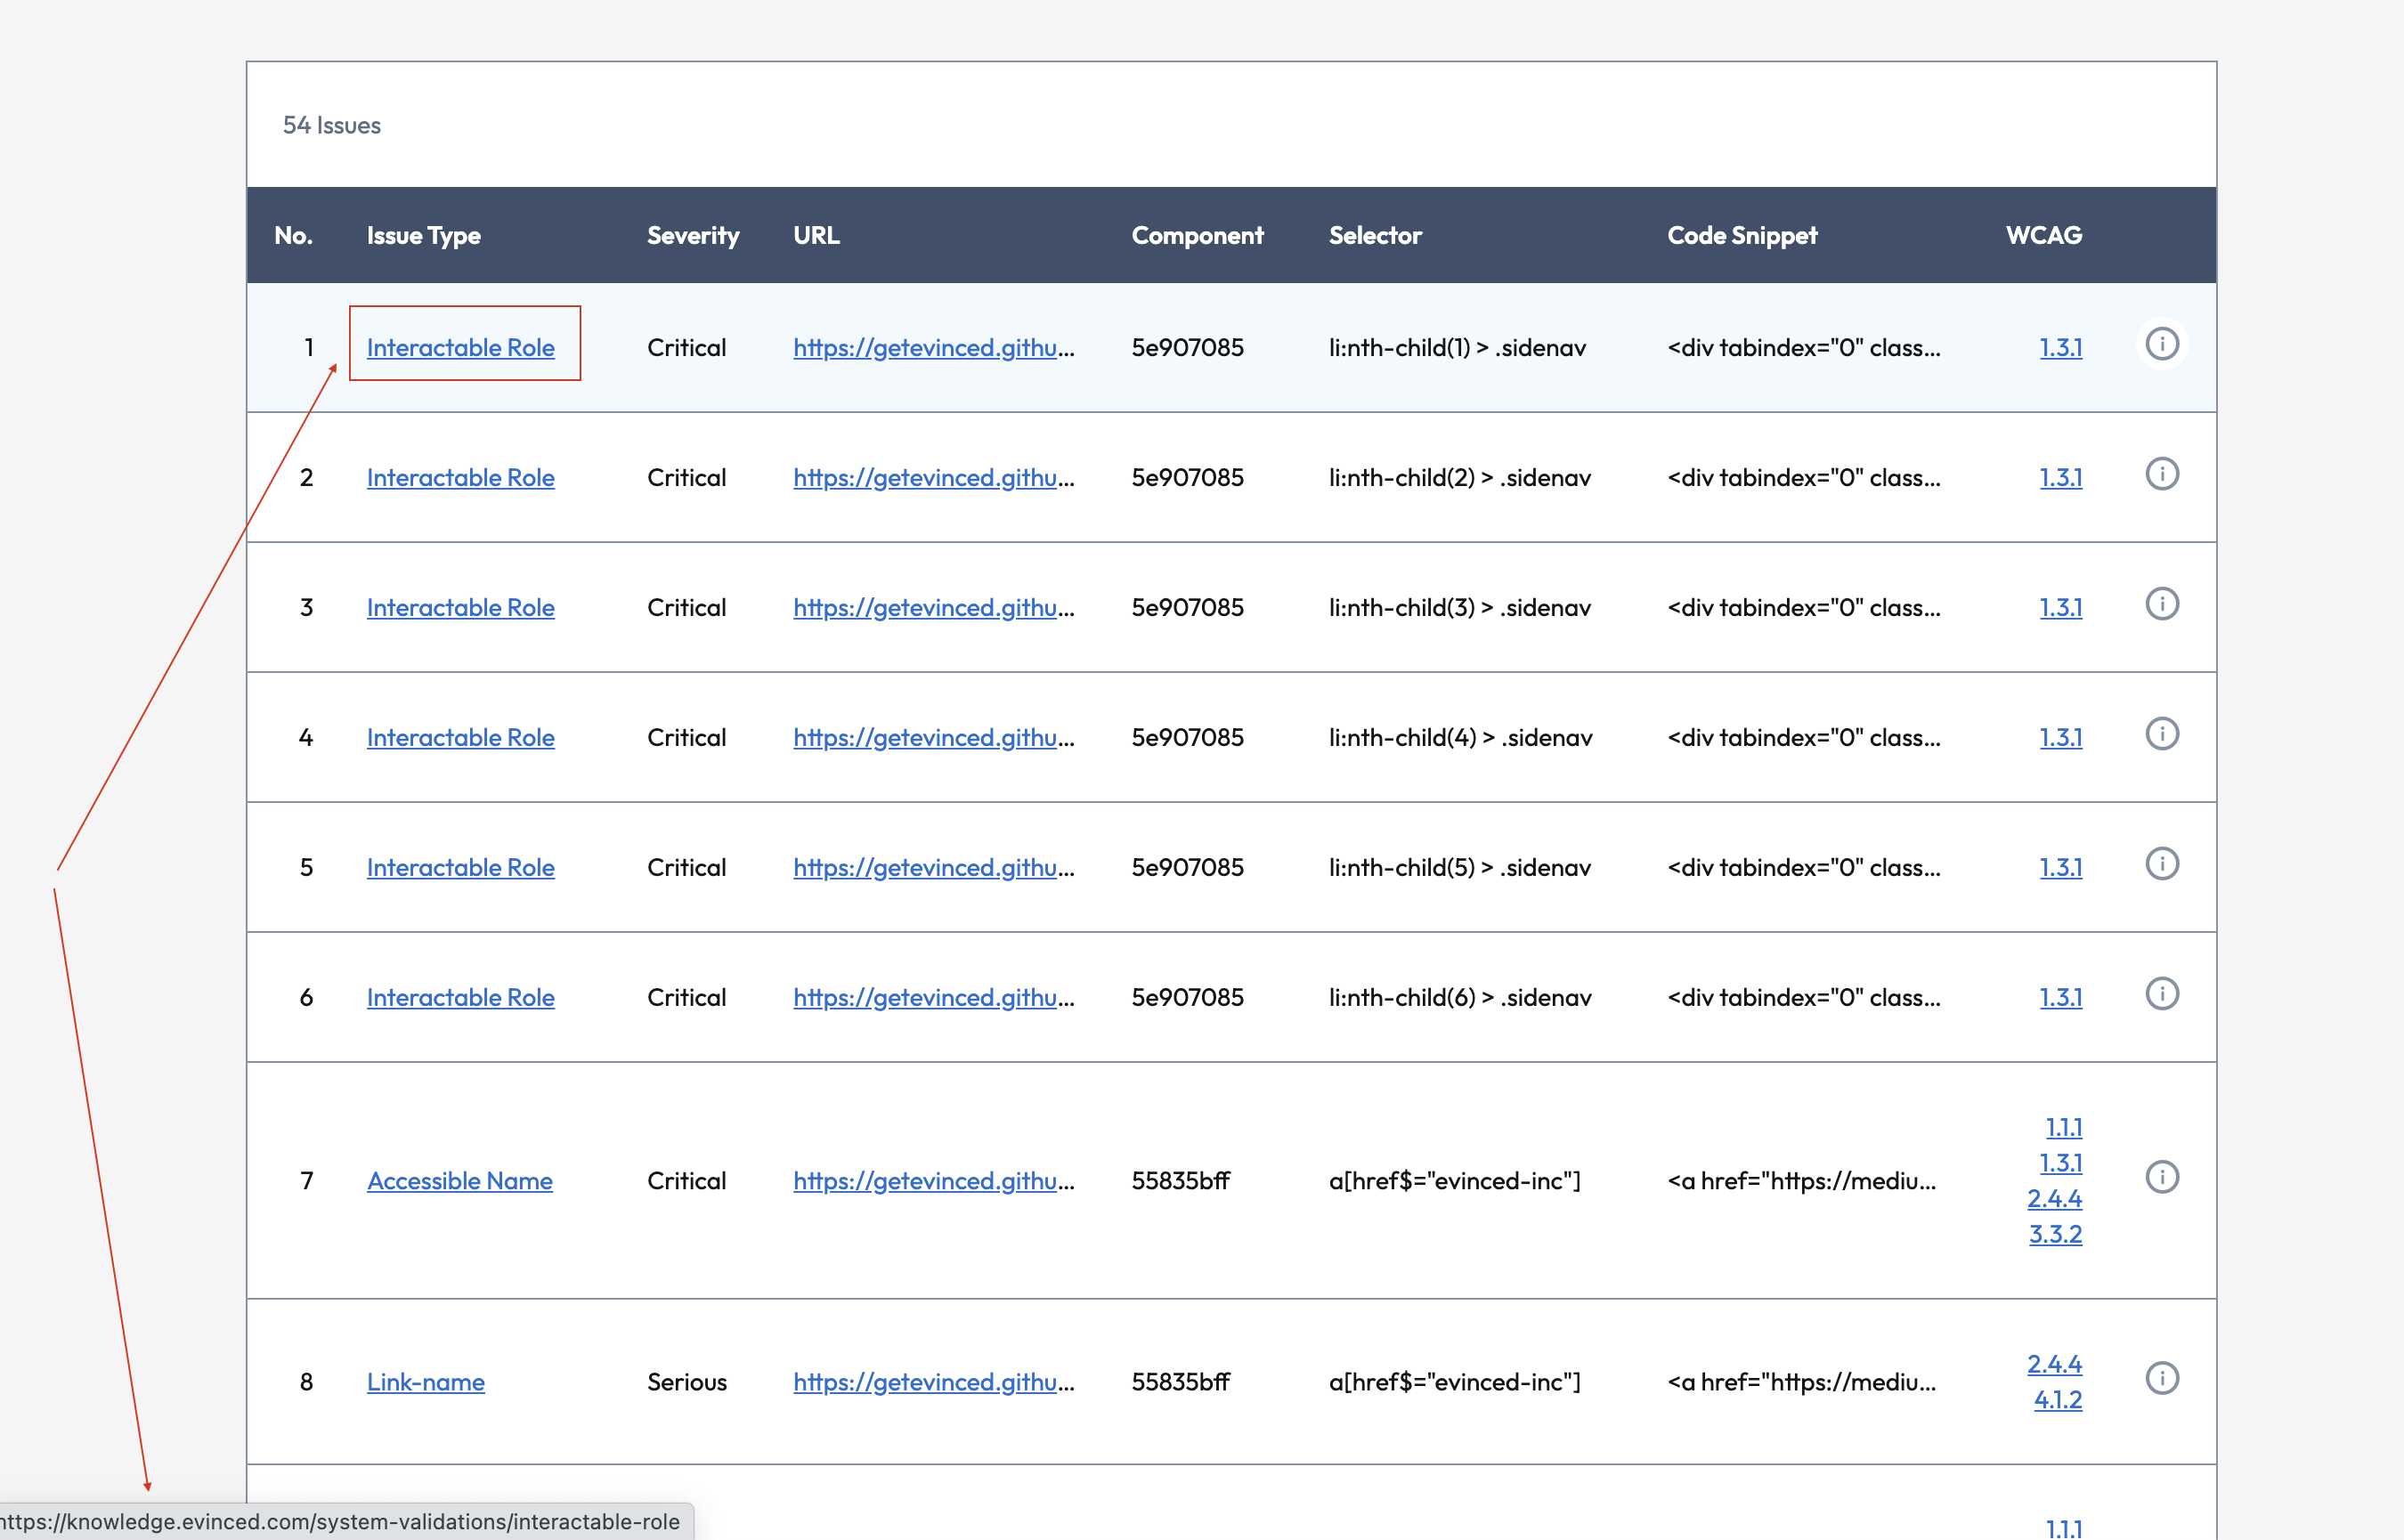
The knowledge base link can be overridden for every issue type ID.
Issue type IDs can be found by inspecting a JSON report as described in Web Reports.
For example, the issue with name Interactable Role has ID WRONG_SEMANTIC_ROLE.
Recommended:
1Evinced.init({2 analysis: {3 ISSUE_CONTENT_PER_TYPE: {4 WRONG_SEMANTIC_ROLE: {5 knowledgeBaseLink: 'https://yourKnowlegdeBase.com/'6 }7 }8 }9});
Deprecated (legacy flat issuesContentPerType key in env.evincedConfig or Evinced.init()):
1Evinced.init({2 issuesContentPerType: {3 WRONG_SEMANTIC_ROLE: {4 knowledgeBaseLink: 'https://yourKnowlegdeBase.com/'5 }6 }7});
Shadow DOM Support
Shadow DOM is now supported by default. No additional configuration is needed.
IFrames Support
When true, accessibility analysis includes iframe that exist inside the page.
Default: true.
When scan.iframes is enabled (default), accessibility analysis includes the application under test and same-origin page iframes — iframe elements in the page.
cypress.config.js with expose (Cypress 15.10+ / 16):
1const { defineConfig } = require('cypress');23module.exports = defineConfig({4 e2e: {5 setupNodeEvents(on) {6 on('task', { evTask: require('@evinced/cypress-sdk').cyEvTask });7 }8 },9 expose: {10 evincedConfig: {11 scan: { iframes: false }12 }13 }14});
cypress.config.js with env (Cypress 12–15):
1module.exports = {2 env: {3 evincedConfig: {4 scan: { iframes: false }5 }6 }7};
Evinced.init():
1Evinced.init({2 scan: { iframes: false }3});
Per command:
1cy.evStart({ scan: { iframes: false } });2cy.evAnalyze({ scan: { iframes: false } });
Important. Cross-origin page iframes are not analyzed. Findings inside those frames are not collected. Analysis still runs in the main application window and any same-origin nested frames.
During continuous recording (cy.evStart / cy.evStop), the SDK also analyzes dynamically added iframes and continues analysis when an existing iframe navigates to a new src.
Note: Since iframe analysis is enabled by default, tests may take longer on pages with multiple or complex iframes.
Include Hidden IFrames Domain
Configures which hidden iframe domains are included in accessibility analysis. By default, hidden iframes are excluded for performance and security reasons.
This setting allows you to specify a list of domains to analyze even when the iframe is hidden.
Supported pattern formats:
- Exact match:
example.com— matches the exact URL string - Regex with flags:
/.*\.google\.com.*/i— matches using regex with optional flags (i, g, m, u, y) - Raw regex:
.*\.example\.com.*— matches using a raw regex pattern
Per command:
1cy.evAnalyze({2 scan: {3 iframes: true,4 iframeDomains: [5 'https://exact-domain.com',6 '/.*\.google\.com.*/i',7 '.*\.example\.com.*'8 ]9 }10});
cypress.config.js with expose:
1const { defineConfig } = require('cypress');23module.exports = defineConfig({4 expose: {5 evincedConfig: {6 scan: {7 iframes: true,8 iframeDomains: [9 'https://exact-domain.com',10 '/.*\.google\.com.*/i'11 ]12 }13 }14 }15});
Evinced.init():
1Evinced.init({2 scan: {3 iframes: true,4 iframeDomains: [5 'https://exact-domain.com',6 '/.*\.google\.com.*/i'7 ]8 }9});
Proxy
Configures proxy server access settings. Needed to enable outbound communication to the Evinced Platform through a proxy server.
You can configure pages to load over the HTTP(S) proxy via environment variables. You can optionally specify username and password for HTTP(S) proxy. Here is an example of a global proxy:
1export HTTPS_PROXY=https://username:password@your-proxy-url:port
Network Idle Detection
The networkIdle configuration enables the SDK to wait for all network requests to complete before
running accessibility analysis. This is particularly useful for modern web applications that load
content dynamically after the initial page load.
Why use Network Idle Detection?
When testing modern web applications, accessibility analysis may run before all content has loaded, resulting in:
- Incomplete results: Dynamic content not yet rendered won't be analyzed
- False negatives: Accessibility issues in delayed content won't be detected
- Inconsistent results: Analysis timing may vary between test runs
Network idle detection solves this by ensuring all network activity has settled before analysis begins.
Configuration Options:
| Option | Type | Default | Description |
|---|---|---|---|
enabled | boolean | false | Enables or disables network idle detection |
idleTimeout | number | 300 | Time in milliseconds to wait after the last network request completes before considering the network idle |
maxWaitTime | number | 7500 | Maximum time in milliseconds to wait for network idle. If exceeded, analysis proceeds with a warning |
Network idle detection can be configured globally during SDK initialization or per-command for granular control.
Global Configuration
Recommended:
1Evinced.init({2 network: {3 idle: {4 enabled: true,5 timeout: 300,6 maxWait: 75007 }8 }9});
Deprecated (legacy flat networkIdle):
1Evinced.init({2 networkIdle: {3 enabled: true,4 idleTimeout: 300,5 maxWaitTime: 75006 }7});
Per-Command Configuration
Recommended:
1cy.evStart({2 network: { idle: { enabled: true, maxWait: 10000 } }3});45cy.evAnalyze({6 network: { idle: { enabled: true, maxWait: 5000 } }7});
Deprecated:
1cy.evStart({2 networkIdle: {3 enabled: true,4 maxWaitTime: 100005 }6});78cy.evAnalyze({9 networkIdle: {10 enabled: true,11 maxWaitTime: 500012 }13});
Usage Example
1cy.evStart({ network: { idle: { enabled: true } } });2cy.visit('https://example.com/app');3cy.get('[data-nav="products"]').click();4cy.evStop();56cy.visit('https://example.com/products');7cy.evAnalyze({ network: { idle: { enabled: true } } });
Configuration Options
network.idle.enabled(boolean, default:false) - Enable/disable network idle detectionnetwork.idle.timeout(number, default:300) - Milliseconds to wait with no active requests before considering network idlenetwork.idle.maxWait(number, default:7500) - Maximum time to wait before proceeding anyway
How It Works:
The SDK monitors all network requests and waits for the network to become idle before proceeding with analysis:
- Network is considered "idle" when no requests are active for at least
idleTimeoutmilliseconds - Analysis waits for idle state or
maxWaitTime, whichever comes first - Configuration from
evStart()automatically applies to subsequent page navigations andevStop()
Best Practices:
- Start with defaults: Enable with default settings and adjust only if needed
- Increase timeout for slow APIs: If your backend is slow, increase
maxWaitTime - Use per-command for specific pages: Enable only for pages with dynamic content
Important Notes:
- Disabled by default: The feature is opt-in to maintain backward compatibility
- No overhead when disabled: When not enabled, there is zero performance impact
- Automatic timeout extension: Command timeouts are automatically adjusted based on
maxWaitTime - Warning on timeout: If
maxWaitTimeis exceeded, the SDK logs a warning and proceeds with analysis
Global Switch
When false, disables Evinced functionality. Enabled by default, use this setting to disable
Evinced accessibility analysis when not needed during test development or when running CI jobs
where accessibility testing is not intended.
Default: true.
When switched off:
evStart()andevSaveFile()will be bypassed.evStop()andevAnalyze()will return an empty report.
Switching Evinced Functionality Off in Configuration
1// Add the following code to cypress.config.js (version >=v10) or cypress.json (version <v10)2env: {3 evincedConfig: {4 switchOn: false5 }6}
Important! Global Switch environment variable overrides the global configuration option.
Switching Evinced Functionality Off in Environment
Recommended (cypress.config.js):
1module.exports = {2 env: {3 evincedConfig: {4 switchOn: false5 }6 }7};
Recommended (environment variable):
1export CYPRESS_EV_SWITCH_ON="false"
Alternative (same modern key via Evinced.init()):
1Evinced.init({ switchOn: false });
Uploading Reports to Evinced Platform
Introduction
Evinced Platform allows you to seamlessly collect, organize, visualize and monitor Evinced accessibility reports in one place. In this section, we will guide you through the key functionalities of the upload methods of the accessibility reports from the Evinced SDK to the Evinced Platform, which was introduced in version 4.3.0. This upload method is fully compatible with the previous versions of the Evinced SDK API, and is disabled by default.
Enable Upload Report to Platform
To enable the uploading functionality of accessibility reports to
the Evinced Platform you will need to set the enableUploadToPlatform
feature flag to true via global setUploadToPlatformConfig method:
1// file: support/e2e.js2import Evinced from "@evinced/cypress-sdk";3Evinced.setUploadToPlatformConfig({4 enableUploadToPlatform: true,5 setUploadToPlatformDefault: false,6});
Recommended (cypress.config.js):
1module.exports = {2 env: {3 evincedConfig: {4 platform: {5 upload: {6 enabled: true, // Allows platform upload when a scan opts in or when autoUpload is true7 autoUpload: false // When false, upload only when a command passes uploadToPlatform: true8 }9 }10 }11 }12};
Deprecated (legacy flat keys in env.evincedConfig):
1module.exports = {2 env: {3 evincedConfig: {4 uploadToPlatformOptions: {5 enableUploadToPlatform: true,6 setUploadToPlatformDefault: false7 }8 }9 }10};
Deprecated (setUploadToPlatformConfig()):
1Evinced.setUploadToPlatformConfig({2 enableUploadToPlatform: true,3 setUploadToPlatformDefault: false4});
Warning: Settings in cypress.config.js take precedence over setUploadToPlatformConfig() when both are used.
platform.upload.enabled turns platform upload on for the SDK. platform.upload.autoUpload controls whether uploads happen automatically after each scan (true) or only when a command explicitly passes uploadToPlatform: true (false, default).
Note: Using uploadToPlatform: true in method parameters (e.g., cy.evAnalyze({ uploadToPlatform: true })) is not sufficient on its own when autoUpload is false. You must first enable upload via platform.upload.enabled (or legacy setUploadToPlatformConfig() / uploadToPlatformOptions).
Automatic Report Upload
Once the enableUploadToPlatform method is set to true and setUploadToPlatformDefault is true (which is the default),
all generated reports will be automatically uploaded to the Platform immediately upon calling the evStop() or evAnalyze() command.
How it works:
- When
enableUploadToPlatform: trueandsetUploadToPlatformDefault: true (default), upload happens automatically - No additional code is needed - just call
evAnalyze()orevStop()and the report uploads - Upload occurs synchronously as part of the command execution
If you want to change this behavior and control uploads manually, set the setUploadToPlatformDefault feature flag to false.
Automatic Upload of Reports
Once upload is enabled, reports can upload automatically at the end of each analysis session when platform.upload.autoUpload is true (legacy: setUploadToPlatformDefault: true).
Recommended (cypress.config.js):
1module.exports = {2 env: {3 evincedConfig: {4 platform: {5 upload: {6 enabled: true,7 autoUpload: true8 }9 }10 }11 }12};
Deprecated (legacy flat keys in env.evincedConfig):
1module.exports = {2 env: {3 evincedConfig: {4 uploadToPlatformOptions: {5 enableUploadToPlatform: true,6 setUploadToPlatformDefault: true7 }8 }9 }10};
Deprecated (setUploadToPlatformConfig()):
1import Evinced from '@evinced/cypress-sdk';23Evinced.setUploadToPlatformConfig({4 enableUploadToPlatform: true,5 setUploadToPlatformDefault: true6});
If the setUploadToPlatformDefault is disabled, you can still upload
selected reports to the platform.
For that, use the following parameter in the evStop() command:
The uploadToPlatform flag is optional. Use it if you have the setUploadToPlatformDefault flag set to false. If the setUploadToPlatformDefault flag is set to true, then every report will be uploaded to the platform.
1cy.evStop({ uploadToPlatform: true }).then((report) => {2 // some code3});
Or, in the evAnalyze() command:
1cy.evAnalyze({ uploadToPlatform: true }).then((report) => {2 // some code3});
Test Names
To facilitate report management and be able to distinguish between different reports on the Platform, use the Cypress.currentTest (https://docs.cypress.io/api/cypress-api/currenttest) method to inform the test name and test class.
It’s recommended to do that in the “beforeEach” hook.
1beforeEach(() => {2 cy.addLabel({3 testName: Cypress.currentTest.title4 });5});
Labels and Custom Fields
You can attach labels and custom fields to your report to enhance readability and organization in the platform. Labels help you filter, search, and organize reports on the Evinced Platform.
There are two types of labels:
Built-in Labels: Pre-defined labels that can be set using the addLabel method. Available built-in labels include:
testName- The name of the testtestFile- The file path of the testenvironment- The environment where the test runs (e.g., "Development", "Staging", "Production")flow- The test flow identifiergitBranch- The Git branch namegitUserName- The Git user namegitVersion- The Git commit version
Custom Labels: Flexible key-value pairs that can be set using the customLabel method. You can use any custom key-value pairs, including:
- Single values:
{ productVersion: '1.0.0' } - Multiple values (arrays):
{ browsers: ['Chrome', 'Firefox'] } - Special label
unitId: Use this to tag tests for relevant units within your organization
See the following code examples of how to set up labels:
1it('Test', () => {2 // Set built-in labels3 cy.addLabel({4 testName: 'My Test',5 environment: 'testEnvironment',6 gitBranch: 'main'7 });89 // Set custom labels (including unitId for organizational tagging)10 cy.customLabel({11 userAgent: 'Chrome',12 browsers: ['Chrome 1.00', 'Firefox 2.00'],13 productVersion: '1.0.0',14 unitId: 'unit-123' // Tag for organizational unit15 });16 // the rest of the test17});
Use of beforeEach and afterEach Hooks
We recommend using the beforeEach and afterEach hooks to control analysis sessions and upload reports to the platform. This way, each test will be uploaded separately with its own report.
In beforeEach hook use evStart() to start Evinced analysis and set any labels
you want for the report to contain when uploading to the platform.
In the afterEach hook call evStop() to stop analysis and upload reports to the platform.
See this code example:
1beforeEach(() => {2 cy.evStart();3 cy.visit('https://getevinced.github.io/spa-example/#/services');4 cy.addLabel({5 testName: Cypress.currentTest.title6 });7});89afterEach(() => {10 cy.evStop({ uploadToPlatform: true }).then((report) => {11 // some code12 });13});
Putting All of This Together
Here is a complete code snippet of how to perform uploads to the platform on a per-test basis.
12context('Upload to platform', () => {3 beforeEach(() => {4 cy.evStart();5 cy.visit('https://getevinced.github.io/spa-example/#/services');6 cy.addLabel({7 testName: Cypress.currentTest.title8 });9 });1011 afterEach(() => {12 cy.wait(1000);13 cy.evStop({ uploadToPlatform: true }).then((report) => {14 expect(report).to.have.length(22);15 });16 });1718 it('Test. Upload to platform with hooks', () => {19 cy.addLabel({20 environment: 'demo',21 customFields: { newValue: 'testValue' }22 });2324 cy.customLabel({25 customParameter: 'demo label',26 productVersion: '1.00'27 });28 });29});30
Accessing Upload Information
After uploading issues to the platform, you can retrieve the upload test ID and platform URL using these convenience methods.
Methods:
getUploadTestId()
Returns the unique test ID generated for the upload.
1cy.evGetUploadTestId().then((testId) => {2 cy.log(`Upload Test ID: ${testId}`);3 // Output: Upload Test ID: a58e1808-3b31-4b6b-8a14-3d8e95fe76434});
getUploadTestUrl()
Returns the platform URL where the uploaded report can be viewed.
1cy.evGetUploadTestUrl().then((platformUrl) => {2 cy.log(`Platform URL: ${platformUrl}`);3 // Output: Platform URL: https://platform.evinced.com/web-sdk/test/a58e1808-3b31-4b6b-8a14-3d8e95fe76434});
Complete Example:
1cy.evStop({ uploadToPlatform: true }).then((report) => {2 // Get upload information3 cy.evGetUploadTestId().then((testId) => {4 cy.log(`Test ID: ${testId}`);5 });67 cy.evGetUploadTestUrl().then((platformUrl) => {8 cy.log(`Platform URL: ${platformUrl}`);9 });10});
Tutorials
You can find fully functional example projects on our GitHub.
Generating a comprehensive accessibility report for your application
In this tutorial, we will enhance our existing Cypress UI test with the Evinced Cypress SDK in order to check our application for accessibility issues. In order to get started you will need the following:
- All of the prerequisites for the Evinced Cypress SDK should be met
- Evinced Cypress SDK should be added to your project
Preface - existing UI test overview
Let’s consider the following basic UI test as our starting point.
1context("Evinced Demo Site tests", () => {2 it("Search Test", () => {3 cy.visit("https://demo.evinced.com/");4 const BASE_FORM_SELECTOR =5 "#gatsby-focus-wrapper > main > div.wrapper-banner > div.filter-container";6 const SELECT_HOME_DROPDOWN = `${BASE_FORM_SELECTOR} > div:nth-child(1) > div > div.dropdown.line`;7 const SELECT_WHERE_DROPDOWN = `${BASE_FORM_SELECTOR} > div:nth-child(2) > div > div.dropdown.line`;8 const TINY_HOME_OPTION = `${BASE_FORM_SELECTOR} > div:nth-child(1) > div > ul > li:nth-child(2)`;9 const EAST_COST_OPTION = `${BASE_FORM_SELECTOR} > div:nth-child(2) > div > ul > li:nth-child(3)`;10 cy.get(SELECT_HOME_DROPDOWN).click();11 cy.get(TINY_HOME_OPTION).click();12 cy.get(SELECT_WHERE_DROPDOWN).click();13 cy.get(EAST_COST_OPTION).click();14 });15});
We wrote this test for a demo travel site called TRVL that has a few known accessibility issues.
The purpose of this test is to check the functionality of the main application screen and ensure a user can successfully select their desired trip. For now, this test is only concerned with the functional testing of the app. However, with the help of the Evinced Cypress SDK, we can also check it for accessibility issues along the way. Let’s go through this process with the following step-by-step instructions.
Step #1 - Initialize the Evinced Cypress SDK
In your cypress/support/e2e.js file add the following lines to add the Evinced engine to your project. See details about Evinced.init in API section.
1import Evinced from "@evinced/cypress-sdk";2Evinced.init();
Step #2 - Start the Evinced engine
Now that we have everything we need to scan for accessibility issues, let’s start the Evinced engine. Since we are going to use it scan throughout our test, the best place for its initialization will be our before method.
1context("Evinced Demo Site tests", () => {2 before(() => {3 // Start the Evinced engine4 cy.evStart();5 });67 it("Search Test", () => {8 cy.visit("https://demo.evinced.com/");9 const BASE_FORM_SELECTOR =10 "#gatsby-focus-wrapper > main > div.wrapper-banner > div.filter-container";11 const SELECT_HOME_DROPDOWN = `${BASE_FORM_SELECTOR} > div:nth-child(1) > div > div.dropdown.line`;12 const SELECT_WHERE_DROPDOWN = `${BASE_FORM_SELECTOR} > div:nth-child(2) > div > div.dropdown.line`;13 const TINY_HOME_OPTION = `${BASE_FORM_SELECTOR} > div:nth-child(1) > div > ul > li:nth-child(2)`;14 const EAST_COST_OPTION = `${BASE_FORM_SELECTOR} > div:nth-child(2) > div > ul > li:nth-child(3)`;15 cy.get(SELECT_HOME_DROPDOWN).click();16 cy.get(TINY_HOME_OPTION).click();17 cy.get(SELECT_WHERE_DROPDOWN).click();18 cy.get(EAST_COST_OPTION).click();19 });20});
Step #3 - Stop the Evinced engine and create reports
As our test was executed we collected a lot of accessibility information. We can now perform accessibility assertions at the end of our test suite. Referring back again to our UI test the best place for this assertion will be the method that gets invoked last - after. To stop the Evinced engine and generate the actual object representation of your accessibility report simply call the evStop() method. We can then output the report files in JSON format.
1context("Evinced Demo Site tests", () => {2 before(() => {3 // Start the Evinced engine4 cy.evStart();5 });67 after(() => {8 // Conclude the scan, print issues to cy.log with logIssues and print the report JSON object to browser's console9 cy.evStop({ logIssues: true }).should((report) => {10 console.log(JSON.stringify(report, null, 2));11 });12 });1314 it("Search Test", () => {15 cy.visit("https://demo.evinced.com/");16 const BASE_FORM_SELECTOR =17 "#gatsby-focus-wrapper > main > div.wrapper-banner > div.filter-container";18 const SELECT_HOME_DROPDOWN = `${BASE_FORM_SELECTOR} > div:nth-child(1) > div > div.dropdown.line`;19 const SELECT_WHERE_DROPDOWN = `${BASE_FORM_SELECTOR} > div:nth-child(2) > div > div.dropdown.line`;20 const TINY_HOME_OPTION = `${BASE_FORM_SELECTOR} > div:nth-child(1) > div > ul > li:nth-child(2)`;21 const EAST_COST_OPTION = `${BASE_FORM_SELECTOR} > div:nth-child(2) > div > ul > li:nth-child(3)`;22 cy.get(SELECT_HOME_DROPDOWN).click();23 cy.get(TINY_HOME_OPTION).click();24 cy.get(SELECT_WHERE_DROPDOWN).click();25 cy.get(EAST_COST_OPTION).click();26 });27});
For the sake of simplicity of this tutorial let’s simply assume that our application is accessible as long as it has no accessibility issues found. Thus, if we have at least one accessibility issue detected - we want our tests to be failed. Let’s add the corresponding assertion to our after method. For more information regarding reports as well as the Report object itself, please see our detailed Web Reports page.
1after(() => {2 // Scan for a11y issues, create the JSON report, and assert on the number of critical issues found3 cy.evStop().should((issues) => {4 expect(issues).to.be.empty();5 });6});
You are now set to run the test and ensure the accessibility of your application! So, go ahead and run it via your IDE or any other tooling you use for JavaScript development.
Fail the test if critical issues are found
Here you can see a way of failing your test if critical accessibility issues are found using the Cypress JS SDK.
Using evAnalyze:
1cy.evAnalyze().should((issues) => {2 const criticalIssues = issues.filter((issue) => issue.severity.name === 'Critical');3 assert(criticalIssues.length === 0, 'found critical issues');4});
Using evStart/evStop:
1await browser.evStart();23cy.evStop().should((issues) => {4 const criticalIssues = issues.filter((issue) => issue.severity.name === 'Critical');5 assert(criticalIssues.length === 0, 'found critical issues');6});
The criticalIssues array will contain all the critical issues found during the scan. If the array is not empty, the test will fail on the assertion.
Complete Test Suite Integration
You can use global hooks to seamlessly integrate the Evinced Cypress SDK into your test suite. By leveraging Cypress's before, after, beforeEach, and afterEach hooks, you can simplify setup and ensure the SDK is consistently initialized and managed across all tests.
Below is an example of how to update your e2e.js file to configure global hooks, including offline credentials setup and automatic start/stop of the Evinced SDK during your tests:
12import Evinced from '@evinced/cypress-sdk';34// Initialize the Evinced Cypress SDK5Evinced.init();67// Configure Offline Credentials8Evinced.setOfflineCredentials({9 serviceId: Cypress.env('CYPRESS_EVINCED_SERVICE_ID'),10 token: Cypress.env('CYPRESS_EVINCED_AUTH_TOKEN'),11});1213// Global `before` Hook: Runs once before all tests14before(() => {15 cy.log('Running global before');16});1718// Global `after` Hook: Runs once after all tests19after(() => {20 cy.log('Running global after');21});2223// Global `beforeEach` Hook: Runs before each test24beforeEach(() => {25 cy.log('Running global beforeEach');26 cy.evStart(); // Start the Evinced analysis session27});2829// Global `afterEach` Hook: Runs after each test30afterEach(() => {31 cy.log('Running global afterEach');32 cy.evStop(); // Stop the Evinced analysis session33});3435
Support
Please feel free to reach out to support@evinced.com with any questions.
FAQ
- Can I configure which validations to run?
Yes, see the Configuration section for details on how to configure Axe validations to your needs.
- Can I run tests with Evinced using cloud-based services like Sauce Labs, Perfecto, or BrowserStack?
Yes, we have tested the Evinced SDK on many of these types of cloud-based services and expect no issues.