Selenium JS SDK
The Evinced Selenium JS SDK integrates with new or existing Selenium WebDriver tests to automatically detect accessibility issues. By adding a few lines of code to your Selenium WebDriver project, you can begin analyzing all the web pages and DOM changes to provide a dynamic view of how your site can become more accessible. As a result of the test, a rich and comprehensive report is generated to easily track issues to resolution.
Interested in seeing this in action? Contact us to get started!
Prerequisites
- Selenium version 4 or higher
- Mocha tests only supported
Get started
Installation
To install Selenium JS SDK you will need either a file provided by Evinced Support or access to a remote repository that provides it. If you have neither, contact us to get started.
Installation with a locally provided file
With a local copy of the Selenium JS SDK gzipped tar package (.tgz extension), install it in your project using NPM or Node package manager of your choice:
1# Using NPM2npm install -D "path to js-selenium-sdk-<version>.tgz file"
Installation from a remote repository
Evinced Customers have the option of accessing Selenium JS SDK from a remote repository — the Evinced Jfrog Artifactory — to keep their SDK version up-to-date and to share the SDK internally at their organization.
When access is enabled, Selenium JS SDK is available at
https://evinced.jfrog.io/artifactory/restricted-npm/%40evinced/js-selenium-sdk.
Installation using NPM:
1npm install @evinced/js-selenium-sdk
Authentication
To launch Selenium JS SDK, you need to have a Service ID and an API Key.
Where to find your Evinced SDK credentials
These credentials are available via the Evinced Product Hub in the “Automation for Web” or “Automation for Mobile” product areas. Click the “Get SDK” button to see the Service Account ID and API Key at the bottom of the page.
Authenticate for Offline Testing
There are two methods to provide the token: online mode and offline mode. Online mode contacts the Evinced Licensing Server. Offline mode assumes that an Evinced employee has supplied a JSON Web Token (JWT). If an offline token is required, please reach out to your account team or support@evinced.com.
Please set credentials in environment variables and reference the environment variables in code.
1# Online mode2export EVINCED_SERVICE_ID=<serviceId>3export EVINCED_API_KEY=<apiKey>45# Offline mode, when a JWT has been provided by Evinced6export EVINCED_SERVICE_ID=<serviceId>7export EVINCED_AUTH_TOKEN=<token>
Setting credentials, an example:
1// Online credentials2const { setCredentials } = require('@evinced/js-selenium-sdk');34await setCredentials({5 serviceId: process.env.EVINCED_SERVICE_ID,6 secret: process.env.EVINCED_API_KEY7});89// OR1011// If provided a JWT by Evinced12// Offline credentials13const { setOfflineCredentials } = require('@evinced/js-selenium-sdk');1415setOfflineCredentials({16 serviceId: process.env.EVINCED_SERVICE_ID,17 token: process.env.EVINCED_AUTH_TOKEN,18});
Your First Test
SDK Initialization
To use Selenium JS SDK, you first need to authenticate. Please refer to Authentication for details.
Add Evinced Accessibility Checks (Single Run Mode)
This is a simple example of how to add an Evinced accessibility scan to a test. Please note the inline comments that give detail on each test step.
1const { Builder } = require('selenium-webdriver');2const { EvincedSDK } = require('@evinced/js-selenium-sdk');34describe('Demo page', async () => {5 let driver;67 it('Demo page. evAnalyze', async () => {8 const driver = await new Builder()9 .forBrowser('chrome')10 .build();11 const evincedService = new EvincedSDK(driver);12 await driver.get('https://demo.evinced.com/');13 const issues = await evincedService.evAnalyze();14 assert.equal(issues.length, 6);15 await driver.quit();16 });17});
Add Evinced Accessibility Checks (Continuous Mode)
This is an example of how to add a continuous Evinced accessibility scan to a test. Using the
evStart() and evStop() methods, the Evinced engine will continually scan in the background capturing all DOM changes and page navigation as the test is executed. This will capture all accessibility issues as clicking on drop-downs or similar interactions reveals more of the page. The advantage of continuous mode is that no interaction with the actual test code is needed.
1const { Builder } = require('selenium-webdriver');2const { EvincedSDK } = require('@evinced/js-selenium-sdk');34describe('Demo page', async () => {5 let driver;67 it('Demo page. evStart/evStop', async () => {8 const driver = await new Builder()9 .forBrowser('chrome')10 .build();11 const evincedService = new EvincedSDK(driver);12 await evincedService.evStart();13 await driver.get('https://demo.evinced.com/');14 const issues = await evincedService.evStop();15 assert.equal(issues.length, 6);16 await driver.quit();17 });18});
API
EvincedSDK
Prepares the Evinced object for use in the project.
The specific SDK initialization is not needed. You need just import EvincedSDK in your test files.
1const { EvincedSDK } = require('@evinced/js-selenium-sdk');
Refer to Configuration to see examples of initializing with options.
evAnalyze(options)
Scans the current page and returns a list of accessibility issues. This is the recommended method for static page analysis.
Note: This method is not supported if evStart() is already running.
1const evincedService = new EvincedSDK(driver);2await driver.get('https://demo.evinced.com/');3const issues = await evincedService.evAnalyze();
Returns Promise<Issue[]>.
The returned report object contains a list of accessibility issues.
For more information regarding reports as well as the report object itself, please refer to our detailed Web Reports page.
evStart(options)
Continually watches for DOM mutations and page navigation, recording accessibility issues
until the evStop() method is called. This method is recommended for dynamic page flows.
1const evincedService = new EvincedSDK(driver);2await evincedService.evStart();3await driver.get('https://demo.evinced.com/');4const issues = await evincedService.evStop();
Returns Promise<void>.
evStop(options)
Stops the issue-gathering process started by evStart().
1const evincedService = new EvincedSDK(driver);2await evincedService.evStart();3await driver.get('https://demo.evinced.com/');4const issues = await evincedService.evStop();
Returns Promise<Issue[]>.
The returned report object includes all accessibility issues detected between
the evStart() and evStop() method calls.
For more information regarding reports as well as the report object itself, please refer to our detailed Web Reports page.
evSaveFile(destination, issues, format)
Saves issues in a file with the specified format and location.
Supported formats are json, html, sarif, and csv.
Find detailed information in the Web Reports page.
1const evincedService = new EvincedSDK(driver);2await driver.get('https://demo.evinced.com/');3const issues = await evincedService.evAnalyze();4evincedService.evSaveFile(issues, 'html', 'test-results/evinced-report.html');5evincedService.evSaveFile(issues, 'csv', 'test-results/evinced-report.csv');6evincedService.evSaveFile(issues, 'json', 'test-results/evinced-report.json');7evincedService.evSaveFile(issues, 'sarif', 'test-results/evinced-report.sarif.json');
Returns Promise<void>.
Configuration
The same configuration object can be used when initializing the Evinced object
using evConfig.json and when calling the evStart()
and evAnalyze() methods but with a bit different consequences.
Providing options when initializing defines a global configuration for all calls
of evAnalyze() and evStart(), while providing options to
either of those methods affect only the test in which they are called.
Options provided in either evAnalyze() or evStart() override
those set in Evinced engine initialization.
Engines Configuration
Evinced uses two separate engines when scanning for accessibility issues, one is the aXe engine and the other is the Evinced engine. By default, Evinced disables the aXe Needs Review and Best Practices issues based on customer request and due to the fact they are mostly false positives. Please note this setting when comparing issue counts directly. See an example of how to enable Needs Review and Best practices issues in the Toggles section.
Configuration Object
To define global configuration for Selenium JS SDK please use file `evConfig.json in a root directory of your project.
1export type EvInitOptions = {2 rootSelector?: string;3 enableScreenshots?: boolean;4 axeConfig?: axe.RunOptions;5 skipValidations?: SkipValidation[];6 logging?: {7 LOGGING_LEVEL: string;8 ADD_LOGGING_CONTEXT?: boolean;9 };10 toggles?: { [key: string]: boolean };11};
Root Selector
Sets a CSS selector to limit the Evinced Engine to scan only the selected element and its children. Must be a valid CSS selector. If not set, the Evinced Engine will scan the entire document.
Default: no value
1const evincedService = new EvincedSDK(driver);2await evincedService.evStart({3 initOptions: {4 rootSelector: '.some-selector'5 }6});7await driver.get('https://demo.evinced.com/');8const issues = await evincedService.evStop();
Axe Configuration
Configures Axe open-source accessibility toolkit, which the Evinced engine includes with its own, more extensive accessibility detection. For full Axe config options, see Axe Core API.
1const evincedService = new EvincedSDK(driver);2await driver.get('https://demo.evinced.com/');3const axeConfig = {4 rules: {5 "link-name": { enabled: false },6 },7};8const issues = await evincedService.evAnalyze({9 initOptions: {10 axeConfig11 }12});
Engine Logging
Set level of messages the Evinced engine will print to the console.
Valid levels are "debug", "info", "warn" and "error".
Default: "error"
1const evincedService = new EvincedSDK(driver);2await driver.get('https://demo.evinced.com/');3const issues = await evincedService.evAnalyze({4 initOptions: {5 logging: {6 LOGGING_LEVEL: 'debug',7 ADD_LOGGING_CONTEXT: true,8 },9 }10});
Reports Screenshots
When true, the Evinced SDK will include screenshots in its reports that
highlight elements with accessibility issues.
Default: false.
Note: Enabling screenshots may affect test run performance.
1const issues = await evincedService.evAnalyze({2 initOptions: {3 enableScreenshots: true,4 }5});
Toggles
Enables experimental features. Feature names and values may vary from release to release.
Example:
1const issues = await evincedService.evAnalyze({2 initOptions: {3 toggles: {4 USE_AXE_NEEDS_REVIEW: true,5 USE_AXE_BEST_PRACTICES: true6 }7 }8});
Skip Validations
Sets validation types to be skipped for specified URL pattern and CSS selector. Issue type IDs can be found by inspecting a JSON report as described in Web Reports.
Default: no validations skipped.
1const skipSelector = {2 selector: 'testValue.slds-checkbox',3 urlRegex: '.*',4 validationTypes: ["WRONG_SEMANTIC_ROLE", "NOT_FOCUSABLE", "NO_DESCRIPTIVE_TEXT"],5};6await evincedService.evStart({ initOptions: { skipValidations: [skipSelector] }});
Recording Service
This setting controls how frequently event-triggered functions are executed, helping to optimize performance and responsiveness. The option does not enable or disable the event-handling service itself but determines how frequently events are processed based on the selected mode.
Available modes:
debounce– Delays execution until a set time has passed since the last event. Useful for actions triggered by continuous input, such as typing in a search box, to avoid excessive function calls.throttle– Ensures execution at fixed intervals, regardless of event frequency. Ideal for scenarios like handling window resize events or scroll tracking, where limiting execution prevents performance degradation.
Default: Functions execute as triggering events occur.
An example of how to modify settings:
1const evincedService = new EvincedSDK(driver);23await evincedService.evStart({4 initOptions: {5 recordingService: {6 ENABLE_DEBOUNCE_NEW_SELECTORS: true,7 DEBOUNCE_NEW_SELECTORS_MS: 500,8 DELAY_MODE: 'throttle'9 },10 }11});1213await driver.get('https://demo.evinced.com/');1415await evincedService.evStop();
Shadow DOM Support
Shadow DOM is now supported by default. No additional configuration is needed.
If using an earlier release, configure shadow DOM support as follows:
1// Via evAnalyze method2const issues = await evincedService.evAnalyze({3 initOptions: {4 toggles: {5 SUPPORT_SHADOW_DOM: true6 }7 }8});910// Via evStart method11await evincedService.evStart({12 initOptions: {13 toggles: {14 SUPPORT_SHADOW_DOM: true15 }16 }17});1819// As a part of Global Configuration via evConfig.json20{21 "toggles": {22 "SUPPORT_SHADOW_DOM": true23 }24}
Uploading Reports to Evinced Platform
Introduction
Evinced Platform allows you to seamlessly collect, organize, visualize and monitor Evinced accessibility reports in one place. In this section, we will guide you through the key functionalities of the upload methods of the accessibility reports from the Evinced SDK to the Evinced Platform, which was introduced in version to be determined. This upload method is fully compatible with the previous versions of the Evinced SDK API, and is disabled by default.
The feature is not yet implemented in this SDK. If you’d like to increase the priority of it, please contact support@evinced.com.
Tutorials
You can find fully functional example projects on our GitHub.
Generating a comprehensive accessibility report for your application
In this tutorial, we will enhance our existing Selenium JS UI test with the Evinced JS Selenium SDK in order to check our application for accessibility issues. In order to get started you will need the following:
- All of the prerequisites for the Evinced JS Selenium SDK should be met
- Evinced JS Selenium SDK should be added to your project
Preface - existing UI test overview
Let’s consider the following basic UI test as our starting point.
1const { Builder } = require("selenium-webdriver");23describe("Evinced Demo site tests", async () => {4 let driver;5 before(async () => {6 let options;7 driver = await new Builder()8 .forBrowser("chrome")9 .setChromeOptions(options)10 .build();1112 await driver.manage().setTimeouts({ implicit: 1000 });13 });1415 after(async () => {16 await driver.quit();17 });1819 it("Demo page. Single page analyze", async () => {20 await driver.get("https://demo.evinced.com/");21 });22});
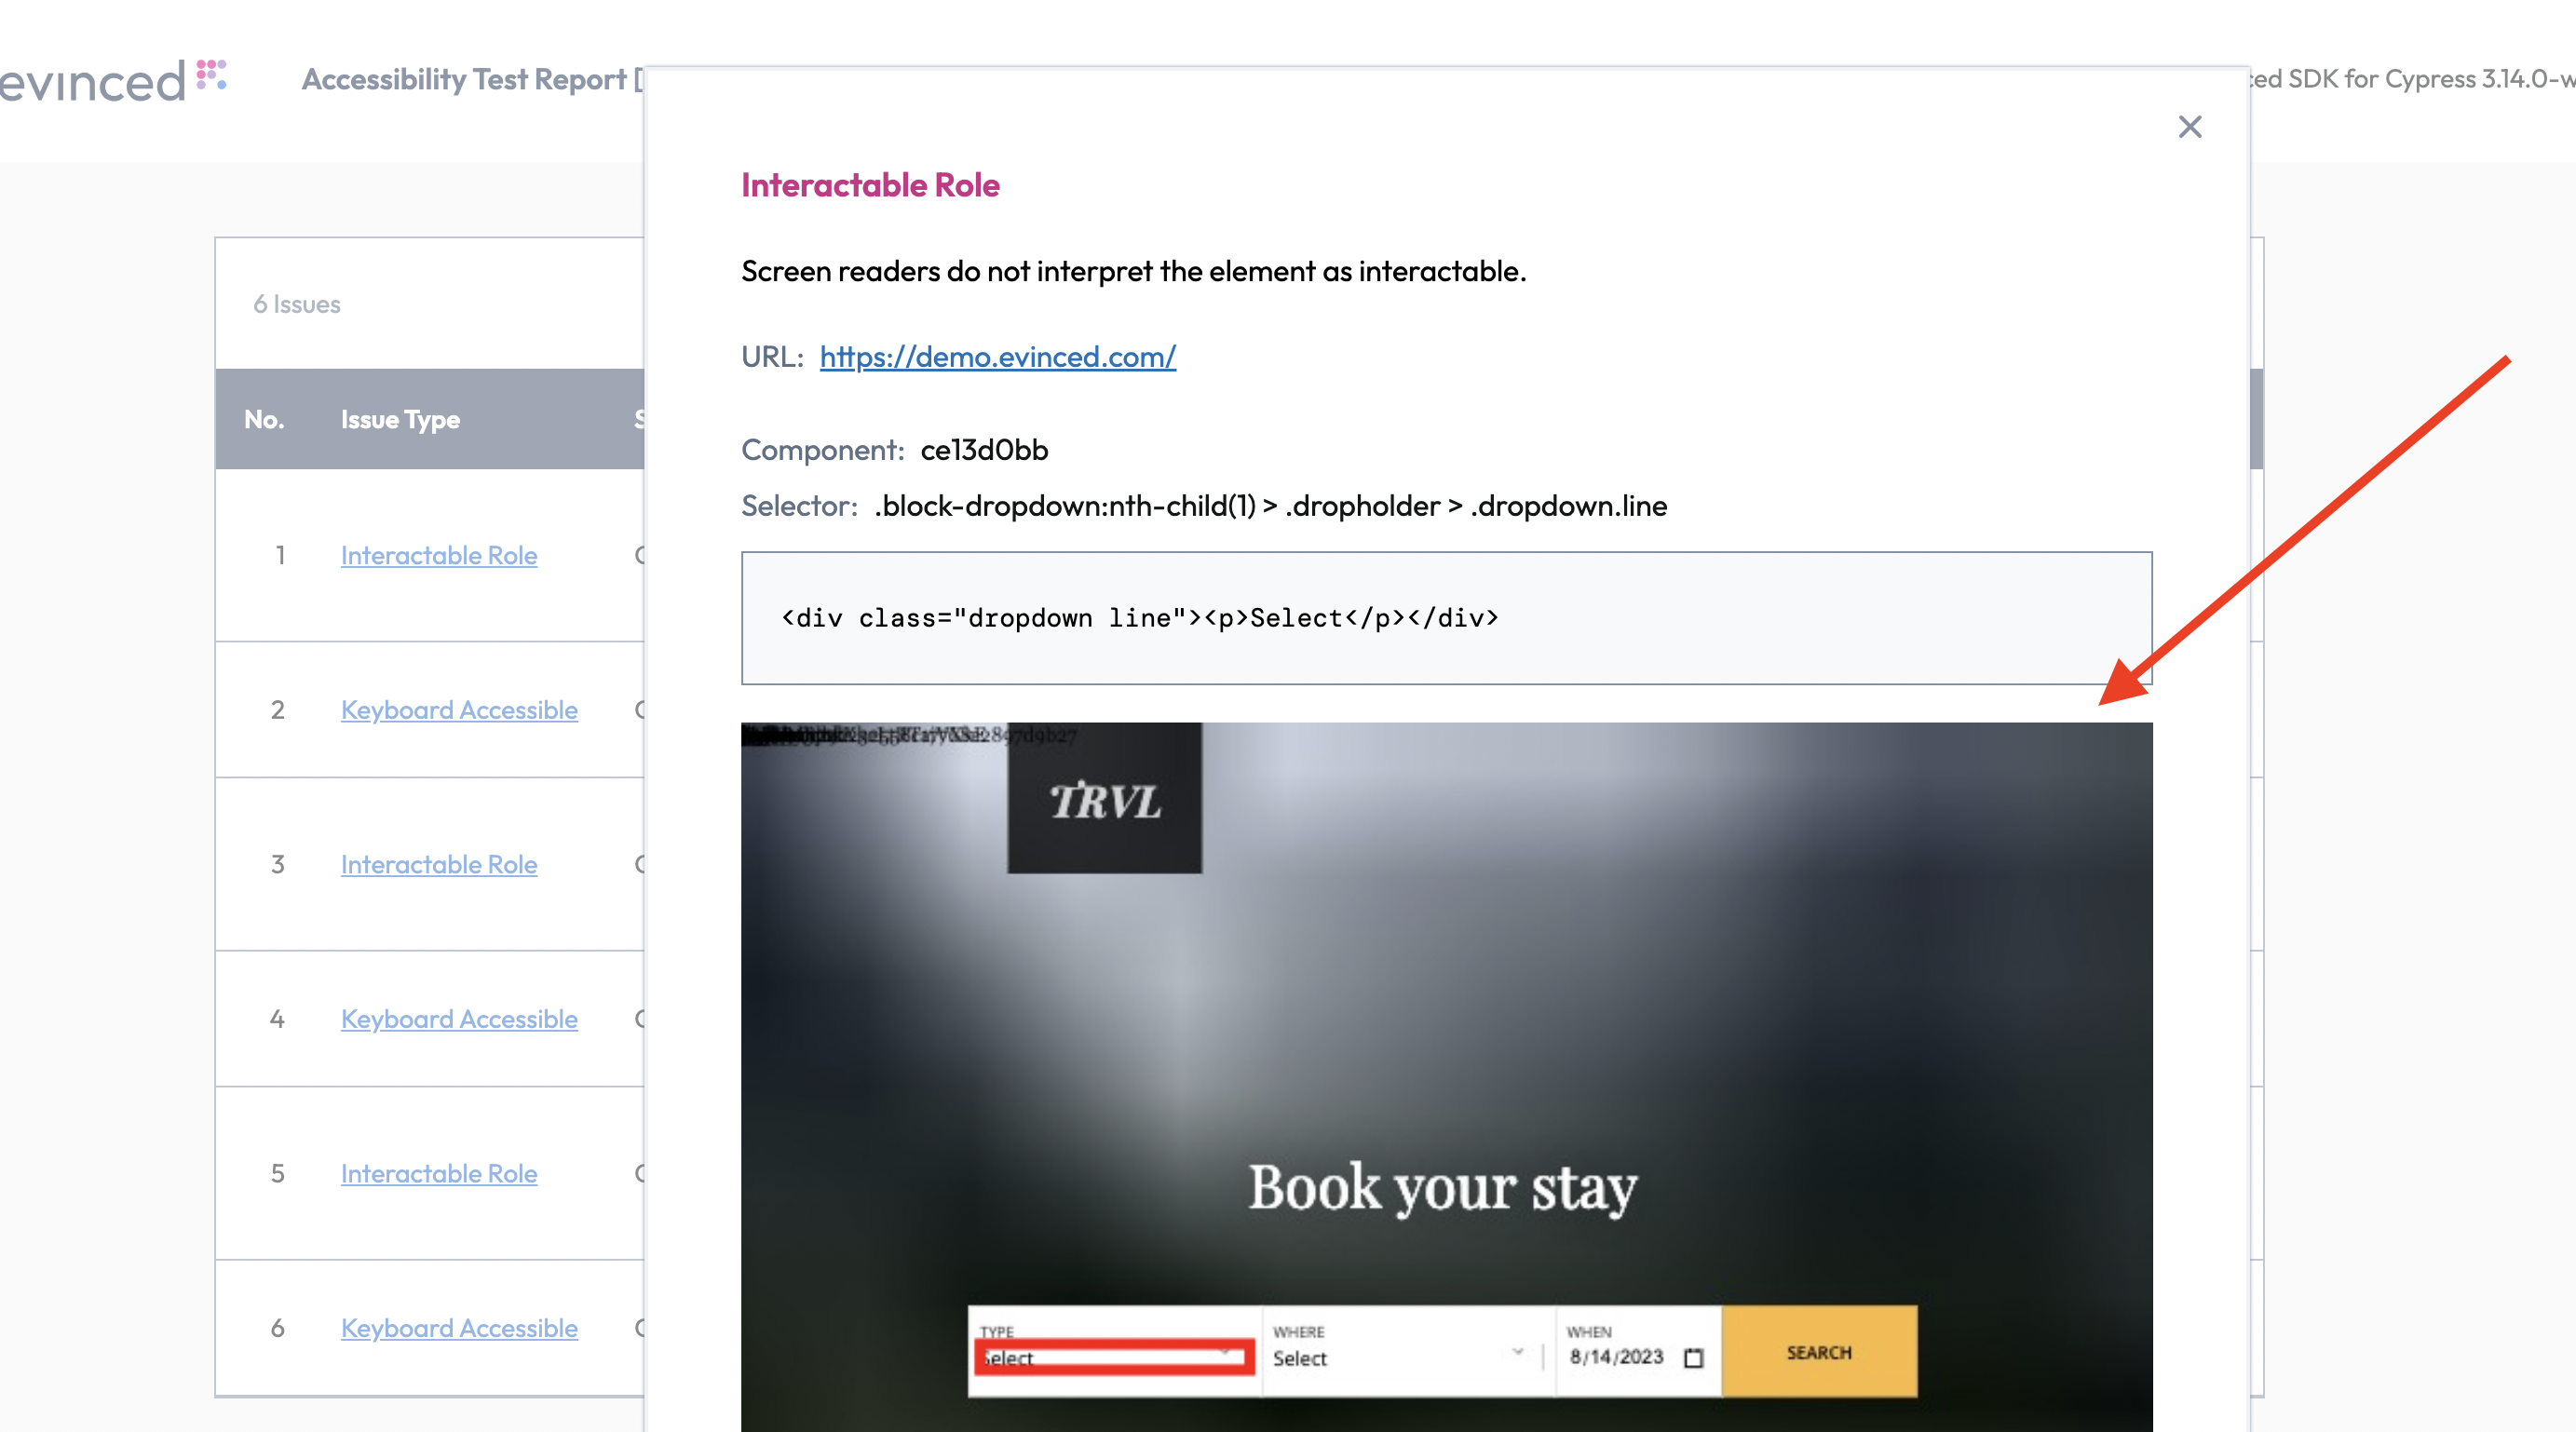
We wrote this test for a demo travel site called TRVL that has a few known accessibility issues.
The purpose of this test is to check the functionality of the main application screen and ensure a user can successfully select their desired trip. For now, this test is only concerned with the functional testing of the app. However, with the help of the Evinced JS Selenium SDK, we can also check it for accessibility issues along the way. Let’s go through this process with the following step-by-step instructions.
Step #1 - Importing the Evinced JS Selenium SDK
In your test file add the following lines to add the Evinced engine to your project.
1const { EvincedSDK } = require("@evinced/js-selenium-sdk");
Step #2 - Start the Evinced engine
Now that we have everything we need to scan for accessibility issues, let’s start the Evinced engine and set credentials. Let's use the offline setting for this example. Since we are going to use it scan throughout our test, the best place for its initialization will be our before method.
1const { Builder } = require("selenium-webdriver");2const { EvincedSDK } = require("@evinced/js-selenium-sdk");34describe("Evinced Demo site tests", async () => {5 let driver;6 let evincedService;7 before(async () => {8 setOfflineCredentials({9 serviceId: process.env.EVINCED_SERVICE_ID,10 token: process.env.EVINCED_AUTH_TOKEN,11 });12 let options;13 driver = await new Builder()14 .forBrowser("chrome")15 .setChromeOptions(options)16 .build();1718 await driver.manage().setTimeouts({ implicit: 1000 });19 evincedService = new EvincedSDK(driver);20 await evincedService.evStart();21 });2223 after(async () => {24 await driver.quit();25 });2627 it("Demo page. Single page analyze", async () => {28 await driver.get("https://demo.evinced.com/");29 });30});
Step #3 - Stop the Evinced engine and create reports
As our test was executed we collected a lot of accessibility information. We can now perform accessibility assertions at the end of our test suite. Referring back again to our UI test the best place for this assertion will be the method that gets invoked last - after. To stop the Evinced engine and generate the actual object representation of your accessibility report simply call the evStop() method.
1const { Builder } = require("selenium-webdriver");2const { EvincedSDK } = require("@evinced/js-selenium-sdk");34describe("Evinced Demo site tests", async () => {5 let driver;6 let evincedService;7 before(async () => {8 setOfflineCredentials({9 serviceId: process.env.EVINCED_SERVICE_ID,10 token: process.env.EVINCED_AUTH_TOKEN,11 });12 let options;13 driver = await new Builder()14 .forBrowser("chrome")15 .setChromeOptions(options)16 .build();1718 await driver.manage().setTimeouts({ implicit: 1000 });19 evincedService = new EvincedSDK(driver);20 await evincedService.evStart();21 });2223 after(async () => {24 const issues = await evincedService.evStop();25 await driver.quit();26 });2728 it("Demo page. Single page analyze", async () => {29 await driver.get("https://demo.evinced.com/");30 });31});
For the sake of simplicity of this tutorial let’s simply assume that our application is accessible as long as it has no accessibility issues found. Thus, if we have at least one accessibility issue detected - we want our tests to be failed. Let’s add the corresponding assertion to our after method. For more information regarding reports as well as the Report object itself, please see our detailed Web Reports page.
1after(async () => {2 const issues = await evincedService.evStop();3 assert.equal(issues.length, 0);4 await driver.quit();5});
You are now set to run the test and ensure the accessibility of your application! So, go ahead and run it via your IDE or any other tooling you use for JavaScript development.
Fail the test if critical issues are found
Here you can see a way of failing your test if critical accessibility issues are found using the Selenium JS SDK.
Using evAnalyze:
1const issues = await evincedService.evAnalyze();23const criticalIssues = issues.filter((issue) => issue.severity.name === 'Critical');4await assert(criticalIssues.length === 0, 'found critical issues');
Using evStart/evStop:
1await evincedService.evStart();2const issues = await evincedService.evStop();34const criticalIssues = issues.filter((issue) => issue.severity.name === 'Critical');5await assert(criticalIssues.length === 0, 'found critical issues');
The criticalIssues array will contain all the critical issues found during the scan. If the array is not empty, the test will fail on the assertion.
Support
Please feel free to reach out to support@evinced.com with any questions.
FAQ
- Can I configure which validations to run?
Yes, see the Configuration section for details on how to configure Axe validations to your needs.
- Can I run tests with Evinced using cloud-based services like Sauce Labs, Perfecto, or BrowserStack?
Yes, we have tested the Evinced SDK on many of these types of cloud-based services and expect no issues.