Selenium Java SDK
The Evinced Selenium Java SDK integrates with new or existing Selenium WebDriver tests to automatically detect accessibility issues. By adding a few lines of code to your Selenium WebDriver project, you can begin analyzing all the web pages and DOM changes to provide a dynamic view of how your site can become more accessible. As a result of the test, a rich and comprehensive report is generated to easily track issues to resolution.
Interested in seeing this in action? Contact us to get started!
Prerequisites
- Selenium version 3.141.59 or higher
- Java Version 11 or higher
- ChromeDriver or FirefoxDriver
Get started
Installation
To install Selenium Java SDK you will need either a file provided by Evinced Support or access to a remote repository that provides it. If you have neither, contact us to get started.
Installation with a locally provided file
You can install Selenium Java SDK using a standalone .jar distribution. In this case, you need to do the following:
- Download the .jar file.
- Unpack the provided selenium_sdk.zip to any desirable location.
- Add the following dependencies entries pointing to selenium_sdk.jar
- Gradle:1 implementation files('/Users/<path-to-your-unpacked-folder>/selenium_sdk.jar')
- Maven:
- First, install the “all” jar into your local Maven repository by the following command:
Example:1mvn org.apache.maven.plugins:maven-install-plugin:2.5.2:install-file -Dfile=selenium_sdk-<version>.jar -DpomFile=selenium_sdk-<version>.pom1mvn org.apache.maven.plugins:maven-install-plugin:2.5.2:install-file -Dfile=selenium_sdk-1.30.1.jar -DpomFile=selenium_sdk-1.30.1.pom - Add the corresponding dependency into your pom.xml:1 <dependency>2 <groupId>com.evinced</groupId>3 <artifactId>selenium_sdk</artifactId>4 <version>1.30.1</version>5 </dependency>
- First, install the “all” jar into your local Maven repository by the following command:
- Gradle:
Installation from a remote repository
Evinced Customers have the option of accessing Selenium Java SDK from a remote repository — the Evinced Jfrog Artifactory — to keep their SDK version up-to-date and to share the SDK internally at their organization.
When access is enabled, Selenium Java SDK is available at
https://evinced.jfrog.io/artifactory/restricted-maven/com/evinced/selenium_sdk.
Authentication
To launch Selenium Java SDK, you need to have a Service ID and an API Key.
Where to find your Evinced SDK credentials
These credentials are available via the Evinced Product Hub in the “Automation for Web” or “Automation for Mobile” product areas. Click the “Get SDK” button to see the Service Account ID and API Key at the bottom of the page.
Authenticate for Offline Testing
There are two methods to provide the token: online mode and offline mode. Online mode contacts the Evinced Licensing Server. Offline mode assumes that an Evinced employee has supplied a JSON Web Token (JWT). If an offline token is required, please reach out to your account team or support@evinced.com.
Please set credentials in environment variables and reference the environment variables in code.
1# Online mode2export EVINCED_SERVICE_ID=<serviceId>3export EVINCED_API_KEY=<apiKey>45# Offline mode, when a JWT has been provided by Evinced6export EVINCED_SERVICE_ID=<serviceId>7export EVINCED_AUTH_TOKEN=<token>
Setting credentials, an example:
Add this code either in some static initializer section or into BeforeAll clause, so it should be called once before the first test.
1// Online mode2EvincedSDK.setCredentials(System.getenv("EVINCED_SERVICE_ID"), System.getenv("EVINCED_API_KEY"));34// OR56// If provided a JWT by Evinced7// Offline mode8EvincedSDK.setOfflineCredentials(System.getenv("EVINCED_SERVICE_ID"), System.getenv("EVINCED_AUTH_TOKEN"));9
Your First Test
SDK Initialization
To use Selenium Java SDK, you first need to authenticate. Please refer to Authentication for details.
Add the import statement to the beginning of your test file.
1import com.evinced.EvincedWebDriver;
Under the hood, the Evinced SDK utilizes several Selenium commands in order to get accessibility data. For this reason, we need to initialize EvincedWebDriver with the ChromeDriver instance in the following way:
1EvincedWebDriver driver = new EvincedWebDriver(new ChromeDriver());
Using Evinced with RemoteWebDriver? Learn more
If your test framework is built on top of a RemoteWebDriver implementation (e.g., Selenium Grid, cloud-based services like BrowserStack, Sauce Labs, or other custom WebDriver servers), it is recommended to initialize the driver using the following code snippet:
1EvincedRemoteWebDriver driver = new EvincedRemoteWebDriver(new ChromeDriver());
Add Evinced Accessibility Checks (Single Run Mode)
This is a simple example of how to add an Evinced accessibility scan to a test. Please note the inline comments that give detail on each test step.
This is a simple JUnit example of how to add a single Evinced accessibility scan to a test. Please note the inline comments that give detail on each test step.
1@Test2public void evAnalyzeSimpleTest() {3 // Initialize EvincedWebDriver which wraps a ChromeDriver instance4 EvincedWebDriver driver = new EvincedWebDriver(new ChromeDriver());56 // Navigate to the site under test7 driver.get("https://www.google.com");89 // Run analysis and get the accessibility report10 Report report = driver.evAnalyze();1112 // Assert that there are no accessibility issues13 assertTrue(report.getIssues().size() == 0);14}
Add Evinced Accessibility Checks (Continuous Mode)
This is an example of how to add a continuous Evinced accessibility scan to a test. Using the
evStart() and evStop() methods, the Evinced engine will continually scan in the background capturing all DOM changes and page navigation as the test is executed. This will capture all accessibility issues as clicking on drop-downs or similar interactions reveals more of the page. The advantage of continuous mode is that no interaction with the actual test code is needed.
This is a simple JUnit example of how to add a continuous Evinced accessibility scan to a test. Using the evStart and evStop methods, the Evinced engine will continually scan in the background capturing all DOM changes as the test is executed. This will capture all accessibility issues as clicking on dropdowns or similar interactions reveals more of the page. The advantage of continuous mode is that no interaction with the actual test code is needed.
1import com.evinced.EvincedWebDriver;2import com.evinced.EvincedSDK;3import com.evinced.EvincedReporter;45@BeforeClass6public static void setUp() throws MalformedURLException, IOException {7 EvincedSDK.setCredentials(System.getenv("EVINCED_SERVICE_ID"), System.getenv("EVINCED_API_KEY"));8 driver = new EvincedWebDriver(new ChromeDriver());9 // Start the Evinced engine scanning for accessibility issues10 driver.evStart();11 //... the rest of our setup code12}1314@AfterClass15public static void tearDown() throws MalformedURLException, IOException {16 // Stop the Evinced engine17 Report report = driver.evStop();18 //Output the Evinced report in either JSON or HTML format19 EvincedReporter.evSaveFile("test-results", report, EvincedReporter.FileFormat.HTML);20 EvincedReporter.evSaveFile("test-results", report, EvincedReporter.FileFormat.JSON);21 driver.quit();22}2324@Test25public void evAnalyzeSimpleTest() {26 // Navigate to the site under test27 driver.get("https://www.google.com");28 // More test code...29}
API
EvincedWebDriver(chromeDriver, configuration)
Prepares the Evinced object for use in the project.
The EvincedWebDriver constructor expects an instance of ChromeWebDriver. It is possible to pass an instance of a
class that inherits or extends WebDriver.
1ChromeDriver chromeDriver = new ChromeDriver();2EvincedWebDriver driver = new EvincedWebDriver(chromeDriver);
Refer to Configuration to see examples of initializing with options.
evAnalyze(options)
Scans the current page and returns a list of accessibility issues. This is the recommended method for static page analysis.
Note: This method is not supported if evStart() is already running.
1Report report = evincedWebDriver.evAnalyze();
Returns Report.
The returned report object contains a list of accessibility issues.
For more information regarding reports as well as the report object itself, please refer to our detailed Web Reports page.
evStart(options)
Continually watches for DOM mutations and page navigation, recording accessibility issues
until the evStop() method is called. This method is recommended for dynamic page flows.
1evincedWebDriver.evStart();
Returns void.
evStop(options)
Stops the issue-gathering process started by evStart().
1evincedWebDriver.evStart();2Report report = evincedWebDriver.evStop();
Returns Report.
The returned report object includes all accessibility issues detected between
the evStart() and evStop() method calls.
For more information regarding reports as well as the report object itself, please refer to our detailed Web Reports page.
evSaveFile(destination, issues, format)
Saves issues in a file with the specified format and location.
Supported formats are json, html, sarif, and csv.
Find detailed information in the Web Reports page.
1Report report = evincedWebDriver.evStop();2 -- or --3Report report = evincedWebDriver.evAnalyze();45// create a JSON file named jsonReport.json6EvincedReporter.evSaveFile("jsonReport", report, EvincedReporter.FileFormat.JSON);78// create an HTML file named htmlReport.html9EvincedReporter.evSaveFile("htmlReport", report, EvincedReporter.FileFormat.HTML);1011// create an SARIF file named sarifReport.sarif.json12EvincedReporter.evSaveFile("sarifReport", report, EvincedReporter.FileFormat.SARIF);1314// create an CSV file named csvReport.csv15EvincedReporter.evSaveFile("csvReport", report, EvincedReporter.FileFormat.CSV);
Note: To generate a report in the specific format (but JSON) we are running some code on the browser side. If you are using custom WebDriver or there are some environmental issues with starting browser or driver during report generation, please use the command where you can provide the WebDriver object.
1WebDriver driver = yourCustomMethodToInstaantiateDriver();2// Generates aggregated report using custom WebDriver object3EvincedReporter.evSaveFile("htmlReport", EvincedReporter.FileFormat.HTML, driver);4driver.quit();
FileFormat
Defines the file type of the report. Options are JSON, HTML, SARIF and CSV.
Returns Path.
Aggregated Report
The aggregated report feature allows you to have a general aggregated report for
the whole run (not only for one test or suite). This report will contain all the
issues found by the tests where evStart() and
evStop() commands were called. It is still possible to use the
evSaveFile() command in any place of your code along with this
Aggregated Report feature.
1Path htmlAggregatedReport = EvincedReporter.evSaveFile("evinced-html-report", EvincedReporter.FileFormat.HTML);
Configuration
The same configuration object can be used when initializing the Evinced object
using EvincedConfiguration() and when calling the evStart()
and evAnalyze() methods but with a bit different consequences.
Providing options when initializing defines a global configuration for all calls
of evAnalyze() and evStart(), while providing options to
either of those methods affect only the test in which they are called.
Options provided in either evAnalyze() or evStart() override
those set in Evinced engine initialization.
Engines Configuration
Evinced uses two separate engines when scanning for accessibility issues, one is the aXe engine and the other is the Evinced engine. By default, Evinced disables the aXe Needs Review and Best Practices issues based on customer request and due to the fact they are mostly false positives. Please note this setting when comparing issue counts directly. See an example of how to enable Needs Review and Best practices issues in the Toggles section.
Configuration Object
EvincedWebDriver has an optional second parameter is an EvincedConfiguration. When configurations are passed via
the constructor, they are set as a default for all future actions.
1ChromeDriver chromeDriver = new ChromeDriver();2EvincedConfiguration configuration = new EvincedConfiguration();3EvincedWebDriver driver = new EvincedWebDriver(chromeDriver, configuration);
The configurations can be passed to a specific command, such as evAnalyze() or evStart(), it will override the constructor
configurations for that specific command's call.
1EvincedConfiguration configuration = new EvincedConfiguration();2configuration.setUseGlobalPersistentData(true);3Report report = evincedWebDriver.evAnalyze(configuration);
Root Selector
Sets a CSS selector to limit the Evinced Engine to scan only the selected element and its children. Must be a valid CSS selector. If not set, the Evinced Engine will scan the entire document.
Default: no value
1EvincedConfiguration configuration = new EvincedConfiguration();2configuration.setRootSelector(".some-selector"); // css selector
Axe Configuration
Configures Axe open-source accessibility toolkit, which the Evinced engine includes with its own, more extensive accessibility detection. For full Axe config options, see Axe Core API.
1EvincedConfiguration configuration = new EvincedConfiguration();2AxeConfiguration axeConfig = new AxeConfiguration();34// Axe's syntax to make `html-has-lang` validation disabled5axeConfig.setRules(Collections.singletonMap("html-has-lang", new AxeRuleConfiguration(false)));6configuration.setAxeConfig(axeConfig);
Engine Logging
Set level of messages the Evinced engine will print to the console.
Valid levels are "debug", "info", "warn" and "error".
Default: "error"
1EvincedConfiguration globalConfig = new EvincedConfiguration();23EngineLogging engineLogging = new EngineLogging();4engineLogging.setLoggingLevel("debug");5globalConfig.setEngineLogging(engineLogging)
Reports Screenshots
When true, the Evinced SDK will include screenshots in its reports that
highlight elements with accessibility issues.
Default: false.
Note: Enabling screenshots may affect test run performance.
1// On global level2ChromeDriver chromeDriver = new ChromeDriver();3EvincedConfiguration configuration = new EvincedConfiguration();4configuration.setEnableScreenshots(true);5EvincedWebDriver driver = new EvincedWebDriver(chromeDriver, configuration);678// OR910// On command level11EvincedConfiguration configuration = new EvincedConfiguration();12configuration.setEnableScreenshots(true);13driver.evAnalyze(configuration);14
Toggles
Enables experimental features. Feature names and values may vary from release to release.
Example:
1// Globally2EvincedConfiguration globalConfig = new EvincedConfiguration();3Map<String, Boolean> toggles = new HashMap<String, Boolean>(){{4 put(FLAG_NAME_1, false);5 put(FLAG_NAME_2, true);6}};7globalConfig.setExperimentalFlags(toggles);89// Example enabling aXe Needs Review and Best Practices Issues10EvincedConfiguration globalConfig = new EvincedConfiguration();11globalConfig.addExperimentalFlag(USE_AXE_NEEDS_REVIEW, true);12globalConfig.addExperimentalFlag(USE_AXE_BEST_PRACTICES, true);
Skip Validations
Sets validation types to be skipped for specified URL pattern and CSS selector. Issue type IDs can be found by inspecting a JSON report as described in Web Reports.
Default: no validations skipped.
1EvincedConfiguration globalConfig = new EvincedConfiguration();2String selector1 = "test.1--selector";3String selector2 = "test.2--selector";4String type1 = "NO_DESCRIPTIVE_TEXT";5String type2 = "NOT_FOCUSABLE";6String type3 = "ONE_MORE_TYPE_TO_EXCLUDE";78globalConfig.skipValidation(selector1, "http://url.to.skip/path1",9 type1, type2);10globalConfig.skipValidation(selector2, "http://url.to.skip/path2",11 type2, type3, type1);
Recording Service
This setting controls how frequently event-triggered functions are executed, helping to optimize performance and responsiveness. The option does not enable or disable the event-handling service itself but determines how frequently events are processed based on the selected mode.
Available modes:
debounce– Delays execution until a set time has passed since the last event. Useful for actions triggered by continuous input, such as typing in a search box, to avoid excessive function calls.throttle– Ensures execution at fixed intervals, regardless of event frequency. Ideal for scenarios like handling window resize events or scroll tracking, where limiting execution prevents performance degradation.
Default: Functions execute as triggering events occur.
An example of how to modify settings:
1RecordingServiceConfiguration recordingConfiguration = new RecordingServiceConfiguration();2recordingConfiguration.setEnableDebounceNewSelectors(true);3recordingConfiguration.setDebounceNewSelectorsMs(1000);4recordingConfiguration.setDelayMode("throttle");56EvincedConfiguration evincedConfiguration = new EvincedConfiguration();7evincedConfiguration.setRecordingServiceConfiguration(recordingConfiguration);
Knowledge-Base Link Overrides
Sets customized knowledge-base links in the reports. The links are displayed in the reports “Issue Type” column, as shown in the following screenshot:
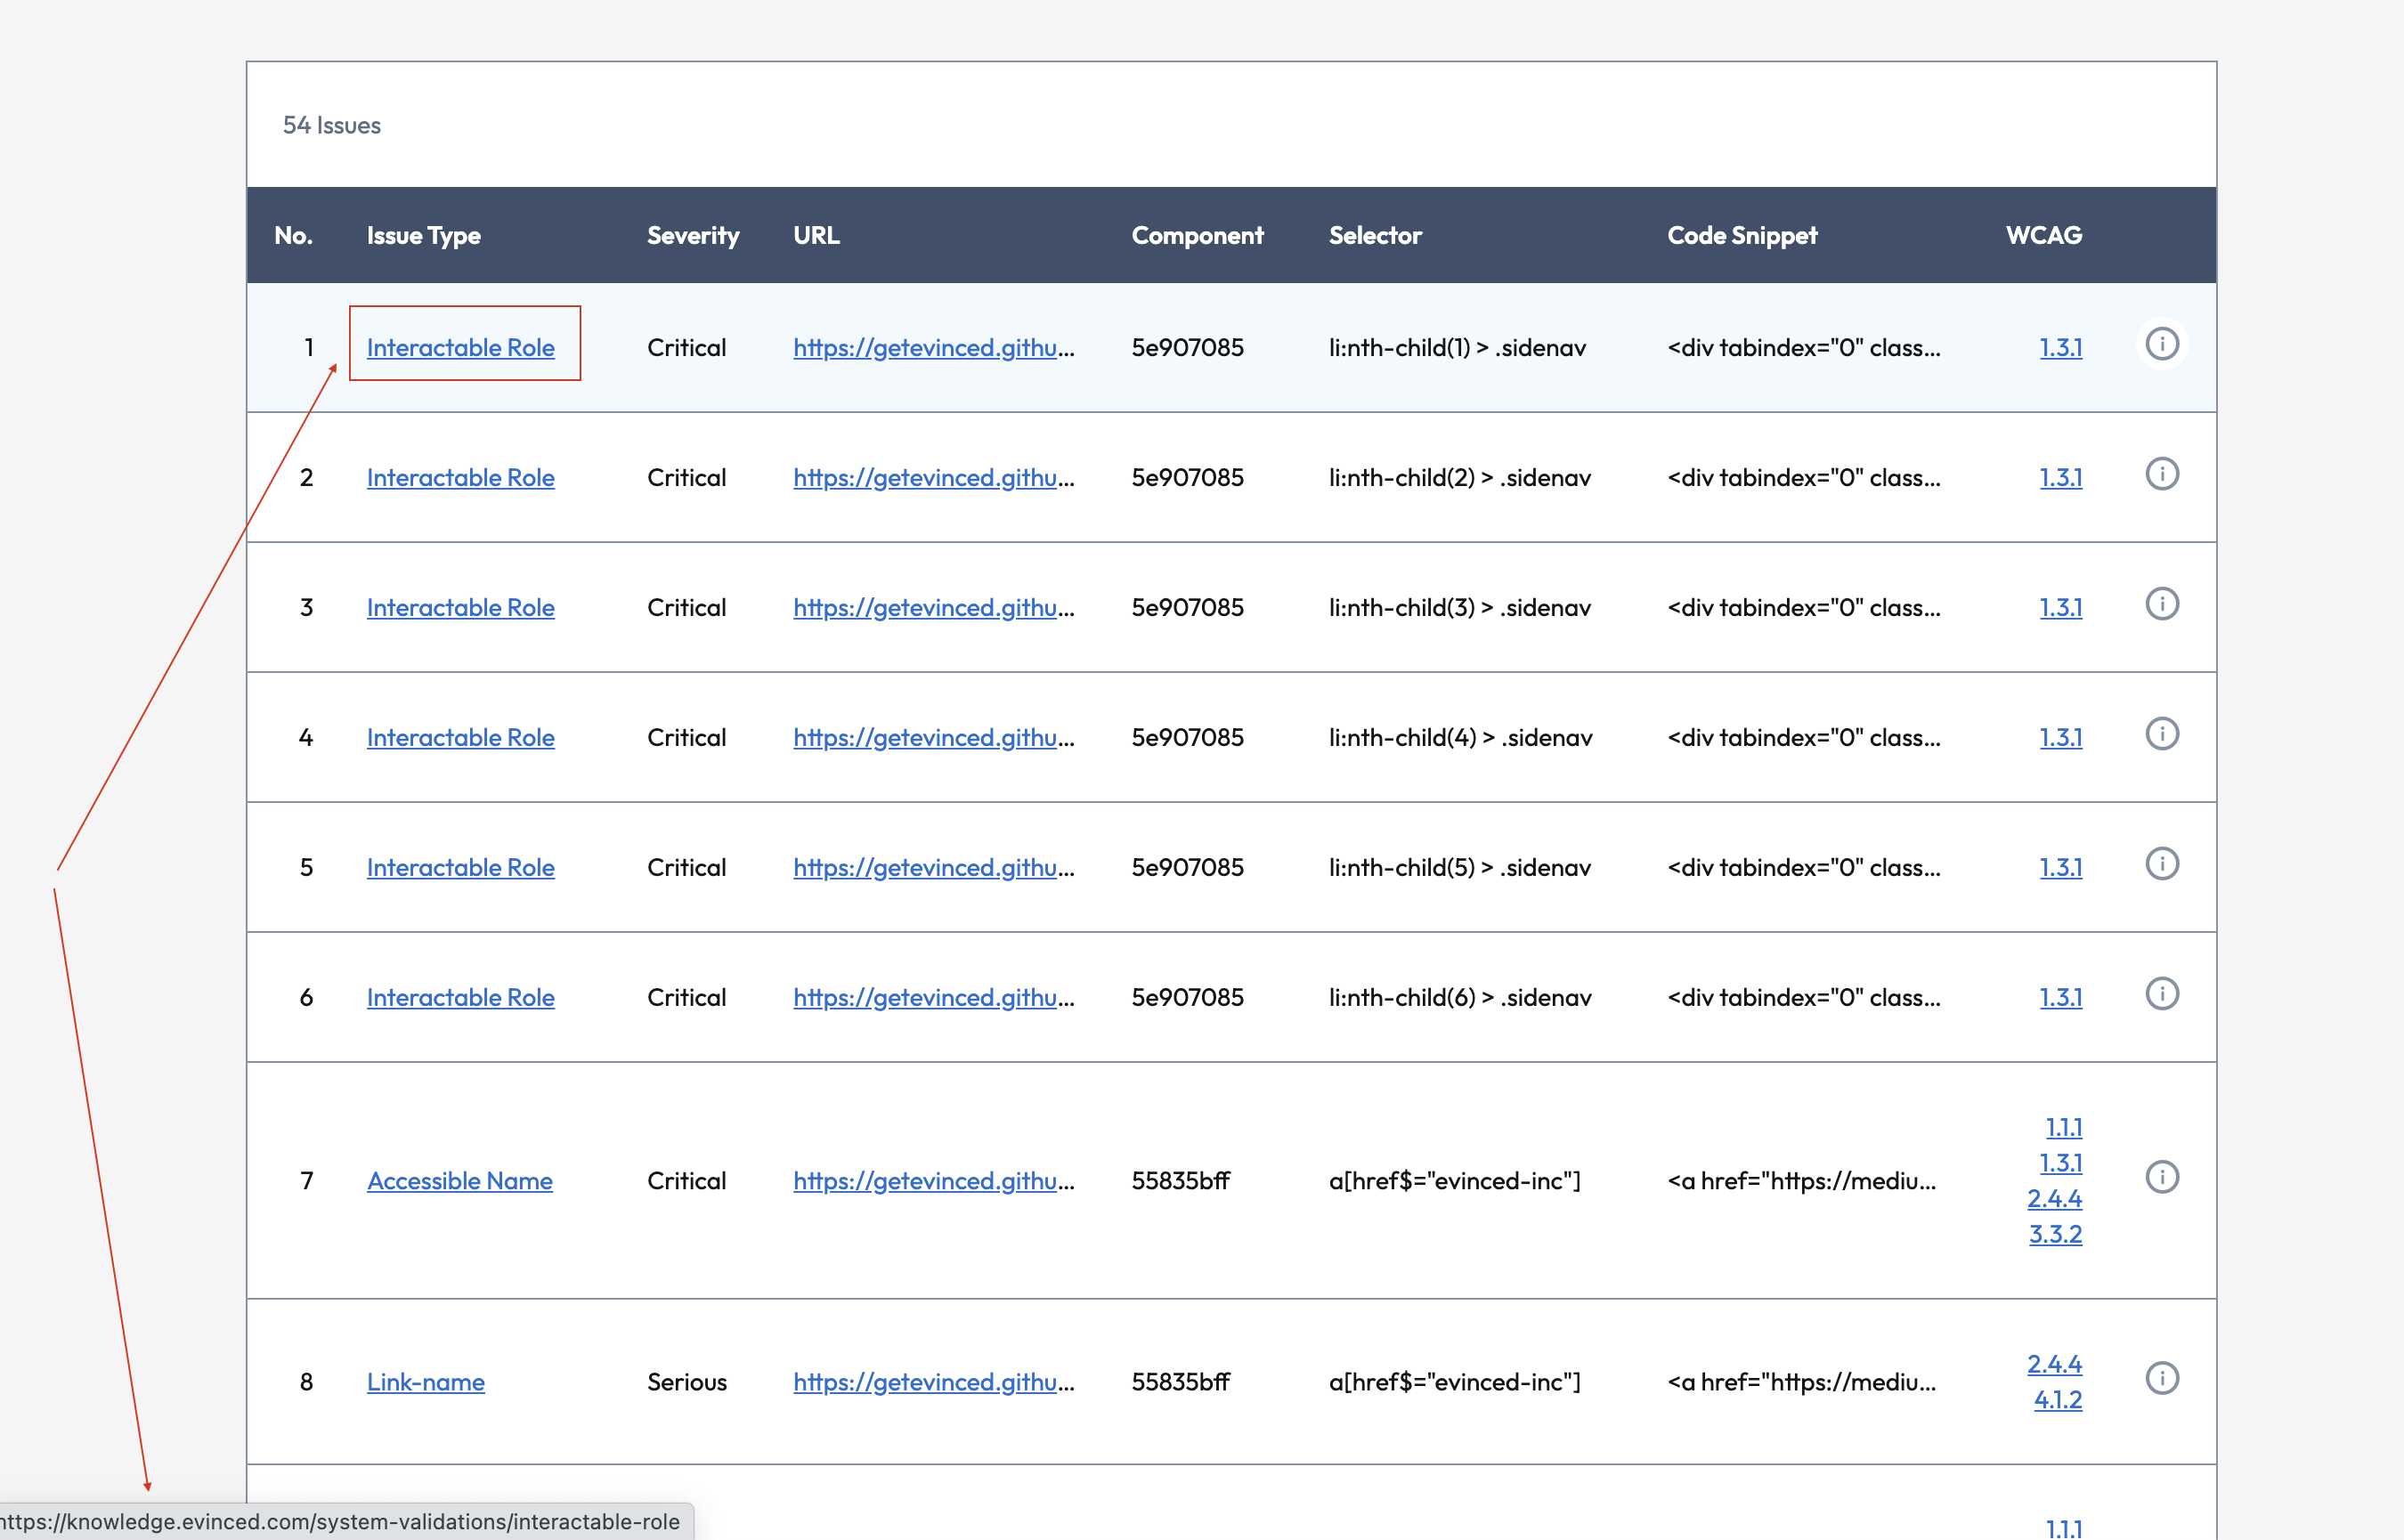
The knowledge base link can be overridden for every issue type ID.
Issue type IDs can be found by inspecting a JSON report as described in Web Reports.
For example, the issue with name Interactable Role has ID WRONG_SEMANTIC_ROLE.
1EvincedConfiguration configuration = new EvincedConfiguration();2configuration3 .setKnowledgeBaseLink("WRONG_SEMANTIC_ROLE", "http://custom.kb.link/wrong_semantic_role")4 .setKnowledgeBaseLink("WRONG_TAB_ORDER", "http://custom.kb.link/wrong_tab_order");
Shadow DOM Support
Shadow DOM is now supported by default. No additional configuration is needed.
If using an earlier release, configure shadow DOM support as follows:
1EvincedConfiguration configuration = new EvincedConfiguration();2configuration.setIncludeShadowDOM(true);
IFrames Support
When true, accessibility analysis includes iframe that exist inside the page.
Default: true.
1EvincedConfiguration configuration = new EvincedConfiguration();2configuration.setIncludeIframes(false);
Proxy
Configures proxy server access settings. Needed to enable outbound communication to the Evinced Platform through a proxy server.
1...2String proxyString = "ip:port";3//Or if you have credentials4String proxyString = "user:password@ip:port";5Proxy proxy = new Proxy();6proxy.setHttpProxy(proxyString)7 .setSslProxy(proxyString);8ChromeOptions chromeOptions = new ChromeOptions();9chromeOptions.setProxy(proxy);10EvincedWebDriver driver = new EvincedWebDriver(new ChromeDriver(chromeOptions));11...
Global Switch
When false, disables Evinced functionality. Enabled by default, use this setting to disable
Evinced accessibility analysis when not needed during test development or when running CI jobs
where accessibility testing is not intended.
Default: true.
When switched off:
evStart()andevSaveFile()will be bypassed.evStop()andevAnalyze()will return an empty report.
Switching Evinced Functionality Off in Configuration
1EvincedSDK.switchOn(false);
Important! Global Switch environment variable overrides the global configuration option.
Switching Evinced Functionality Off in Environment
1export EV_SWITCH_ON=false
Alerts
When true, Evinced expects alerts to be displayed at any time, after any action, and will wait for them to be closed.
When false, Evinced will not wait for alerts to be closed and will continue the analysis.
Default: false.
1// Enables the alert expected mode2evincedConfiguration.setAlertExpected(true);34// Sets the timeout in milliseconds for alert to be closed. Default: 10000 milliseconds5evincedConfiguration.setAlertTimeout(5000);
Uploading Reports to Evinced Platform
Introduction
Evinced Platform allows you to seamlessly collect, organize, visualize and monitor Evinced accessibility reports in one place. In this section, we will guide you through the key functionalities of the upload methods of the accessibility reports from the Evinced SDK to the Evinced Platform, which was introduced in version 3.4.2. This upload method is fully compatible with the previous versions of the Evinced SDK API, and is disabled by default.
Enable Upload Report to Platform
To enable the uploading functionality of accessibility reports to
the Evinced Platform you will need to set the enableUploadToPlatform method to "true":
1EvincedSDK.enableUploadToPlatform(true);
Automatic Report Upload
Once the enableUploadToPlatform method is set to true, then by default
all generated reports will be uploaded to the Platform upon calling the evStop() command.
If you want to change this behavior, set the setUploadToPlatformDefault feature flag to false.
1EvincedSDK.setUploadToPlatformDefault(false);
If the setUploadToPlatformDefault is disabled, you can still upload
selected reports to the platform.
For that, use the following parameter in the evStop() command:
1...2driver.evStop(PlatformUpload.ENABLED);
Test Names
To facilitate report management and be able to distinguish between different reports on the Platform, use the setTestInfo method to inform the test name and test class.
It’s recommended to do that in the “beforeEach” hook.
JUnit:
1...2@Rule3public TestName testName = new TestName();45@Before6public void platformUploadingTestSetup(){7 driver.setTestInfo(testName.getMethodName(), this.getClass().getCanonicalName());8}9...
TestNG:
1@BeforeMethod2protected void evStartBeforeMethod(ITestContext context, ITestResult result) {3 driver.setTestInfo(result.getMethod().getMethodName(), result.getTestClass().getName());4}
Labels and Custom Fields
You can attach labels and custom fields to your report to enhance readability in the platform. The labels will be added to the uploaded reports. See the following code example of how to set that up:
1EvincedSDK.getTestRunInfo()2 .addLabel(Parameter.GIT_USER_NAME, "git")3 .addLabel(Parameter.GIT_BRANCH, "main")4 .addLabel(Parameter.USER_AGENT, "agent007")5 .addLabel(Parameter.ENVIRONMENT, "production")6 .addLabel(Parameter.FLOW, "standard")7 .customLabel("Product version", "1.2.3")8 .customLabel("OS Type", "Linux")9 .customLabel("OS Name", "openSuse");
Use of beforeEach and afterEach Hooks
We recommend using the beforeEach and afterEach hooks to control analysis sessions and upload reports to the platform. This way, each test will be uploaded separately with its own report.
In beforeEach hook use evStart() to start Evinced analysis and set any labels
you want for the report to contain when uploading to the platform.
In the afterEach hook call evStop() to stop analysis and upload reports to the platform.
See this code example:
TestNG:
1@BeforeMethod2protected void evStartBeforeMethod(ITestContext context, ITestResult result) {3 driver.setTestInfo(result.getMethod().getMethodName(), result.getTestClass().getName());4 driver.evStart();5}67@AfterMethod8protected void evStopAfterMethod(ITestContext context, ITestResult result) {9 driver.evStop();10}
Putting All of This Together
Here is a complete code snippet of how to perform uploads to the platform on a per-test basis.
TestNG:
1package com.evinced.example;23import com.evinced.EvincedSDK;4import com.evinced.EvincedWebDriver;5import com.evinced.dto.platform.TestRunInfo.Parameter;6import org.openqa.selenium.chrome.ChromeDriver;7import org.openqa.selenium.chrome.ChromeOptions;8import org.testng.ITestContext;9import org.testng.ITestResult;10import org.testng.annotations.*;111213public class TestExample {1415 public static EvincedWebDriver driver;1617 @BeforeSuite18 protected void beforeSuite() {19 EvincedSDK.setOfflineCredentials(System.getenv("EVINCED_SERVICE_ID"), System.getenv("EVINCED_AUTH_TOKEN"));20 EvincedSDK.enableUploadToPlatform(true);2122 EvincedSDK.getTestRunInfo()23 .addLabel(Parameter.GIT_USER_NAME, "git")24 .addLabel(Parameter.GIT_BRANCH, "master")25 .customLabel("Testing purpose", "Test platform uploading feature");26 }2728 @BeforeTest29 protected void beforeTest() {30 initDriver();31 }3233 @AfterTest34 protected void afterTest() {35 driver.quit();36 }3738 @BeforeMethod39 protected void evStartBeforeMethod(ITestContext context, ITestResult result) {40 driver.setTestInfo(result.getMethod().getMethodName(), result.getTestClass().getName());41 driver.evStart();42 }4344 @AfterMethod45 protected void evStopAfterMethod(ITestContext context, ITestResult result) {46 driver.evStop();47 }4849 protected void initDriver() {50 ChromeOptions options = new ChromeOptions();51 String browserMode = System.getenv("BROWSER_MODE");52 if (browserMode != null) {53 options.addArguments(browserMode);54 }55 driver = new EvincedWebDriver(new ChromeDriver(options));56 }5758 @Test(testName = "Test url")59 public void testUrl() {60 driver.get("https://demo.evinced.com");61 }62}
Tutorials
You can find fully functional example projects on our GitHub.
Generating a comprehensive accessibility report for your application
In this tutorial, we will enhance our existing Selenium UI test with the Evinced Selenium SDK in order to check our application for accessibility issues. In order to get started you will need the following:
- All of the prerequisites for the Evinced Selenium SDK should be met
- Evinced Selenium SDK should be added to your project
Preface - existing UI test overview
Let’s consider the following basic UI test as our starting point.
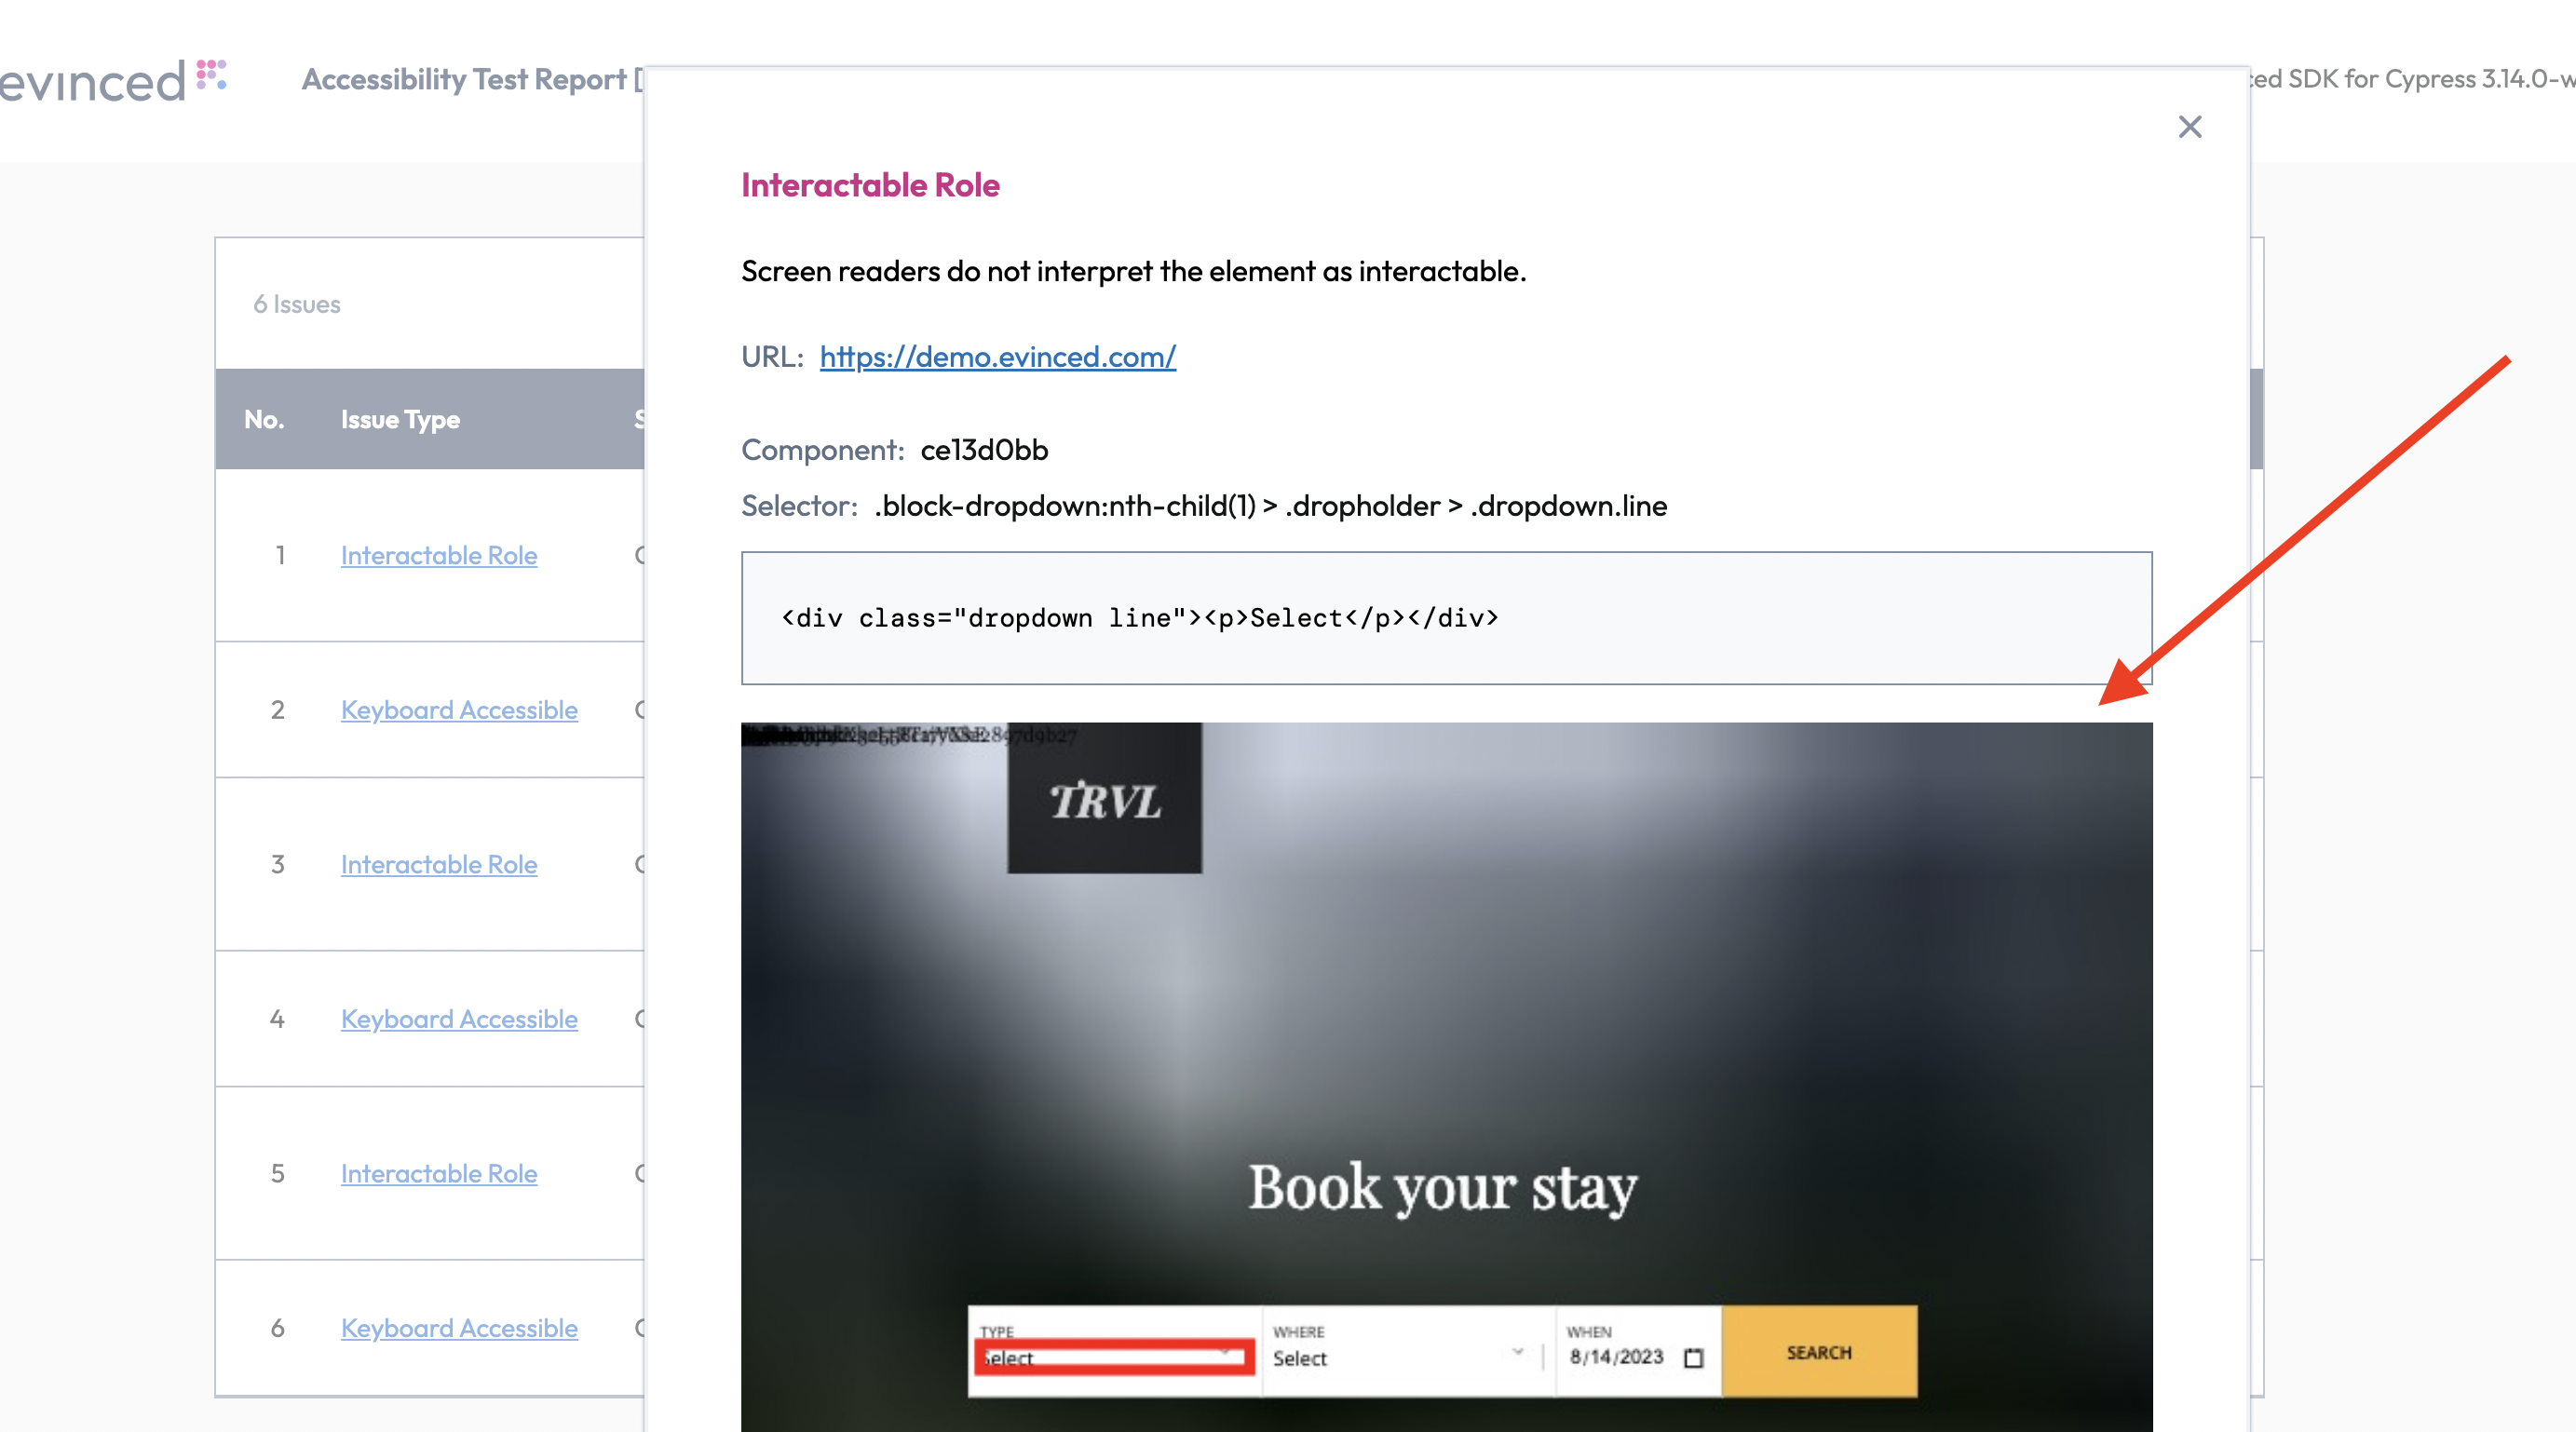
1import com.evinced.EvincedReporter;2import com.evinced.EvincedWebDriver;3import com.evinced.dto.results.Issue;4import com.evinced.dto.results.Report;5import org.junit.Assert;6import org.junit.Test;7import org.openqa.selenium.By;8import org.openqa.selenium.WebElement;9import org.openqa.selenium.chrome.ChromeDriver;10import java.util.List;1112public class AccessibilityTests {13 @Test14 public void evAnalyzeWithAnOpenDropdownTest() {15 ChromeDriver driver = new ChromeDriver();16 driver.get("https://demo.evinced.com/");17 WebElement firstDropdown = driver.findElement(By.cssSelector("div.filter-container > div:nth-child(1) > div > div.dropdown.line"));18 firstDropdown.click();19 WebElement secondDropdown = driver.findElement(By.cssSelector("div.filter-container > div:nth-child(2) > div > div.dropdown.line"));20 secondDropdown.click();21 driver.findElement(By.cssSelector(".react-date-picker")).click();22 }23}
We wrote this test for a demo travel site called TRVL that has a few known accessibility issues.
The purpose of this test is to check the functionality of the main application screen and ensure a user can successfully select their desired trip. For now, this test is only concerned with the functional testing of the app. However, with the help of the Evinced Selenium SDK, we can also check it for accessibility issues along the way. Let’s go through this process with the following step-by-step instructions.
Step #1 - Initialize the Evinced Selenium SDK
Before making any assertions against our app, we need to initialize EvincedWebDriver object. This object is used primarily as an entry point to all of the accessibility scanning features. Since we are going to use it scan throughout our test, the best place for its initialization will be our setUp method which gets executed first.
1import com.evinced.EvincedReporter;2import com.evinced.EvincedWebDriver;3import com.evinced.dto.results.Issue;4import com.evinced.dto.results.Report;5import org.junit.Assert;6import org.junit.Test;7import org.openqa.selenium.By;8import org.openqa.selenium.WebElement;9import org.openqa.selenium.chrome.ChromeDriver;10import com.evinced.EvincedWebDriver;11import java.util.List;1213public class AccessibilityTests {14 private EvincedWebDriver driver;1516 @Before17 public void setUp() {18 driver = new EvincedWebDriver(new ChromeDriver());19 }2021 @Test22 public void evAnalyzeWithAnOpenDropdownTest() {23 driver.get("https://demo.evinced.com/");24 WebElement firstDropdown = driver.findElement(By.cssSelector("div.filter-container > div:nth-child(1) > div > div.dropdown.line"));25 firstDropdown.click();26 WebElement secondDropdown = driver.findElement(By.cssSelector("div.filter-container > div:nth-child(2) > div > div.dropdown.line"));27 secondDropdown.click();28 driver.findElement(By.cssSelector(".react-date-picker")).click();29 }30}
The EvincedWebDriver requires only an instance of ChromeDriver.
Step #2 - Start the Evinced engine
Now that we have initiated the Selenium driver and added the capabilities needed to scan for accessibility issues, let’s start the Evinced engine. Since we are going to use it scan throughout our test, the best place for its initialization will be our setUp method after our Selenium driver is configured.
1import com.evinced.EvincedReporter;2import com.evinced.EvincedWebDriver;3import com.evinced.dto.results.Issue;4import com.evinced.dto.results.Report;5import org.junit.Assert;6import org.junit.Test;7import org.openqa.selenium.By;8import org.openqa.selenium.WebElement;9import org.openqa.selenium.chrome.ChromeDriver;10import com.evinced.EvincedWebDriver;11import java.util.List;1213public class AccessibilityTests {14 private EvincedWebDriver driver;1516 @Before17 public void setUp() {18 driver = new EvincedWebDriver(new ChromeDriver());19 // Start the Evinced Engine20 driver.evStart();21 }2223 @Test24 public void evAnalyzeWithAnOpenDropdownTest() {25 driver.get("https://demo.evinced.com/");26 WebElement firstDropdown = driver.findElement(By.cssSelector("div.filter-container > div:nth-child(1) > div > div.dropdown.line"));27 firstDropdown.click();28 WebElement secondDropdown = driver.findElement(By.cssSelector("div.filter-container > div:nth-child(2) > div > div.dropdown.line"));29 secondDropdown.click();30 driver.findElement(By.cssSelector(".react-date-picker")).click();31 }32}
There are additional configuration options that can be included as well. More information can be found in the API section of this documentation.
Step #3 - Stop the Evinced engine and create reports
As our test was executed we collected a lot of accessibility information. We can now perform accessibility assertions at the end of our test suite. Referring back again to our UI test the best place for this assertion will be the method that gets invoked last - tearDown. To stop the Evinced engine and generate the actual object representation of your accessibility report simply call the evStop() method. We can then output the report files in either HTML or JSON format (or both!).
1import com.evinced.EvincedReporter;2import com.evinced.EvincedWebDriver;3import com.evinced.dto.results.Issue;4import com.evinced.dto.results.Report;5import org.junit.Assert;6import org.junit.Test;7import org.openqa.selenium.By;8import org.openqa.selenium.WebElement;9import org.openqa.selenium.chrome.ChromeDriver;10import com.evinced.EvincedWebDriver;11import java.util.List;1213public class AccessibilityTests {14 private EvincedWebDriver driver;1516 @Before17 public void setUp() {18 driver = new EvincedWebDriver(new ChromeDriver());19 // Start the Evinced Engine20 driver.evStart();21 }2223 @After24 public void tearDown() {25 // Stop the Evinced Engine26 Report report = driver.evStop();27 // Output the Accessibility results in JSON or HTML28 EvincedReporter.evSaveFile(testName.getMethodName(), report, EvincedReporter.FileFormat.HTML);29 EvincedReporter.evSaveFile(testName.getMethodName(), report, EvincedReporter.FileFormat.JSON);30 driver.quit();31 }3233 @Test34 public void evAnalyzeWithAnOpenDropdownTest() {35 driver.get("https://demo.evinced.com/");36 WebElement firstDropdown = driver.findElement(By.cssSelector("div.filter-container > div:nth-child(1) > div > div.dropdown.line"));37 firstDropdown.click();38 WebElement secondDropdown = driver.findElement(By.cssSelector("div.filter-container > div:nth-child(2) > div > div.dropdown.line"));39 secondDropdown.click();40 driver.findElement(By.cssSelector(".react-date-picker")).click();41 }42}
For the sake of simplicity of this tutorial let’s simply assume that our application is accessible as long as it has no accessibility issues found. Thus, if we have at least one accessibility issue detected - we want our tests to be failed. Let’s add the corresponding assertion to our tearDown method
1@After2public void tearDown() {3 // Stop the Evinced Engine4 Report report = driver.evStop();5 // Output the Accessibility results in JSON or HTML6 EvincedReporter.evSaveFile(testName.getMethodName(), report, EvincedReporter.FileFormat.HTML);7 EvincedReporter.evSaveFile(testName.getMethodName(), report, EvincedReporter.FileFormat.JSON);89 // Optional assertion for gating purposes10 List<Issue> issues = report.getIssues();11 Assert.assertEquals(0, issues.size());1213 driver.quit();14}
You are now set to run the test and ensure the accessibility of your application! So, go ahead and run it via your IDE or any other tooling you use for Java development.
Additional Configuration Examples
Testing accessibility in a specific state of the application
In this example, we are going to test the accessibility of a page in a specific state. This test navigates to a page, opens a dropdown, and only then runs the accessibility engines to identify issues.
1import com.evinced.EvincedReporter;2import com.evinced.EvincedWebDriver;3import com.evinced.dto.results.Issue;4import com.evinced.dto.results.Report;5import org.junit.Assert;6import org.junit.Test;7import org.openqa.selenium.By;8import org.openqa.selenium.WebElement;9import org.openqa.selenium.chrome.ChromeDriver;1011import java.util.List;1213public class AccessibilityTests {1415 @Test16 public void evAnalyzeWithAnOpenDropdownTest() {17 EvincedWebDriver driver = new EvincedWebDriver(new ChromeDriver());18 driver.get("https://demo.evinced.com/");1920 // interacting with the page - opening all dropdown21 WebElement firstDropdown = driver.findElement(By.cssSelector("div.filter-container > div:nth-child(1) > div > div.dropdown.line"));22 firstDropdown.click();2324 Report report = driver.evAnalyze();25 List<Issue> issues = report.getIssues();26 Assert.assertEquals(8, issues.size());2728 // write the report to HTML format to a file named: "test-results.html"29 EvincedReporter.evSaveFile("test-results", report, EvincedReporter.FileFormat.HTML);30 }31}
Running evAnalyze on multiple tabs
The evAnalyze command will works as expected on the primary tab. When testing on an additional browser tab, simply switch the driver from the primary Selenium window handle to the window handle of the new tab and then run evAnalyze. This code is shown on lines 14-15 of the example below.
Example In the example below, page1.html has a link that opens in a new tab.
1// navigate to page12driver.get("page1.html");34// get report for page15Report report = driver.evAnalyze();6List<Issue> issues = report.getIssues();7// run some assertions8assertEquals(1, issues.size());910// perform an action that opens a new tab11driver.findElement(new By.ById("open-tab-link")).click();1213// switch to new tab14String tabWindowHandle = driver.getWindowHandles().toArray()[1].toString();15driver.switchTo().window(tabWindowHandle);1617// get report for the new tab,18// the issues for page1 won't appear here, only ones found on the new tab19report = driver.evAnalyze();20issues = report.getIssues();21assertEquals(3, issues.size());
Running evStart and evStop on multiple tabs
The evStart and evStop method scopes are limited to a single tab or Selenium window handle. This means that if you have more than one tab, you will need to call evStop and then switch to the window handle of the new tab. Once the window handle switch has occurred, run a new instance of evStart followed evStop at the appropriate time.evStop must be called on the tab that evStart command was called on, before starting evStart on a new tab.
In the example below, page1.html has a link that opens in a new tab.
1 // navigate to page12 driver.get("page1.html");34 driver.evStart();56 // perform actions on page1, clicks, etc...78 // the evStart and evStop scopes are limited to a single window handle.9 // this means that if you have more than one tab, you need to switch it's window and only then run `evStart` and `evStop`10 // The `evStop` must be called on the tab that `evStart` command was called on, before starting `evStart` on a new tab11 Report report = driver.evStop();12 List<Issue> issues = report.getIssues();13 assertEquals(1, issues.size());1415 // perform an action that opens a new tab16 driver.findElement(new By.ById("open-tab-link")).click();1718 // move to tab19 String tabWindowHandle = driver.getWindowHandles().toArray()[1].toString();20 driver.switchTo().window(tabWindowHandle);2122 // get report for the new tab,23 // the issues for page1 won't appear here, only ones found on the new tab24 driver.evStart();25 report = driver.evStop();26 issues = report.getIssues();27 assertEquals(3, issues.size());
Running evStart and evStop on a different TargetLocator (frame / iframe)
In case the evStart command is called on a different context, for example - after switching WebDriver’s context into an iframe, the Evinced engines will be injected into that iframe only.
In order to get the results back you will need to switch to the same context evStart was called on, before calling evStop.
In case you are using a website that relies deeply on iframes, we suggest using the IncludeIframes API configuration.
In the example below, page1.html has an iframe in it, with id iframe1.
1 // navigate to page12 driver.get("page1.html");34 // switch to the iframe5 driver.switchTo().frame(driver.findElement(By.id("iframe1")));67 // start recording8 driver.evStart();910 // perform actions on iframe1 inside page1, clicks, etc...1112 // if you go back to the defaultContent (the iframe parent)13 // the `evStop` method will fail14 driver.switchTo().defaultContent();1516 // don't do that, it will fail17 driver.evStop();1819 // but you can get the results when inside the iframe20 // switch to the iframe21 driver.switchTo().frame(driver.findElement(By.id("iframe1")));2223 // now evStop returns all the issues recorded inside the iframe24 Report report = driver.evStop();25 List<Issue> issues = report.getIssues();26 assertEquals(1, issues.size());
Add accessibility testing to existing tests
It is possible to configure EvincedWebDriver to be called also used in @Before and @After methods. In the example below, evStart starts recording before the test starts, and evStop is called after each test.
1import com.evinced.dto.results.Report;2import io.github.bonigarcia.wdm.WebDriverManager;3import org.junit.*;4import org.junit.rules.TestName;5import org.openqa.selenium.chrome.ChromeDriver;67public class BeforeAfterTest {89 @Rule10 public TestName testName = new TestName();1112 private EvincedWebDriver driver;1314 /**15 * Instantiate the WebDriver16 */17 @BeforeClass18 public void setupClass() {19 WebDriverManager.chromedriver().setup();20 driver = new EvincedWebDriver(new ChromeDriver());21 driver.manage().window().maximize();22 }2324 /**25 * Start recording before each test26 */27 @Before28 public void setUp() {29 driver.evStart();30 }3132 /**33 * Ensure we close the WebDriver after finishing34 */35 @After36 public void after() {37 // write an HTML report to file38 Report report = driver.evStop();39 EvincedReporter.evSaveFile(testName.getMethodName(), report, EvincedReporter.FileFormat.HTML);40 }4142 @Test43 public void visitDemoPage() {44 driver.get("https://demo.evinced.com");45 }4647 @Test48 public void visitGoogle() {49 driver.get("https://www.google.com");50 }51}
Fail the test if critical issues are found
Here you can see a way of failing your test if critical accessibility issues are found using the Selenium Java SDK.
Using evAnalyze:
1Report report = driver.evAnalyze();23List<Issue> criticalIssues = report.getIssues().stream()4 .filter(issue -> "Critical".equals(issue.getSeverity().getName()))5 .collect(Collectors.toList());67assertTrue(criticalIssues.isEmpty(), "Critical issues are found");
Using evStart/evStop:
1driver.evStart();2Report report = driver.evStop();34List<Issue> criticalIssues = DATA.getReport().getIssues().stream()5.filter(issue -> "Critical".equals(issue.getSeverity().getName()))6.collect(Collectors.toList());78assertTrue(criticalIssues.isEmpty(), "Critical issues are found");
The criticalIssues array will contain all the critical issues found during the scan. If the array is not empty, the test will fail on the assertion.
Support
Please feel free to reach out to support@evinced.com with any questions.
FAQ
- Can I configure which validations to run?
Yes, see the Configuration section for details on how to configure Axe validations to your needs.
- Can I run tests with Evinced using cloud-based services like Sauce Labs, Perfecto, or BrowserStack?
Yes, we have tested the Evinced SDK on many of these types of cloud-based services and expect no issues.