Espresso / UIAutomator SDK
The Evinced Espresso / UIAutomator SDK integrates with new or existing UI tests to automatically detect accessibility issues. With the addition of a few lines of code you can analyze your entire application to understand how it can become more accessible. At the conclusion of the tests actionable HTML and JSON reports are generated to track issues in any reporting tool.
Supported platforms / frameworks
The Espresso / UIAutomator SDK supports Android UI tests on emulators or real devices with a minimum Android API level of 21 (Android 5.0).
Get Started
Setup
In order to use any of the Evinced Mobile SDKs you first need to create an Evinced account. Once your account is created, you will get your
apiKeyand a matchingserviceAccountId. Initialize the SDK with these tokens it will validate access with Evinced servers when you run your tests. If an outbound internet connection is not available in your running environment - contact us at support@evinced.com to get an offline APIKey.Add the SDK as a dependency using one of the following options:
Add to Gradle Add the Evinced package repository URL to your root build.gradle at the end of repositories:
1allprojects {2 repositories {3 //...4 maven { url 'https://evinced.jfrog.io/artifactory/public-gradle' }5 }6 }Note: If you use Gradle 7.0 or higher, you should add it instread to the settings.gradle file
Add the following to your module build.gradle file:
1androidTestImplementation "com.evinced:espresso-sdk:{sdk-version}"Add to Maven: Add the Evinced package repository URL to your build file:
1<repositories>2 <repository>3 <id>evinced-repository</id>4 <url>https://evinced.jfrog.io/artifactory/public-gradle</url>5 </repository>6</repositories>Add the dependency:
1<dependency>2 <groupId>com.evinced</groupId>3 <artifactId>espresso-sdk</artifactId>4 <version>{sdk-version}</version>5 <type>aar</type>6</dependency>Download .aar library from Evinced package repository: Espresso/UIAutomator SDK and add it manually for your project.
Configure the SDK with Evinced authentication credentials Customizing the JUnit Runner (Recommended)
Online setup by using
AccountIdandApiKey1public class CustomJUnitRunner extends AndroidJUnitRunner {2 @Override3 public void callApplicationOnCreate(Application app) {4 super.callApplicationOnCreate(app);5 EvincedEngine.setupCredentials(accountId, apiKey);6 }7 }8 ```Offline setup by using AccountId and
AccessToken1public class YourCustomJUnitRunner extends AndroidJUnitRunner {2 @Override3 public void callApplicationOnCreate(Application app) {4 super.callApplicationOnCreate(app);5 EvincedEngine.setupOfflineCredentials(accountId, accessToken)6 }7}Replace the existing
AndroidJunitRunnerin `build.gradle:1defaultConfig {2 //...34 // testInstrumentationRunner "android.support.test.runner.AndroidJUnitRunner"5 testInstrumentationRunner 'com.xx.yy.CustomJUnitRunner'6}
Replace {sdk-version} with the latest SDK version that can be found here: espresso sdk jfrog.
After creating the custom AndroidJUnitRunner you may need to sync Gradle/Maven with the project.
Authenticating within a test class
Add the setupCredentials call to your @BeforeClass method:
1@BeforeClass2public static void setup() {3 // Init instance of EvincedEngine in @BeforeClass method4 EvincedEngine.setupCredentials(accountId, apiKey);5 evincedEngine = EvincedEngine.getInstance(InstrumentationRegistry.getInstrumentation());6 // Other setup code...7}
Your first test
Initialize the SDK instance
Init the EvincedEngine instance in each test class inside the @BeforeClass (@BeforeAll equivalent for JUnit5 runner) method:
1// import statement2import com.evinced.test.EvincedEngine;34@RunWith(AndroidJUnit4.class)5public class UITests1 {6 // Declare EvincedEngine instance7 private static EvincedEngine evincedEngine;8 // public static method annotated @BeforeClass executed only once before running all tests in the current class9 @BeforeClass10 public static void setup() {11 // Init instance of EvincedEngine in @BeforeClass method12 evincedEngine = EvincedEngine.getInstance(InstrumentationRegistry.getInstrumentation());13 // Other setup code...14 }15}
Add accessibility scans to your test
Call the EvincedEngine.analyze() method at every point at which an accessibility scan would capture new areas of the application.
1@RunWith(AndroidJUnit4.class)2public class UITests {3 //...4 @Test5 public void test1() {6 // test code...7 // Call EvincedEngine.analyze() every time the information on the screens changes8 // or when you want to make accessibility check9 evincedEngine.analyze();10 // test code...11 evincedEngine.analyze();12 }13 //...14 @Test15 public void testN() {16 // test code...17 evincedEngine.analyze();18 // test code...19 }20 }
Run validations and generate reports
The @AfterClass method executes only after all tests in the current class have completed. This makes it the perfect place to run our validations on data collected and stored by the EvincedEngine.analyze() calls and generate HTML and JSON reports in the emulator/device file structure.
1@RunWith(AndroidJUnit4.class)2public class UITests {3 //...4 // @AfterClass method executed only once after running all thes tests in the current class are complete5 @AfterClass6 public static void tearDown() {7 // Run accessibility validations for all collected data stored by the EvincedEngine.analyze()8 // calls and generate HTML and JSON reports in the emulator/device file structure9 evincedEngine.reportStored();10 // Other tearDown code...11 }12}
Report
EvincedEngine.reportStored() or EvincedEngine.report() will generate HTML and JSON reports stored in a specific folder in the file structure of the emulator or device on which the tests were executed. The file path to the reports can be found by searching the logs using the key evinced_report_path.
Report path example:
D/evinced_report_path:/storage/self/primary/Evinced_A11Y_Test_Results_08.10.2021_11.57
Run tests locally
If the tests are being run locally reports can be downloaded by using AndroidStudio -> Device File Explorer or the following adb command:
adb pull <reports path> <local path>
Run tests on CI
If the tests are being executed using a CI tool the pipeline script below can be used to pass the Evinced reports to the CI tool reporting structure:
1// add this step after the tests run command2- run:3 name: get evinced reports4 when: always5 command: |6 adb logcat -d > logfile.txt7 REPORT_PATH="$(cat logfile.txt | grep evinced_report_path | awk -F " :" '{ print $NF }' | tail -n 1 | grep -o '\/.*[0-9]' )"8 echo ${REPORT_PATH}9 adb pull ${REPORT_PATH} evinced_report10 zip -r evinced_report.zip evinced_report
Note: The script uses a list of logs that are cached within the emulator storage. If the number of logs is large, it is possible to lose the evinced_report_path key. In this case, please increase the buffer size with the following command adb logcat -G <size> M (default size = 2 Mb)
1//... other steps2- android/start-emulator-and-run-tests:3 pre-run-tests-steps:4 - run: adb logcat -G 16M // increase log buffer size to 16 Mb5 test-command: ./gradlew :app:connectedFreeDebugAndroidTest //tests run command
Note: If you use for test emulators with API 21 or 22, make sure that you create them with sdcard storage by adding -c 1000M option (you can read details in avdmanager documentation). You can add it in pipeline script with additional-avd-args: -c 1000M line in android/start-emulator-and-run-tests step.
Also if you run tests on emulators with API 23+, you need add next adb options to the app build.gradle. You can check for environmental variables to enable/disable these options if you run different emulators.
1android {2 //...3 adbOptions {4 installOptions '-g', '-r'5 }6}
For more information regarding the HTML and JSON reports as well as the Report object itself, please see our detailed Mobile Reports page.
Permissions
The following permissions are required for the Espresso SDK:
android.permission.WRITE_EXTERNAL_STORAGE (for storing HTML / JSON reports in the device file structures) and android.permission.INTERNET (if you use online setup by using EvincedEngine.setupCredentials (accountId, apiKey)). Instrumentation tests use the tested app permissions, so they need to be added to the main manifest file.
If you do not have the required permissions, you can use the following instructions to add permissions to debug build and avoid adding them to the production version.
Set the permissions in src/debug/AndroidManifest.xml. If the file doesn't exist, create it.
By default, AndroidTest uses debug as a BuildType, so if you define your testing permissions there, then the manifest merging process will add these permissions to your UI test build.
Below is an example of the AndroidManifest.xml file with the added permissions. Note that You don't need to include the package attribute because it will be inherited from lower priority level manifest.
1<?xml version="1.0" encoding="utf-8"?>2<manifest xmlns:android="http://schemas.android.com/apk/res/android">3 <uses-permission android:name="android.permission.WRITE_EXTERNAL_STORAGE" />4 <uses-permission android:name="android.permission.INTERNET"/>56 <!--required requestLegacyExternalStorage if you run your tests on Android 29-->7 <application8 android:requestLegacyExternalStorage="true"/>9</manifest>
Continuous mode
Continuous mode allows continual scanning of the application without the need to insert individual scan calls with in the test code. Simply specify the start and end points using the following methods EvincedEngine.startAnalyze() and EvincedEngine.stopAnalyze(). Then Evinced engines will automatically scan the application after each Espresso command. All issues detected during the tests will be added to the HTML and JSON reports automatically generated with the stopAnalyze() method is called.
Track scan all changes that occur in a particular test:
1@Test2public void yourTest() {3 evincedEngine.startAnalyze();4 // test body5 evincedEngine.stopAnalyze();6}
or scan all changes that occur in the test class:
1@BeforeClass2public static void setup() {3 ...4 evincedEngine.startAnalyze();5 ...6}78@AfterClass9public static void tearDown() {10 evincedEngine.stopAnalyze();11}
Note: for stable operation in continuous scanning mode, please make sure that all animations on the device (emulator) are turned off.
Issue filtering
The Espresso SDK supports advanced settings that allow you to apply additional configurations when generating issue reports. Simply create an instance of the EvincedConfig object with the appropriate options. Below is an example of using EvincedConfig and IssueFilter:
Global filtering:
1// Create an example filter to exclude all Needs Review issues globally2final IssueFilter globalFilter = new IssueFilter()3 .severity(Severity.NeedsReview);45// Add the IssueFilter to the creation instance of EvincedAppiumSdk6final EvincedConfig globalEvincedConfig = new EvincedConfig()7 .excludeFilters(globalFilter);8final EvincedEngine evincedEngine = EvincedEngine.getInstance(InstrumentationRegistry.getInstrumentation(), new InitOptions(globalEvincedConfig));
Filtering on an individual scan (analyze() or report() call):
1// Passing multiple exclude filters for an individual scan2final IssueFilter multipleSeverityFilter = new IssueFilter()3 .severity(Severity.NeedsReview, Severity.BestPractice);45 final IssueFilter complexFilter = new IssueFilter()6 .matchElementById("com.example:id/myElement")7 .issueType(IssueType.CollidingControls)8 .severity(Severity.NeedsReview);910final IssueFilter complexFilter1 = new IssueFilter()11 .issueType(IssueType.DuplicateName, SpecialCharacters)12 .severity(Severity.NeedsReview, BestPractice);13final EvincedConfig evincedConfig = new EvincedConfig()14 .excludeFilters(multipleSeverityFilter, multipleSeverityFilter, complexFilter);1516// Apply the configuration for a specific screen state scan17evincedEngine.report(false, evincedConfig);18evincedEngine.analyze(evincedConfig);
Depending on the purpose of filtering, you can use two directions -include or exclude using the appropriate methods:
EvincedConfig().includeFilters(filter)EvincedConfig().excludeFilters(filters)
List of available issue filtering options
| Option | Method | Description |
|---|---|---|
viewId | public IssueFilter matchElementById(String viewId) | Native Android view id |
severity | public IssueFilter severity(Severity... severity)public IssueFilter severity(List<Severity> severities) | Filter by Severity - not apply on UI elements the accessibility validations with specific Severity types. |
issueType | public IssueFilter issueType(IssueType... issueType)public IssueFilter issueType(List<IssueType> issueTypes) | Filter by IssueType - not apply on UI elements the accessibility validations with specific IssueType. |
Filter by UIElement
Evinced Espresso SDK supports Espresso, UIAutomator and JetpackCompose test frameworks. Each of them provides its own API for finding and identifying UI elements. Identified elements can be used to build filters to include/exclude certain interface elements to perform validations on them. Building this type of filter is available in several steps:
For Espresso:
- Add espresso extensions module to your module
build.gradlefile:androidTestImplementation 'com.evinced:espresso-ext:{version}' - Find the element using Espresso native capabilities:1final ViewInteraction viewInteraction = onView(withId(R.id.yourViewId));
- Build Espresso SDK
UIElementobject:1final List<UIElement> uiElements = EvincedEspressoUtils.buildUIElements(viewInteraction); - Create filter object:1final IssueFilter issueFilter = new IssueFilter().matchByUIElements(uiElements);
For UIAutomator:
- Add UIAutomator extensions module to your module
build.gradlefile:androidTestImplementation 'com.evinced:uiautomator-ext:{version}' - Find the element using Espresso native capabilities:1final UiObject uiObject = uiDevice.findObject(new UiSelector().resourceId("yourViewId"));
- Build Espresso SDK
UIElementobject:1final List<UIElement> uiElements = EvincedUIAutomatorUtils.buildUIElements(uiObject); - Create filter object:1final IssueFilter issueFilter = new IssueFilter().matchByUIElements(uiElements);
Config file
Along with the configuration creation options within the code, it is also possible to create filters using a JSON file located in assets directory of your tests. To import the file use the examples below:
1final EvincedConfig evincedConfigFromFile = EvincedConfig.fromAssetsFile(InstrumentationRegistry.getInstrumentation(), "evinced_config.json");
1{2 "excludeFilters": [3 {4 "viewId": "viewId",5 "severities": [6 {7 // you can use id or name separately8 "id": "3c68eb41-9227-481d-8eec-9dc8956b1900",9 "name": "Needs Review"10 }11 ],12 "issueTypes": [13 {14 // you can use id or name separately15 "id": "e871b2e7-1b6d-47bc-96db-7f3dff4bfd5a",16 "name": "Duplicate Name"17 }18 ]19 }20 ]21}
Storing screenshots in reports
By default screenshots are provided in HTML reports for each scan, but for JSON-reports they are disabled by default. You can explicitly enable or disable screenshots using the InitOptions. Screenshots in JSON reports are provided in Base64 format.
Available screenshot options:
| Option | Description |
|---|---|
InitOptions.ScreenshotOption.Base64 | Add a screenshot to the json report and the Report object in Base64. Available using the screenshotBase64 field |
InitOptions.ScreenshotOption.File | Save a screenshot as separately .jpeg file. the name of the screenshot is the same as the id of the corresponding report. |
InitOptions.ScreenshotOption.Both | Save the screenshot as a .jpeg file and also as Base64 in the json report. See options above |
InitOptions.ScreenshotOption.Disabled | The screenshot is available only in the HTML report. Disabled by default. |
Global screenshot config:
1final InitOptions initOptions = new InitOptions(InitOptions.ScreenshotOption.Base64);2// setup options during the SDK initialization3final EvincedEngine evincedEngine = EvincedEngine.getInstance(InstrumentationRegistry.getInstrumentation(), initOptions);45// change the existing options6final InitOptions newOptions = new InitOptions(InitOptions.ScreenshotOption.Disabled);7evincedEngine.setOptions(newOptions);
Rule validation configurations
RulesConfig allows you to change the accessibility check for different rules. It is set globally and used for all subsequent reports.
Disabling the tappable area validation
This example disables validation for tappable area:
1evincedEngine.setOptions(new InitOptions(new RuleConfig(IssueType.TAPPABLE_AREA, false))
Disabling the label capitalization validation
This example disables validation for label capitalization:
1evincedEngine.setOptions(new InitOptions(new RuleConfig(IssueType.LABEL_CAPITALIZATION, false))
Disabling the color contrast validation
This example disables validation for color contrast:
1evincedEngine.setOptions(new InitOptions(new RuleConfig(IssueType.COLOR_CONTRAST, false)))
Customize color contrast options
Fuzziness factor configuration for color contrast. For example, the WCAG norm for this ratio is 4.5:1, but if your corporate colors have a ratio of 4.45:1, then this can be specified using the following options:
1final Map<String, Object> colorContrastOptions = new HashMap<>();2colorContrastOptions.put("contrastRatioNormalText", 4.45f);3colorContrastOptions.put("contrastRatioLargeText", 4.45f);4colorContrastOptions.put("contrastRatioNonText", 4.45f);5final RuleConfig colorContrastRuleConfig = new RuleConfig(IssueType.COLOR_CONTRAST, true, colorContrastOptions);6evincedEngine.setOptions(new InitOptions(colorContrastRuleConfig));
Tappable Area
Every native mobile application features a wide variety of UI elements which are interactive via tap. Consider elements like buttons, text fields, toggles and others. Each of them should be tapped in order to become focused and to allow any further interaction. The lower the tappable area of the element (an imaginary square where user should tap) the less convenient it is to operate with the element. Platform constraints describe the width and height of minimum tappable area.
tappableAreaDimensions - the minimum size that does not trigger Tappable Area validation.
Possible values: This field supports any valid positive Float values.
By default for Android this value is 48dp.
tappableAreaConformanceLevel - option to set WCAG Conformance Level Config for Tappable Area (available in 1.24.0 and above).
Possible values: "AAA" or "AA" string.
The level of "AA" will validate also for spacing between the elements.
The level of "AAA" will not validate spacing between the elements, only the element size.
The default is equal to the "AAA" string.
For example
1final Map<String, Object> tapAreaOption = new HashMap<>();2tapAreaOption.put("tappableAreaDimensions", 55.5);3tapAreaOption.put("tappableAreaConformanceLevel", "AA");4final RuleConfig tapAreConfig = new RuleConfig(IssueType.TAPPABLE_AREA, true, tapAreaOption);5InitOptions initOptions = new InitOptions().setRuleConfig(tapAreConfig);6evincedEngine.setOptions(initOptions);
Exporting the accessibility report in CSV format
It is possible to export the accessibility report in CSV format in addition to the JSON and HTML formats. The CSV file with the report will be saved in a Zip archive which will also include a folder with all the application screenshots made during the scan session. The screenshots may be excluded from the export.
In order to export the a11y report in CSV format the exportCsv option should be set to true in additionalOptons:
1final InitOptions initOptions = new InitOptions().putAdditionalOption("exportCsv", true);2evincedEngine.setOptions(initOptions);3final Report report = evincedEngine.report();
The Zip archive with the report will be saved next to the JSON and HTML reports in the same output folder.
In case there is a need to save the archive with the CSV report to a different location the exportCsvPath can be used to specify the absolute path to the target location. The general exportCsv toggle should still be set to true:
1final InitOptions initOptions = new InitOptions()2 .putAdditionalOption("exportCsv", true);3 .putAdditionalOption("exportCsvPath", "/custom-absolute-path");45evincedEngine.setOptions(initOptions);6final Report report = evincedEngine.report();
In case you want to exclude the screenshots from the exported archive and to only have the CSV report file included, use the csvScreenshotsDisabled toggle:
1final InitOptions initOptions = new InitOptions()2 .putAdditionalOption("exportCsv", true);3 .putAdditionalOption("csvScreenshotsDisabled", false);45evincedEngine.setOptions(initOptions);6final Report report = evincedEngine.report();
Uploading reports to Evinced Platform
Evinced Platform allows you to seamlessly collect, organize, and visualize Evinced accessibility reports in one place. In this section, we will guide you through the key functionalities of the upload methods from Evinced Espresso SDK, which was introduced in version 1.14.0, to the Evinced Platform. This upload method is fully compatible with the previous versions of the Evinced Espresso SDK API, and is disabled by default.
Initialize report uploading to the Evinced Platform
In order to start using Evinced Platform feature you need to include the PlatformConfig in the InitOptions:
1@BeforeClass2public static void setup() {3 ...4 final InitOptions options = new InitOptions(5 new InitOptions.PlatformConfig(6 InitOptions.UploadOption.ENABLED_BY_DEFAULT7 )8 );9 evincedEngine.setOptions(options);10}
In this case, all of the reports from a test class will be uploaded to the Evinced Platform where you can view the accessibility issues.
Selective uploading
You can configure uploading only a specific set of reports:
1@Test2public void test1() {3 ...4 final Report report1 = evincedEngine.report();5 ...6 final Report report2 = evincedEngine.report(PlatformUpload.ENABLED);7}
In this case, only the second report will be uploaded to Evinced Platform.
The same behavior applies to internally stored reports reportStored() after the analyze() calls and to the stopAnalyze() in the continuous mode:
1@Test2public void test1() {3 ...4 evincedEngine.analyze();5 List<Report> reportList = evincedEngine.reportStored(PlatformUpload.ENABLED);6}
Or:
1@Test2public void test1() {3 ...4 evincedEngine.startAnalyze();5 // test body6 List<Report> reportList = evincedEngine.stopAnalyze(PlatformUpload.ENABLED);7}
Notice: that in these examples we didn't use InitOptions.PlatformConfig. It's not required to use this config argument to enable the selective report uploading.
Please find more information about continuous mode here if needed.
Disable report uploading to Platform
In order to disable the upload method for all reports without changing arguments for each report(), reportStored() or stopAnalyze() methods you can use the following InitOption:
1@BeforeClass2public static void setup() {3 ...4 final InitOptions options = new InitOptions(5 new InitOptions.PlatformConfig(6 // Setting the forceDisableReportsUpload flag to true, disable all reports uploading.7 true8 )9 );10 evincedEngine.setOptions(options);11}1213@Test14public void test1() {15 ...16 final Report report1 = evincedEngine.report();17 ...18 final Report report2 = evincedEngine.report(PlatformUpload.ENABLED);19}
Labeling uploaded reports
To be able to distinguish between different reports on Evinced Platform, the following pre-defined labels will be collected and added programmatically.
| Labels | Description |
|---|---|
appName | The display name of the target application. |
appVersion | For example 1.1.3. |
appBuildNumber | For example 56. |
deviceManufacturer | For example - Google. |
deviceModel | For example - sdk_gphone_x86_64. |
deviceName | For example - generic_x86_64_arm64. |
testMethodName | The method name of the actual test. |
testCaseName | The class name of the actual test. |
deviceType | Can be emulator or physical. |
isInAppSdkConnected | Should be true in case of accessibility validation using Evinced InApp SDK inside a target application. |
isInAppSdkInstalled | Should be true in case of the presence of Evinced InApp SDK in the target application. |
osName | Should always be Android. |
osVersion | The version of the target Android. |
SDKBuildNumber | Should be equal to 1.14.0 or higher. |
SDKBuildType | Should always be Espresso SDK. |
Customizing labels before uploading reports
To distinguish between reports from different parts of your applications or tests you can also add custom labels to the uploaded reports.
1@Test2public void test1() {3 ...4 Map<String, String> labels1 = new HashMap<>();5 labels1.put("MyCustomLabelKey1", "MyCustomLabelValue1");6 final Report report1 = evincedEngine.report(PlatformUpload.ENABLED, labels1);7 ...8 Map<String, String> labels2 = new HashMap<>();9 labels2.put("MyCustomLabelKey2", "MyCustomLabelValue2");10 final Report report2 = evincedEngine.report(PlatformUpload.ENABLED, labels2);11}
The custom key "MyCustomLabelKey1" and the custom value "MyCustomLabelValue1" will be attached to the first report. The custom key "MyCustomLabelKey2" and the custom value "MyCustomLabelValue2" will be attached to the second report.
Customizing labels before uploading reports for the entire test class
In order to label all reports inside your test class with a common key/value, use the addTestCaseMetadata() method:
1@BeforeClass2public static void setup() {3 ...4 evincedEngine.addTestCaseMetadata("MyCustomCommonLabelKey", "MyCustomCommonLabelValue");5 ...6}78@Test9public void test1() {10 ...11 Map<String, String> labels1 = new HashMap<>();12 labels1.put("MyCustomLabelKey1", "MyCustomLabelValue1");13 final Report report1 = evincedEngine.report(PlatformUpload.ENABLED, labels1);14 ...15 Map<String, String> labels2 = new HashMap<>();16 labels2.put("MyCustomLabelKey2", "MyCustomLabelValue2");17 final Report report2 = evincedEngine.report(PlatformUpload.ENABLED, labels2);18}
In this case, all reports in the test class scope will have "MyCustomCommonLabelKey"/"MyCustomCommonLabelValue". In addition, "MyCustomLabelKey1"/"MyCustomLabelValue1" will be added only to the first report and "MyCustomLabelKey2"/"MyCustomLabelValue2" will be added only to the second report.
Test assertion
If you want to interrupt the test execution in case the report is not uploaded, it's possible to set the failTestOnUploadError argument of the InitOptions.PlatformConfig:
1@BeforeClass2public static void setup() {3 ...4 final InitOptions options = new InitOptions(5 new InitOptions.PlatformConfig(6 InitOptions.UploadOption.DISABLED_BY_DEFAULT,7 // Enabled the failTestOnUploadError flag8 true9 )10 );11 evincedEngine.setOptions(options);12}1314@Test15public void test1() {16 ...17 Map<String, String> labels1 = new HashMap<>();18 labels1.put("MyCustomLabelKey1", "MyCustomLabelKey1");19 final Report report1 = evincedEngine.report(PlatformUpload.ENABLED, labels1);20 // The test will fail in case of any uploading error, it can be an internal connection or routing problems21 ...22}
In the case of upload errors you should see an exception with a detailed error message that can be found in the logcat window to help understand the cause of the error and possible solutions.
List of available Platform upload options
forceDisableReportsUpload
forceDisableReportsUpload = true - the upload method is completely disabled. All report uploading will be disabled regardless of the upload argument:
1@BeforeClass2public static void setup() {3 ...4 final InitOptions options = new InitOptions(5 new InitOptions.PlatformConfig(6 // forceDisableReportsUpload = true7 true,8 // uploadOption = InitOptions.UploadOption.ENABLED_BY_DEFAULT9 InitOptions.UploadOption.DISABLED_BY_DEFAULT10 )11 );12 evincedEngine.setOptions(options);13 ...14}1516@Test17public void test1() {18 ...19 // This report won't be uploaded to Evinced Platform, because of forceDisableReportsUpload = true20 Report report1 = evincedEngine.reportStored(PlatformUpload.ENABLED);21 ...22 // These reports won't be uploaded to Evinced Platform, because of forceDisableReportsUpload = true23 List<Report> reportList2 = evincedEngine.reportStored(PlatformUpload.ENABLED);24 ...25 // These reports won't be uploaded to Evinced Platform, because of forceDisableReportsUpload = true26 List<Report> reportList3 = evincedEngine.stopAnalyze(PlatformUpload.ENABLED);27 ...28}
forceDisableReportsUpload = false is a default value of the upload to Platform configuration;
uploadOption
InitOptions.UploadOption.ENABLED_BY_DEFAULT - All reports will be uploaded, except for the reports with the upload argument equals to PlatformUpload.DISABLED:
1@BeforeClass2public static void setup() {3 ...4 final InitOptions options = new InitOptions(5 new InitOptions.PlatformConfig(6 // uploadOption = InitOptions.UploadOption.ENABLED_BY_DEFAULT7 InitOptions.UploadOption.ENABLED_BY_DEFAULT8 )9 );10 evincedEngine.setOptions(options);11 ...12}1314@Test15public void test1() {16 ...17 // This report won't be uploaded to Evinced Platform18 Report report1 = evincedEngine.reportStored(PlatformUpload.DISABLED)19 ...20 // These reports won't be uploaded to Evinced Platform21 List<Report> reportList2 = evincedEngine.reportStored(PlatformUpload.DISABLED)22 ...23 // These reports won't be uploaded to Evinced Platform24 List<Report> reportList3 = evincedEngine.stopAnalyze(PlatformUpload.DISABLED)25 ...26}
InitOptions.UploadOption.DISABLED_BY_DEFAULT - Only reports that are marked with upload argument equal to PlatformUpload.ENABLED will be uploaded:
1@BeforeClass2public static void setup() {3 ...4 final InitOptions options = new InitOptions(5 new InitOptions.PlatformConfig(6 // uploadOption = InitOptions.UploadOption.DISABLED_BY_DEFAULT,7 InitOptions.UploadOption.DISABLED_BY_DEFAULT,8 )9 );10 evincedEngine.setOptions(options);11 ...12}1314@Test15public void test1() {16 ...17 // This report will be uploaded to Evinced Platform18 Report report1 = evincedEngine.reportStored(PlatformUpload.ENABLED);19 ...20 // These reports will be uploaded to Evinced Platform21 List<Report> reportList2 = evincedEngine.reportStored(PlatformUpload.ENABLED);22 ...23 // These reports will be uploaded to Evinced Platform24 List<Report> reportList3 = evincedEngine.stopAnalyze(PlatformUpload.ENABLED);25 ...26}
failTestOnUploadError
failTestOnUploadError = true - Stop the test execution in case of an upload error;
failTestOnUploadError = false - Continues the test execution no matter of any upload errors. Default value.
The state table of the configurations is as following:
| forceDisable ReportsUpload | uploadOption | failTestOn UploadError | upload | Description |
|---|---|---|---|---|
false | DISABLED_BY_DEFAULT | false | null | Report won't be uploaded. |
false | DISABLED_BY_DEFAULT | false | ENABLED | Report will be uploaded. |
false | DISABLED_BY_DEFAULT | false | DISABLED | Report won't be uploaded. |
false | ENABLED_BY_DEFAULT | false | null | Report will be uploaded. |
false | ENABLED_BY_DEFAULT | false | ENABLED | Report will be uploaded. |
false | ENABLED_BY_DEFAULT | false | DISABLED | Report won't be uploaded. |
true | DISABLED_BY_DEFAULT | false | null | Report won't be uploaded. |
true | DISABLED_BY_DEFAULT | false | ENABLED | Report won't be uploaded. |
true | DISABLED_BY_DEFAULT | false | DISABLE | Report won't be uploaded. |
true | ENABLED_BY_DEFAULT | false | null | Report won't be uploaded. |
true | ENABLED_BY_DEFAULT | false | ENABLED | Report won't be uploaded. |
true | ENABLED_BY_DEFAULT | false | DISABLE | Report won't be uploaded. |
false | DISABLED_BY_DEFAULT | true | null | Report won't be uploaded. |
false | DISABLED_BY_DEFAULT | true | ENABLED | Report will be uploaded. Test execution will be interrupted in case of an upload error. |
false | DISABLED_BY_DEFAULT | true | DISABLE | Report won't be uploaded. |
false | ENABLED_BY_DEFAULT | true | null | Report will be uploaded. Test execution will be interrupted in case of an upload error. |
false | ENABLED_BY_DEFAULT | true | ENABLED | Report will be uploaded. Test execution will be interrupted in case of an upload error. |
false | ENABLED_BY_DEFAULT | true | DISABLE | Report won't be uploaded. |
List of available Platform upload arguments
report(PlatformUpload.ENABLED) - Upload the report or reports. Will have an effect when the InitOptions.PlatformConfig is InitOptions.UploadOption.ENABLED_BY_DEFAULT or InitOptions.UploadOption.DISABLED_BY_DEFAULT. Can be used as an argument is report(PlatformUpload.ENABLED), stopAnalyze(PlatformUpload.ENABLED) or reportStored(PlatformUpload.ENABLED) methods;
report(PlatformUpload.DISABLED) - Don't upload the report or reports. Will have an effect when the InitOptions.PlatformConfig is InitOptions.UploadOption.ENABLED_BY_DEFAULT or InitOptions.UploadOption.DISABLED_BY_DEFAULT Can be used as an argument is report(PlatformUpload.DISABLED), stopAnalyze(PlatformUpload.DISABLED) or reportStored(PlatformUpload.DISABLED) methods.
Skip export of empty accessibility reports
In order to skip creation of empty accessibility reports (ones having 0 issues) import the ReportSavingStrategy enum from the SDK package and
use it to specify the following flag in the options:
1final InitOptions initOptions = new InitOptions()2 .setReportSavingStrategy(ReportSavingStrategy.SKIP_EMPTY);3evincedEngine.setOptions(initOptions);
This option will either filter out the empty (having 0 issues) scans from the resulting report or will prevent the entire report file from being saved in case all the scans in the report are empty.
Other values of the ReportSavingStrategy are
SAVE_ALL. This option reflects the default behavior when all reports/scans including the empty ones get exported. This option doesn't have to be specified explicitly.SKIP_EMPTY. This option switches off saving of all the reports files in the file system. The platform uploading will still happen if it is enabled with the corresponding settings.
Export accessibility labels of buttons and images for manual review
Accessibility labels of buttons and descriptive images should be meaningful, so users can fully understand their purpose and easily interact with the application. You can review those labels and validate they are meaningful by exporting a JSON report of the accessibility label of images and buttons, separated from the test report. To export this JSON report, simply add the following flag:
1final InitOptions initOptions = new InitOptions();2initOptions.putAdditionalOption("exportMeaningfulLabels", true);3evincedEngine.setOptions(initOptions);
You should see a new JSON file created beside other report files with a default name: Evinced_Meaningful_Labels_Test_Results_11_15_2023_09_49_51.json. The structure of this JSON file is described in our Mobile Reports page.
To change the default folder destination and the file name of the meaningful labels JSON report you can use the second additional option with an absolute folder path:
1final InitOptions initOptions = new InitOptions();23String customFilePath = "/storage/emulated/0/Documents/my_meaningful_report_$formattedDateTime.json"45initOptions.putAdditionalOption("exportMeaningfulLabels", true);6initOptions.putAdditionalOption("exportMeaningfulLabelsPath", customFilePath);7evincedEngine.setOptions(initOptions);
Be careful with the custom absolute file path it can be different for each emulator or a physical device. In case of Espresso SDK it's better to use the default path.
Integration Android Mobile Kit feature
Evinced Android Mobile Kit adds new types of validation for target application. Add the import statement to the beginning of your test file.
1import com.evinced.test.models.MobileKitConfig;
Setup Mobile Kit Config.
1@BeforeClass2public static void setup() {3 ...4 evincedEngine = EvincedEngine.getInstance(InstrumentationRegistry.getInstrumentation());5 evincedEngine.setupCredentials(accountId, apiKey);6 final InitOptions initOptions = new InitOptions()7 // Setting mobileKitEnabled = true8 // And failMobileKitConnectionError = true9 .setMobileKitConfig(new MobileKitConfig(true, true));10 evincedEngine.setOptions(initOptions);11}
Note: Make sure that your target application has the Mobile Kit dependency.
Comparing with baseline report
You can compare a newly generated report against a predefined baseline report from some previous scan. You can do it in your CI pipelines or just occasionally run locally to track how many accessibility issues were resolved from a previous scan or what new issues were introduced.
To do this, you need to provide BaselineConfig with baseline report file to the report() method using ReportArguments bundle. BaselineConfig expects a File object that represents a previously generated evinced report in a JSON format.
1Report report = evincedEngine.report(2 new ReportArguments()3 .setBaselineReport(new BaselineConfig(baselineFile))4);
Similarly, you can use baseline feature with reportStored() and stopAnalyze() as well.
With ReportArguments you can also provide all other reports arguments as usual.
Using this feature, in your HTML and JSON reports you can see what issues are Persistent (e.g. already encountered in baseline report) or New (e.g introduced in new scan).
Checking comparison data in Report object
In the Report object you can use getBaselineCompareInfo() methods to get BaselineCompareInfo with properties such as getStatus() and getBaselineReportFileName(). BaselineCompareInfo also has getSummary() property that returns BaselineCompareInfo.Summary object with the basic comparison statistics.
Report object have a few useful helper methods: hasNewIssues() and hasPersistentIssues() to check if there are such types of issues in the report or getNewIssues() to get only that issues, that don't exist in the baseline report.
Also there are similar methods hasNewIssuesFiltered(IssueFilterType, IssueFilter) and getNewIssuesFiltered(IssueFilterType, IssueFilter), which are useful for filtering new issues:
1// Get only new issues with SERIOUS severity2List<Issue> seriousIssues = report.getNewIssuesFiltered(Report.IssueFilterType.INCLUDE, new IssueFilter().severity(Severity.SERIOUS));34// Get only new issues that are NOT "Tappable Area" issues5List<Issue> noTapAreaIssues = report.getNewIssuesFiltered(Report.IssueFilterType.EXCLUDE, new IssueFilter().issueType(IssueType.TAPPABLE_AREA));
In case of successful comparison, you can use getBaselineStatus() on Issue objects to check if they are Persistent or New.
Common usage with android assets
If you want to store baseline reports directly in the project, you can place them into android assets folder. But as android store them as compressed data, you need firstly to copy them as files to the device.
You can do it in your test with the next snippet:
1private File getBaselineAsTempFile(String filename) {2 try {3 Context context = InstrumentationRegistry.getInstrumentation().getContext();4 InputStream baselineInputStream = context.getAssets().open(filename);5 File outputFile = File.createTempFile(filename, null);6 Files.copy(baselineInputStream, outputFile.toPath(), REPLACE_EXISTING);7 return outputFile;8 } catch (IOException e) {9 throw new RuntimeException(e);10 }11}
Configuring baseline report
Along with baseline report file, in BaselineConfig you can customize error handling strategy providing boolean failTestOnBaselineComparisonError flag.
By default, it's this flag is true, so in case if baseline file provided but Evinced SDK can not perform comparison, the BaselineNotPerformedException will be thrown with details in message.
In case if you want to ignore such errors, you can change it in the BaselineConfig.
1Report report = evincedEngine.report(2 new ReportArguments()3 .setBaselineReport(new BaselineConfig(baselineFile, false))4);
API
EvincedEngine.getInstance(InstrumentationRegistry.getInstrumentation())
Init the EvincedEngine instance - should be called in annotated methods @BeforeClass (@BeforeAll for JUnit5).
Example usage:
1@BeforeClass2public static void setupEvinced() {3 evincedEngine = EvincedEngine.getInstance(InstrumentationRegistry.getInstrumentation());4}
void EvincedEngine.analyze()
Should be called each time you want to scan a specific screen state for accessibility violations. This method collects the current view hierarchy tree to be later analyzed when the reportStored() method is called. No return value.
Example usage:
1@Test2public void testSwitchTheme() {3 clickPreference(R.string.user_interface_label);4 evincedEngine.analyze();5}
Report EvincedEngine.report()
Report EvincedEngine.report(boolean assertIssues)
Scan the current page state for accessibility violations. A list of Report objects will be returned and used to automatically generate HTML and JSON reports in the emulator/device file structure. If assertIssues = true an assertion error will be thrown if any accessibility issues are found.
Example usage:
1@Test2public void testSwitchTheme() {3 clickPreference(R.string.user_interface_label);4 evincedEngine.analyze();5 // This will throw an assertion error if any accessibility issues are found6 evincedEngine.report(true)7}
List<Report> EvincedEngine.reportStored()
List<Report> EvincedEngine.reportStored(boolean assertIssues)
Run the accessibility validations using the data collected by the EvincedEngine.analyze() method calls. A list of Report objects will be returned and used to automatically generate HTML and JSON reports in the emulator/device file structure. If assertIssues = true an assertion error will be thrown if any accessibility issues are found. For more information regarding the HTML and JSON reports as well as the Report object itself, please see our detailed Mobile Reports page.
Example usage:
1@AfterClass2public static void collectA11yData() {3 evincedEngine.reportStored();4}
void EvincedEngine.clearStored()
Clear all stored data collected by EvincedEngine.analyze(). Called automatically after EvincedEngine.reportStored() method.
Example usage:
1@Test2public void testSwitchTheme() {3 clickPreference(R.string.user_interface_label);4 evincedEngine.analyze();5 // This will throw an assertion error if any accessibility issues are found6 evincedEngine.report(true)7 evincedEngine.clearStored();8 // More test code...9}
void EvincedEngine.startAnalyze()
Starts the continuous scan mode - tracks the changes that take place on the screen and under the hood and calls analyze() every time a change occurs. If for some reason a screen change is not tracked, you can add them manually by calling EvincedEngine.analyze()
1@Test2public void yourTest() {3 ...4 evincedEngine.startAnalyze();5 ...6}
Or
1@BeforeClass2public static void setup() {3 ...4 evincedEngine.startAnalyze();5 ...6}
List<Report> EvincedEngine.stopAnalyze()
List<Report> EvincedEngine.stopAnalyze(boolean assertIssues)
Stops the continuous scan mode and calls reportStored() under the hood(which will generate HTML and JSON reports). Should be called after EvincedEngine.startAnalyze() to finish continuous scan mode. If assertIssues = true an assertion error will be thrown if any accessibility issues are found.
1@Test2public void yourTest() {3 evincedEngine.stopAnalyze();4}
Or
1@AfterClass2public static void tearDown() {3 evincedEngine.stopAnalyze();4}
InitOptions
Helper class contains a global SDK options
Default constructor:
public InitOptions()
Method for defining a EvincedConfig object as a global setting:
public InitOptions setEvincedConfig(EvincedConfig evincedConfig)
Set option to save a screenshot in a output JSON report or as a separate .jpeg file:
public InitOptions setScreenshotOption(ScreenshotOption screenshotOption)
Set rule configs:
public InitOptions setRuleConfigs(List<RuleConfig> ruleConfigs)
Method for defining a custom output directory where a user would like to store reporting artifacts (JSON and HTML files):
public InitOptions setOutputDir(String outputDir)
Set output HTML/JSON report name prefix
public InitOptions setReportName(String reportName)
Set InApp SDK feature configuration
public InitOptions setMobileKitConfig(mobileKitConfig: MobileKitConfig)
EvincedConfig
An object that defines the options that will be used when performing accessibility validations and generating reports.
Default public constructors for creating EvincedConfig :
public EvincedConfig()
Set exclude filters:
public EvincedConfig excludeFilters(IssueFilter... excludeFilters)
public EvincedConfig excludeFilters(List<IssueFilter> excludeFilters)
IssueFilter
A filter object that allows you to exclude UI elements from availability reports by certain criteria
IssueFilter public methodes:
public IssueFilter matchElementById(String viewId)
public IssueFilter severity(List<Severity> severities)
public IssueFilter severity(Severity... severity)
public IssueFilter issueType(List<IssueType> issueTypes)
public IssueFilter issueType(IssueType... issueType)
RuleConfig
Default constructor:
public RuleConfig(IssueType name, boolean enabled, Map<String, Any> options)
IssueType - the IssueType on which this rule config should be applied
enabled - allows to enable/disable specified IssueType. By default enabled = true
options - additional a11y validation rule options
Kotlin
While the syntax of the Evinced SDK remains the same, the Kotlin implementation varies slightly to the Java examples above. Below is an example Kotlin implementation. If you are not using the @BeforeClass or @AfterClass annotations in your test class, you can initialize the EvincedEngine as a regular variable.
1package com.example.news23import androidx.compose.ui.test.*4import androidx.compose.ui.test.junit4.createComposeRule5import androidx.test.core.app.ApplicationProvider6import androidx.test.ext.junit.runners.AndroidJUnit47import androidx.test.platform.app.InstrumentationRegistry8import com.evinced.test.EvincedEngine9import org.junit.*10import org.junit.runner.RunWith1112@RunWith(AndroidJUnit4::class)13class NewsTests {14 private val evincedEngine by lazy { EvincedEngine.getInstance(InstrumentationRegistry.getInstrumentation())}1516 @get:Rule17 val composeTestRule = createComposeRule()1819 @Before20 fun setUp() {21 // Using targetContext as the Context of the instrumentation code22 composeTestRule.launchJetNewsApp(ApplicationProvider.getApplicationContext())23 EvincedEngine.setupCredentials("<Service Account ID>", "<API Key>")24 }2526 @After27 fun tearDown() {28 evincedEngine.reportStored()29 }3031 @Test32 fun app_opensInterests() {33 evincedEngine.analyze()34 composeTestRule.onNodeWithContentDescription(35 label = "Open navigation drawer",36 useUnmergedTree = true37 ).performClick()38 evincedEngine.analyze()39 composeTestRule.onNodeWithText("Interests").performClick()40 evincedEngine.analyze()41 composeTestRule.onNodeWithText("Topics").assertExists()42 }43}
If you're using @BeforeClass or @AfterClass annotations, you need to initialize the EvincedEngine and set up credentials in the companion object. This is the recommended approach.
1package com.example.demoapp23import androidx.test.ext.junit.rules.ActivityScenarioRule4import androidx.test.ext.junit.runners.AndroidJUnit45import androidx.test.platform.app.InstrumentationRegistry6import com.evinced.test.EvincedEngine7import com.evinced.test.models.InitOptions8import org.junit.AfterClass9import org.junit.BeforeClass10import org.junit.Rule11import org.junit.Test12import org.junit.runner.RunWith1314@RunWith(AndroidJUnit4::class)15class EvincedTest {1617 @get:Rule18 val activityRule: ActivityScenarioRule<MainActivity> = ActivityScenarioRule(MainActivity::class.java)1920 @Test21 fun testReport() {22 val initOptions = InitOptions().putAdditionalOption("saveInputTree", true)23 evincedEngine.options = initOptions2425 // write your test here.2627 evincedEngine.report()28 }2930 companion object {31 private val evincedEngine = EvincedEngine.getInstance(InstrumentationRegistry.getInstrumentation())3233 @JvmStatic34 @BeforeClass35 fun setUp() {36 EvincedEngine.setupCredentials("<Service Account ID>", "<API Key>")37 }3839 @JvmStatic40 @AfterClass41 fun tearDown() {42 // do your work here43 }44 }45}
Alternatively, you could create a custom rule and set up credentials there.
1package com.example.demoapp23import androidx.test.runner.AndroidJUnitRunner4import com.evinced.test.EvincedEngine56class CustomJUnitRunner : AndroidJUnitRunner() {78 init {9 EvincedEngine.setupCredentials("<Service Account ID>", "<API Key>")10 }11}
After that, set CustomJUnitRunner in your build.gradle file in the app module.
1android {2 ..34 defaultConfig {5 applicationId "com.example.demoapp"6 ..78 testInstrumentationRunner "com.example.demoapp.CustomJUnitRunner"9 }10 ..11}
Then, obtain an instance of the EvincedEngine in the test.
1package com.example.demoapp23import androidx.test.ext.junit.rules.ActivityScenarioRule4import androidx.test.platform.app.InstrumentationRegistry5import com.evinced.test.EvincedEngine6import com.evinced.test.models.InitOptions7import org.junit.Rule8import org.junit.Test910class EvincedTest {11 private val evincedEngine by lazy { EvincedEngine.getInstance(InstrumentationRegistry.getInstrumentation())}1213 @get:Rule14 val activityRule: ActivityScenarioRule<MainActivity> = ActivityScenarioRule(MainActivity::class.java)1516 @Test17 fun testReport() {18 val initOptions = InitOptions().putAdditionalOption("saveInputTree", true)19 evincedEngine.options = initOptions2021 // write your test here.2223 evincedEngine.report()24 }25}
Tutorials
Generating a comprehensive accessibility report for your Android application
In this tutorial, we will enhance our existing Espresso UI test with the Evinced Espresso SDK in order to check our application for accessibility issues. In order to get started you will need the following:
- All of the prerequisites for Evinced Espresso SDK should be met
- Evinced Espresso SDK should be installed in your project
Preface - Existing UI test overview
Let’s consider the following basic UI test as our starting point.
1@RunWith(AndroidJUnit4.class)2public class PreferencesTest {34 @Test5 public void testSwitchTheme() {6 final int theme = UserPreferences.getTheme();7 int otherTheme;8 if (theme == core.R.style.Theme_Light) {9 otherTheme = R.string.pref_theme_title_dark;10 } else {11 otherTheme = R.string.pref_theme_title_light;12 }13 clickPreference(R.string.user_interface_label);14 clickPreference(R.string.pref_set_theme_title);15 onView(withText(otherTheme)).perform(click());16 Awaitility.await().atMost(1000, MILLISECONDS)17 .until(() -> UserPreferences.getTheme() != theme);18 }19}
The purpose of this test is to check that the application theme can be changed successfully. For now, this test is only concerned with the functional testing of the app. However, with the help of the Espresso / UIAutomator SDK, we can also check it for accessibility issues along the way. Let’s go through this process with the following step-by-step instructions.
Step #1 - Initialize the Evinced Espresso SDK
Before making any assertions against our app, we need to initialize EvincedEngine object. This object is used primarily as an entry point to all of the accessibility scanning features. Since we are going to use it primarily within our test, the best place for its initialization will be our @BeforeClass method which gets executed first.
1@RunWith(AndroidJUnit4.class)2public class PreferencesTest {34 @BeforeClass5 public static void setupEvinced() {6 evincedEngine = EvincedEngine.getInstance(InstrumentationRegistry.getInstrumentation());7 }89 @Test10 public void testSwitchTheme() {11 final int theme = UserPreferences.getTheme();12 int otherTheme;13 if (theme == core.R.style.Theme_Light) {14 otherTheme = R.string.pref_theme_title_dark;15 } else {16 otherTheme = R.string.pref_theme_title_light;17 }18 clickPreference(R.string.user_interface_label);19 clickPreference(R.string.pref_set_theme_title);20 onView(withText(otherTheme)).perform(click());21 Awaitility.await().atMost(1000, MILLISECONDS)22 .until(() -> UserPreferences.getTheme() != theme);23 }24}
The only setup needed for the EvincedEngine is to pass it the instrumentation.
Step #2 - Identify which application states you want to check for accessibility issues
Once the SDK is set up, let’s try to carefully consider which states of our application are actually worth checking for accessibility issues. Let’s take a look at our UI test once again:
1@Test2public void testSwitchTheme() {3 final int theme = UserPreferences.getTheme();4 int otherTheme;5 // This step gets the current application theme and determines what the theme will be changed to6 if (theme == core.R.style.Theme_Light) {7 otherTheme = R.string.pref_theme_title_dark;8 } else {9 otherTheme = R.string.pref_theme_title_light;10 }11 // Before we change the theme lets check the current theme for accessibility issues!12 clickPreference(R.string.user_interface_label);13 clickPreference(R.string.pref_set_theme_title);14 onView(withText(otherTheme)).perform(click());15 Awaitility.await().atMost(1000, MILLISECONDS)16 .until(() -> UserPreferences.getTheme() != theme);17 //Now that we have confirmed the theme has changed let's check the new theme for accessibility issues!18}
We have identified two places in our UI test where we would like to perform accessibility scans. Each place represents some distinct application state and each of these states may contain certain accessibility issues. So, let’s put our checks into place.
Step #3 - Setup accessibility analyzing points
The only thing we need to do now is to simply add evincedEngine.analyze(); calls to the places in the test we identified above. Here is what it should look like:
1@Test2public void testSwitchTheme() {3 final int theme = UserPreferences.getTheme();4 int otherTheme;5 // This step gets the current application theme and determines what the theme will be changed to6 if (theme == core.R.style.Theme_Light) {7 otherTheme = R.string.pref_theme_title_dark;8 } else {9 otherTheme = R.string.pref_theme_title_light;10 }11 // Before we change the theme lets check the current theme for accessibility issues!12 evincedEngine.analyze();1314 clickPreference(R.string.user_interface_label);15 clickPreference(R.string.pref_set_theme_title);16 onView(withText(otherTheme)).perform(click());17 Awaitility.await().atMost(1000, MILLISECONDS)18 .until(() -> UserPreferences.getTheme() != theme);1920 //Now that we have confirmed the theme has changed let's check the new theme for accessibility issues!21 evincedEngine.analyze();22}
The analyze method collects an accessibility snapshot of the current application state and puts it into internal in-memory storage. This snapshot contains a lot of information including an application screenshot, accessibility labels, and dimensions of UI elements.
Now that we have gathered the information we need we are finally ready to actually find our whether our app is accessible or not.
Step #4 - Assert your screens at the end of your test suite
As our test was executed we collected a lot of accessibility snapshots via the evincedEngine.analyze() calls. We can now perform accessibility assertions at the end of our test suite. Referring back again to our initial UI test the best place for this assertion will be the method that gets invoked last - @AfterClass.
1@AfterClass2public static void collectA11yData() {3 evincedEngine.reportStored();4}
To generate the actual object representation of your accessibility report simply call the reportStored method. The Evinced Espresso SDK will check all of the previously collected accessibility snapshots for accessibility issues. From this moment you are free to assert against the given list of Report objects in any way, you would like (feel free to explore the corresponding chapter in the “API“ section).
As an example, let’s simply assume that our application is accessible as long as it has no accessibility issues found. Thus, if we have at least one accessibility issue detected - we want our tests to fail. Let’s add the corresponding assertion:
1@AfterClass2public static void collectA11yData() {3 evincedEngine.reportStored(true);4}
You are now set to run the test and ensure the accessibility of your application!
Step #5 - Read the results
For more information regarding the HTML and JSON reports as well as the Report object itself, please see our detailed Mobile Reports page.
FAQ
1. What is the minimum Android API version supported?
The minimum supported Android API level is 21 (Android 5.0).
2. Is there any difference in the number of accessibility validations Evinced will find when testing on an emulator vs. a real physical device?
The Evinced Espresso SDK works equally well on real devices and emulators. The number of validations doesn't depend on the device type (emulator or real device).
3. Can the Engine be used when testing on remote or cloud-based devices?
It may depend slightly on the functionality of the cloud-based device provider, but there are no inherent reasons why the Espresso / UIAutomator SDK wouldn’t work well on any device capable of running Espresso / UIAutomator tests.
4. Do I need to add anything (SDK etc.) to my app during the build process to test for accessibility violations?
The Espresso / UIAutomator SDK is integrated only in UI tests, which run as a separate application. No change or addition is needed to the build process of the application under test.
5. Can the reports be exported directly to the project directory as opposed to remaining on the device?
Unfortunately not. Because the tests are performed as a separate application, it only has access only to the emulator or device file structure. However, you can automate this process of extracting the file by using the example scripts above in your CI tool or as a Gradle task.
6. I got the following error while integrating the Espresso SDK.
1Execution failed for task ':app:processDebugAndroidTestManifest'.2> Manifest merger failed : Attribute application@extractNativeLibs value=(false) from manifestMerger6360702180557287033.xml:36:9-423 is also present at [com.evinced:espresso-sdk:<version>]
Why it happened and how to fix it?
The error occurred while merging the AndroidManifest of your tests and the Espresso SDK AndroidManifest. To fix it in your androidTest AndroidManifest.xml add:
1<application2 tools:replace="android:extractNativeLibs"3 android:extractNativeLibs="true"4 ...>
7. Where can I find the release changelogs?
If you are using JetBrains IDE (Android Studio or IntelliJ IDEA):
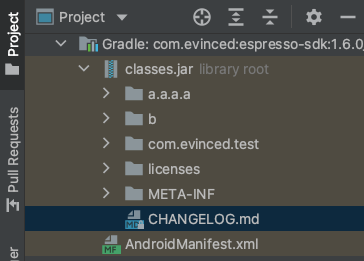
Open ‘Project' tab (⌘1) → ‘Project’ view → 'External Libraries’ section → Gradle: com.evinced.espresso-sdk:<version> → CHANGELOG.md
8. Why do my reports have incorrect screen orientation?
You might notice that your generated report has a screenshot with an incorrect orientation:
 This issue is caused by the asynchronous nature of the screen rotation in Android which is separated from the test execution.
To avoid this problem we propose the following solution:
This issue is caused by the asynchronous nature of the screen rotation in Android which is separated from the test execution.
To avoid this problem we propose the following solution:
1@Test2public void testLandscape() {3 rule.getScenario()4 .onActivity(activity -> activity.setRequestedOrientation(5 // Set your desired screen orientation here:6 ActivityInfo.SCREEN_ORIENTATION_LANDSCAPE7 ));8 getInstrumentation().waitForIdle(() -> {9 try {10 // Wait until the screen orientation change11 Thread.sleep(500);12 // Do the test assertation here13 } catch (InterruptedException e) {14 throw new RuntimeException(e);15 }16 });17 }